
Would you believe me if I told you I started blogging on accident?
Well, kinda…
A few years ago, I decided to start my own fitness coaching business and went ahead and built a website so people could check out my services and client transformations.
I didn’t know anything about blogging or how to use it as a way to bring traffic to my site and generate leads.
As I was researching and reading up on different ways of growing my business, I landed on a video that talked about starting a blog and providing value to your audience in order to grow.
I then began writing and publishing content, learning about search engine optimization (SEO), WordPress, and different platforms like Pinterest to drive traffic.
Fast-forward to today, I now have thousands of monthly readers on my fitness blog.
Isn’t that so raven?
Whether you have a coaching business, want to start affiliate marketing, monetize with ads, sell your own courses and eBooks, or just take on a new hobby, this guide I’ve put together will help you learn how to start a blog pretty easily.
Contents
- Choose your blog topic
- Choose your blogging platform
- Choose your blog’s name
- Register your domain name
- Choose your web host
- Install WordPress
- Choose your WordPress theme
- Set up your blog
- Write your first blog post
- Promote your blog
- Make money blogging
- Join a blogging community
- FAQs about starting a blog
- How to start a blog: final thoughts
Disclosure: You should always assume that pretty much every link on this site is an affiliate link, and if you click it and buy something you like, I’ll earn some money to help me buy a DeLorean, build a time machine, and travel back to the 90s so I can watch Hey Arnold! and eat Dunkaroos again.
Before I walk you through the steps of starting a blog, I wan’t to cover some quick basic information.
A blog is a regularly updated website, typically run by an individual or small group, that’s written in an informal or conversational style.
As I mentioned earlier, blogging is a great way of giving your business more exposure and making money online.
In fact, businesses with blogs produce an average of 67% more leads monthly than companies that don’t, according to data gathered by DemandMetric.
HubSpot also found that businesses that blog get 55% more website visitors than businesses that don’t.
However, while blogging has a high earning potential and can be developed to the point where most of your income is passive, it’s not something easy to accomplish.
If you need to start making money ASAP, I highly recommend you get a day job and grow your blog/business on the side.
Nope, I mean… you’re reading my blog, aren’t you?
Here are some blogging stats for you:
- There are over 600 million active blogs globally in 2020, according to data from Growth Badger.
- There are 32 million bloggers in the U.S. (up by 10 million since 2014), according to Statista.
- 59% of marketers find blogging valuable.
- 70% of people would rather learn about a company through articles than advertisements.
STEP 1
Choose Your Blog Topic
The first step in this how to start a blog guide for beginners is choosing the right topic (niche).
There seems to be a lot of conflicting advice when it comes to choosing what to blog about.
Some “experts” will tell you to blog about your passion, while others will tell you to blog about something that can make you money.
The key, however, lies somewhere in between those two extremes.
To build a successful blog/business, you must write about a topic (niche) that:
- You’re good at (or want to learn more about)
- You see yourself still wanting to write about 2-3 years later
- Solves a problem your audience has (most important one)
Here’s the thing, starting a business is difficult.
You’ll definitely have days when you just want to hang up the gloves.
If you’re writing about something you don’t like, it’ll be even easier to just give up.
On the other hand, blogging about why penguins are so cool might be interesting to you, but not necessarily to anyone else.
So it’ll be a little harder to monetize.
Noticed that I said “harder,” not “impossible.” I know of some bloggers making money in some interesting niches.
For example, there’s someone making tons of money selling a course about raising goats.
Pretty cool, right?
That being said, here are some of the most popular and profitable niches:
- Photography
- Health & Wellness
- Travel
- Food & Recipes
- DIY (Do-It-Yourself)
- Home Decor
- Lifestyle
- Relationships
- Investing
- Fashion
- Tech
- Pets
- Personal Finance
- Personal Development
- Entrepreneurship
- Essential Oils
- Parenting
- Education
Besides finding a niche that you like and it’s profitable, here are two other things I recommend:
1. Niche Down
Niche down as much as you can. Be specific about your topic.
For example, instead of starting a “weight loss” blog, start a “weight loss for women” blog.
Instead of starting a “finance” blog, start a “credit repair” or “how to get out of debt” blog.
This will help you develop a deeper connection with your audience and make you seem like an authority, not only to them but to search engines like Google as well.
2. Just Start
Here’s the thing, the reason you might not know what you like is that you haven’t tried it yet.
At one point, you just have to get out there and start doing stuff to see if you like them.
For example, when I was a teenager, I was into photography.

In my early 20s, I started getting into Brazilian Jiu Jitsu.

And in my mid 20s, I switched gears towards bodybuilding.

So pick a topic that interests you enough, launch your blog, and start writing.
Last thing you’d want is to procrastinate, never start anything, and get stuck wondering “what if.”
Looking back at your life and wondering what could have happened because of a missed opportunity is terrifying.
If you’re still having trouble coming up with a blog niche, you can check out my detailed guide on what to blog about.
A lot of blogging “experts” will tell you that the quickest way to make a lot of money online is to start in a small niche.
As an industrial engineer who has done market and cost analysis for companies like Regal Marine Industries, I’ll tell you why I disagree.
- Income ceiling – it’s easier and faster to make $50,000 in a $100 billion industry than it is in a $1 million industry. Small niches also have income ceilings, which means that there’s only so much money to be made. Plus, you now have all the new bloggers going into smaller niches because the “experts” told them to.
- Competition means traffic – your competitors are often your best source of traffic. Bloggers are always looking for fresh content to keep their audiences engaged and Google happy. A common way they do this is by letting other bloggers publish content on their sites. This is referred to as guest blogging. Basically, they get free content, and you get traffic back to your site.
This is another common question new bloggers often ask.
The thing is, you might be the first person in your niche that someone finds.
For example, there are several popular mommy bloggers, but you could be the first one a brand new mom runs into.
STEP 2
Choose a Blogging Platform
The second step in this how to start a blog guide for beginners is choosing a blogging platform.
A blogging platform is basically your workstation.
This is where you’ll manage everything about your blog, such as writing posts, editing pages, and installing plugins.
When choosing the best platform to start a blog, you have two options:
- Hosted platform (free and paid plans)
- Self-hosted platform (free)
If you’re serious about making money blogging, it’s highly recommended you go with a self-hosted platform.
Hosted Platform
You can start a blog for free using a hosted platform like Wix, Tumblr, Blogger, or WordPress.com.
However, there are plenty of downsides to this, such as:
- Can’t have your own domain – unless you pay for your own domain, you’ll have to use your host’s domain attached to yours. For example, YourBlog.wix.com, YourBlog.wordpress.com, YourBlog.blogspot.com.
- Limited customization – you can’t download plugins or themes. You’re only allowed to use what they have.
- Limited monetization – you’re limited to the ways in which you can earn money. For example, you can’t monetize with ads or create a membership site (you have to pay for this).
- Display ads – some hosts put their own ads on your website, which you don’t get paid for.
- Doesn’t look professional – having your host’s domain attached to your website’s name, generic-looking themes, your host’s branding (powered by “host name”) on your footer, and random ads on your site will make your brand look unprofessional.
Self-Hosted Platform
With a self-hosted platform like WordPress.org, you’ll own your website and are allowed to monetize and customize it however you want and install third-party plugins and themes.
The only downside is that, while WordPress.org is 100% free to use, you’ll have to pay a third-party company to host your blog (unless you have your own server).
A web host provides the services needed for your website to live and be viewed on the internet.
How Much Does it Cost to Start a Blog?
The next question you have is probably how much it cost to start a blog.
Well, since WordPress.org is free, all you’d need to pay for is:
- Your domain name (around $12 per year)
- WordPress hosting (anywhere from $3/month to thousands of dollars per month)
The cost of your web hosting will vary depending on who you choose.
In this article, I’ll show you how to set everything up with NameHero, which you can get started with for as little as $52 for a whole year of hosting depending on the plan you choose.
Don’t worry, we’ll talk more about my hosting recommendations as well as some web hosts you should avoid later in this article.
WordPress.com vs. WordPress.org
One thing I want to address before moving on is the difference between WordPress.com and WordPress.org.
Even though they both have the same name, they’re completely different platforms.
As I mentioned earlier, WordPress.com is a hosted solution, whereas WordPress.org is a self-hosted one.
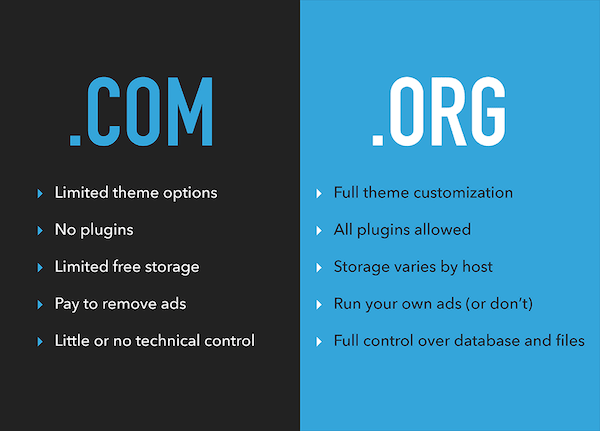
The one you want to use to start a blog and grow your business is WordPress.org.
WordPress is the most popular content management system (CMS) in the world. They power 38% of all websites on the internet, according to data gathered by W3Techs.
A CMS is a software application that allows you to easily build and manage a website without having to know anything about coding.
STEP 3
Choose Your Blog’s Name
The third step in this how to start a blog guide for beginners is choosing your blog’s name.
Your blog name (domain name) will be the first thing people see when visiting your site (e.g., blogstalgia.com).
The best scenario would be to choose a blog name that tells your readers what your blog is about without them having to click through.
For example, if your niche is personal finance and your name is Grace, you could name your blog something like GoodFinance.com or SaveWithGrace.com.
Another option would be to use your own name like many successful bloggers do.
There aren’t many rules when it comes to choosing your blog’s name.
I would just keep it between 1-2 words or 6-10 characters and avoid including another brand’s name on it.
A big mommy blogger almost got sued by Facebook for registering a domain name that included the word Facebook.
Facebook sent her a notification about trademark infringement and let her delete the site.
If she hadn’t, she could’ve ended up paying up to $100,000.
So avoid using domain names like BestNikeShoes.com or KrogerDiscounts.com.
Most of the names I wanted were taken too, including my own name.
There are just too many people on the internet that finding the perfect name is nearly impossible.
My advice is just to go ahead and get started. Some hosts like NameHero will let you choose your domain name later so you can start working on your blog right away.
Honestly, don’t stress about it, there are more important things when it comes to making a blog successful.
If you need more help trying to find a good blog name, check out my detailed guide on how to choose a domain name.
Yes, I highly recommend that you use the “.com” extension.
Most people by default will use “.com” when searching for someone’s website, so you might lose visitors if you use something different.
Also, if someone already has the .com extension of your domain, they could see it as trademark infringement and take legal action against you.
One exception would be if you’re running some sort of non-profit website. In that case, you could use “.org” instead.
Of course! However, you would have to set a redirect so that all the visitors who land in your old domain would be taken to the new one.
I would try to get it right the first time so that you don’t have to go through this process.
It used to be that having your niche in your domain name helped Google understand your website and rank you better, but this isn’t the case anymore.
Google has gotten smarter over the years so you don’t have to include your keyword in your blog’s name.
STEP 4
Register Your Domain Name
The fourth step in this how to start a blog guide for beginners is choosing your domain registrar.
I recommend registering your domain name with Google Domains, and here’s why:
- They’re good – everything runs through Google’s Cloud DNS.
- They’re cheap – no upsells or high renewal prices. It costs the same every year.
- Separate domain and hosting – it’s always recommended to keep your domain name separate from your hosting company. This way, any disputes with your web host ensures your domain name can’t be held against you. Several web hosts have terminated accounts without warning and taken domain names with them for auction.
- Free privacy protection – without privacy protection, your personal information will be displayed on the internet for everyone to see, and you’ll get bombarded with calls and texts from solicitors wanting to sell you their products.
A lot of hosting companies offer a free domain name with the purchase of one of their hosting plans.
If you’re a beginner, this might sound like a good deal.
However, the domain name is only free for the first year, and you still have to pay for privacy protection.
So you aren’t getting a better deal.
In fact, you’ll end up spending even more in subsequent years because the renewal prices are often 2-3x more expensive than other domain registrars.
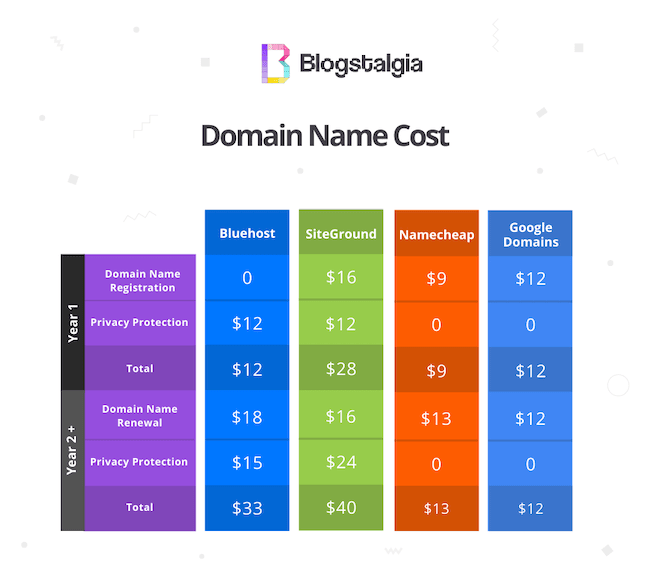
As you can see from the image above, Bluehost offers a free domain but charges $12 for privacy protection, which is the same you’d be paying at Google Domains.
You can also see how the price jumps to $33 per year after the first year, whereas Google Domains stays at $12.
And in case you’re not feeling Google, my recommended alternative is Namecheap.
A lot of people use them and love their support. Plus, they’re also cheap.
And no, I do not get any commission from referring you to Google Domains, I just think they’re one of the cheapest and best options available.
Plus, I hate when other bloggers and big companies try to take advantage of newbies who don’t know any better.
Anyway, here’s how to register with Google Domains:
1. Go to domains.google
2. In the search bar, type in the domain you’d like
3. Click “Get it”
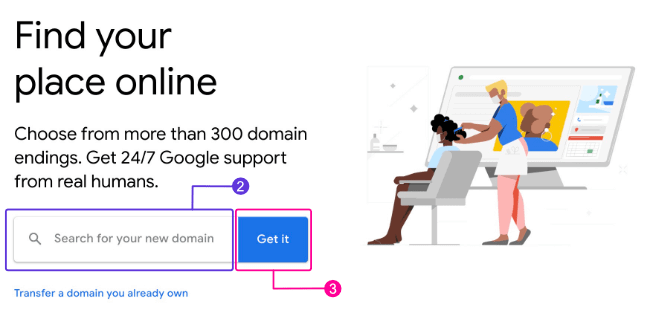
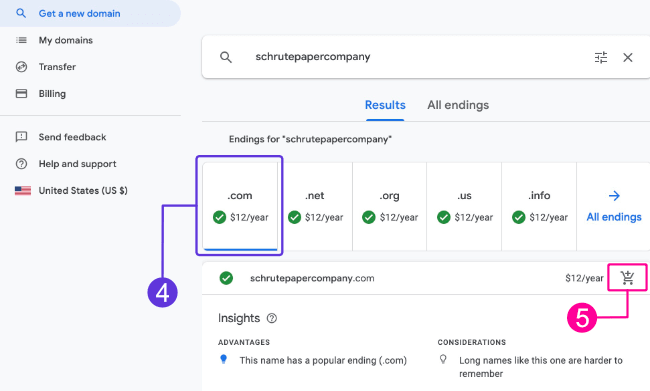
4. Select the “.com” extension
5. Click the little cart icon with the “+” sign
6. Go to your cart
7. Keep privacy protection and Auto-renew [ON]
8. Click the blue “Check out” button at the bottom.
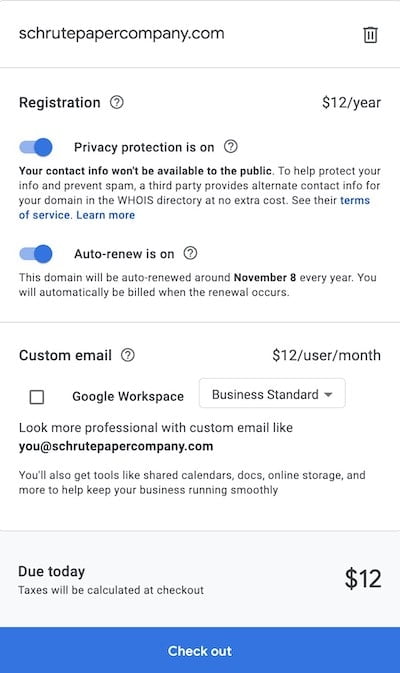
I’ll go over custom emails and how to set them up in the “Setting up Your Blog” section of this how to start a blog guide for beginners.
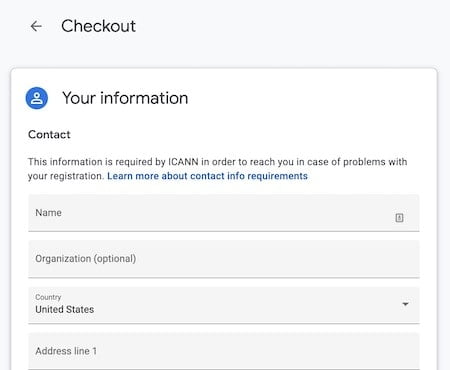
9. Fill out the required fields
10. Click “Save & Continue” at the bottom
11. Add your payment information
12. Click “Buy”
You might be asked to log in to your Gmail account before being able to check out.
So go ahead and log in or create a new account for free if you don’t have one.
That’s it!?
STEP 5
Choose Your Web Host
The fifth step in this how to start a blog guide for beginners is choosing your hosting provider.
What is Web Hosting?
A web host provides the services needed for your website to live and be viewed on the internet.
Look at your web host as an apartment complex where you rent a unit.
Just like there are complexes with good amenities, nice security, and fast response to maintenance requests, there are also bad ones.
Same with hosting companies.
There are web hosts that have great features, such as high security, fast speeds, and 24/7 support, and some that don’t.
Why is Choosing a Good Web Host is Important?
Your hosting company is by far what will have the most impact on your website’s speed and security.
Therefore, it’s important that you choose a good one.
And in case you’re wondering, here’s why site speed matters:
- More than 50% of visitors leave a site if it takes more than 3 seconds to load.
- Google mentioned that page speed is a ranking factor in searches
Best WordPress Hosts
My recommended host is NameHero, and it’s the one I’ll be teaching you how to set up in this how to start a blog guide. (my review)
You can get started with as little as $52 for a year of hosting depending on the plan you choose.
I do get a small commission at no extra cost to you if you purchase hosting through this link.
This allows me to keep content like this free of charge to entrepreneurs like you trying to get their businesses going.
However, I’m very selective of the services I recommend, which is why you won’t see me vouching for companies like Bluehost or GoDaddy, even when I could be earning more than double with them.
Other hosting companies I recommend are:
- Cloudways – great speed and security, support is a hit or miss. If you can stretch your budget to $10-$13/month, you can use Cloudways with Digital Ocean or Vultr High Frequency.
- Kinsta – Fast speeds, high security, and top-notch support. This is where my main fitness website is hosted. However, their plans start at $30/month. To be honest, they might be an overkill if you’re just starting out. But if you want the best of the best, Kinsta is where it’s at. (my review)
I do not recommend hosting with Bluehost, GoDaddy, HostGator, or any company owned by EIG.
Most “big” bloggers aggressively push Bluehost because of their high affiliate commission.
Unfortunately, they’re one of the most underperforming hosting companies.
The only people who recommend them are those bloggers looking to earn some commission.
If you don’t believe me, you can read reviews from actual users on TrustPilot or Reddit.
If you still want to use Bluehost, you can use this link, which will earn me some affiliate commission.
But don’t come to me complaining when your website is super slow or gets hacked because I’ll just go… “I told you so.”
Getting Started With NameHero
1. Go to NameHero – I do get some affiliate commission at no extra cost to you if you purchase it using this link.
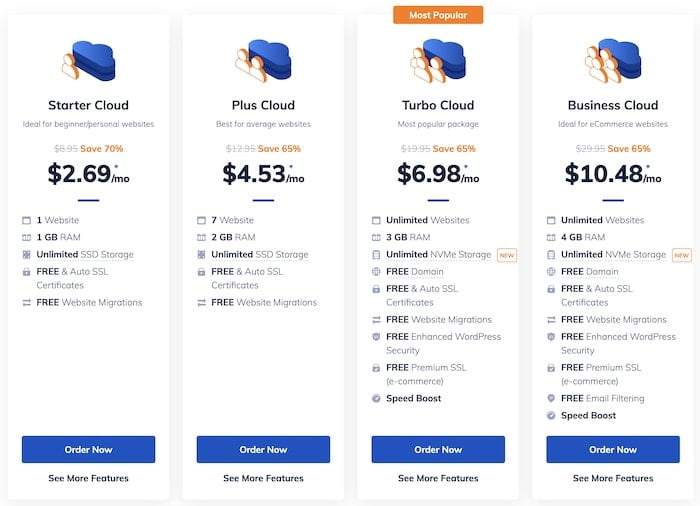
2. Choose your plan – the cheapest plan – Started Cloud – should be enough if you’re just getting started.
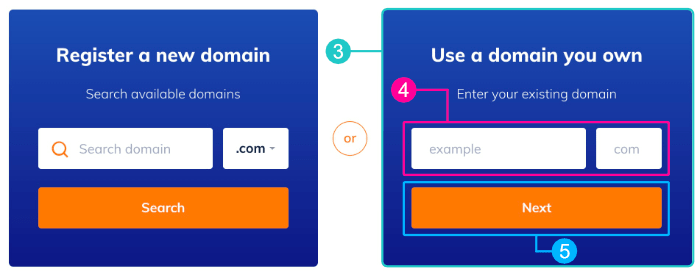
3. Select “Use a domain you own”
4. Enter your domain and extension
5. Click “Next”
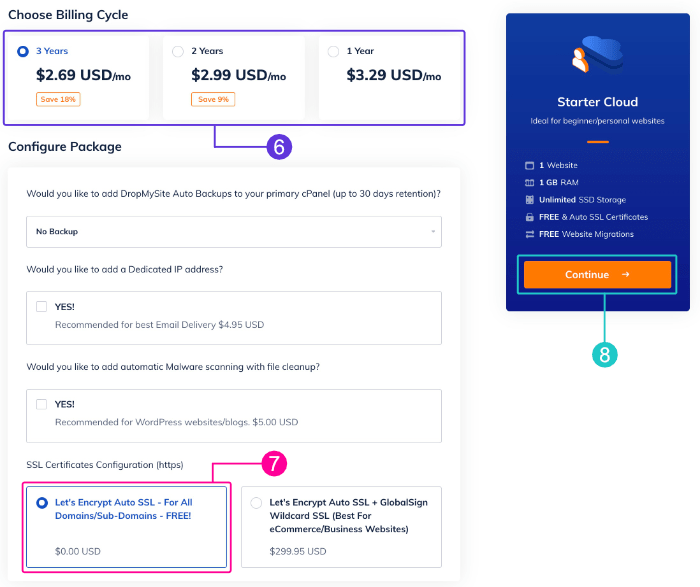
6. Select hosting length
7. Only select the “Let’s Encrypt Auto SSL – For All Domains/Sub-Domains – FREE!” option
8. Click “Continue”
You can choose any plan length that you want.
However, the 3 year plan will give you the best value for your money. Especially since the discount you see is only for new customers.
Once your plan is over, you’ll renew at the regular price.
A lot of people like take advantage of the introductory price and sign up for the 3-year plan.
Personally, I don’t like paying for things too far in advance, so I always go for the 1-year plan.
But it’s really up to you.
A good thing about going for the 3-year plan is that you’ll make a commitment with yourself.
The investment upfront will serve as a motivator to keep you grinding towards your goals.
If you only invest a few dollars, it can be easy to just say, “whatever, it wasn’t that much,” and quit.
NameHero also has a 30-day money-back guarantee, so you can try it out risk-free.
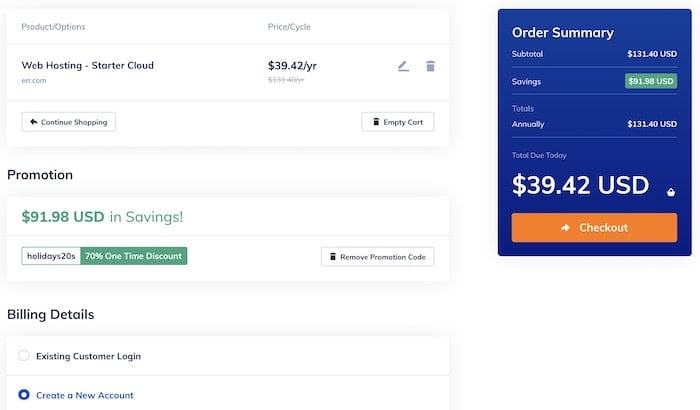
9. Review your plan
10. Enter your payment information
11. Check out
Update Your Nameservers
If you decided to get your domain name from NameHero, you can skip this step.
If you followed my advice and got your domain name from Google Domains or a different registrar, follow these steps to update your nameservers.
Once you pay for your hosting plan, NameHero will send you an email titled “New Account Information.”
This email will include your nameservers and login details.
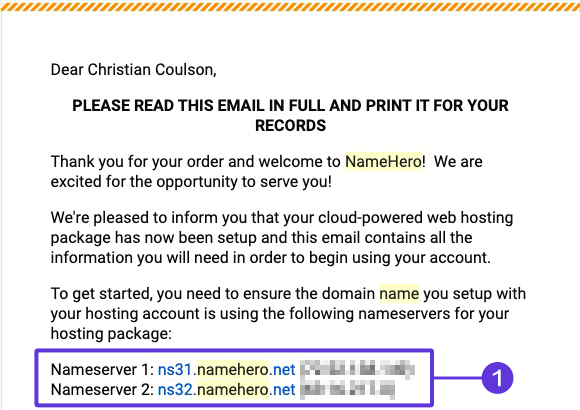
Here’s how to update your nameservers:
1. Log in to your domain registrar, in this case, it’d be Google Domains.
2. Click “My domains” on the left sidebar
3. Select your domain
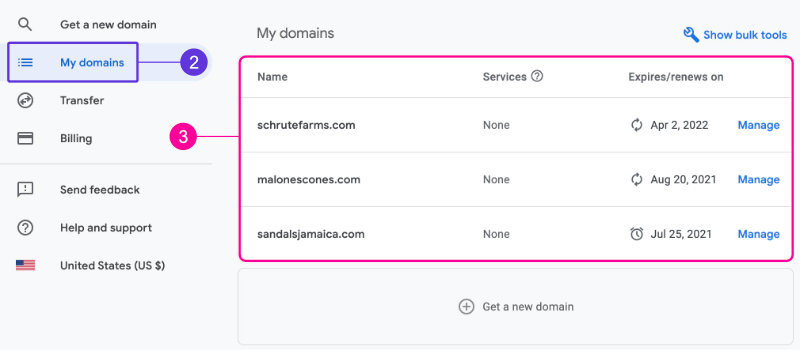
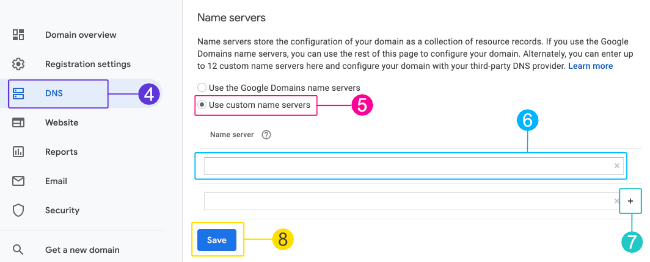
4. Click “DNS” on the left sidebar
5. Select the “Use custom name servers” option
3. Copy the nameservers NameHero sent you in the “New Account Information” email
4. Click the “+” icon to add more nameservers
5. Click “Save”
Done! Just give it like 24 hours for the changes to fully propagate.
STEP 6
Install WordPress
The sixth step in this how to start a blog guide for beginners is installing WordPress.

As mentioned earlier in this how to start a blog guide, we’re going to be using WordPress.org as our blogging platform.
How to install WordPress on NameHero
1. Log in to NameHero’s client area using the details provided in your “New Account Information” email
2. Click on your website

3. Log in to cPanel
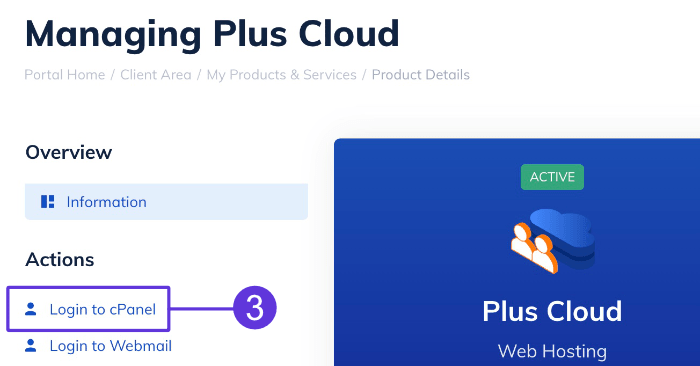
4. Look for the “Softaculous Apps Installer” section
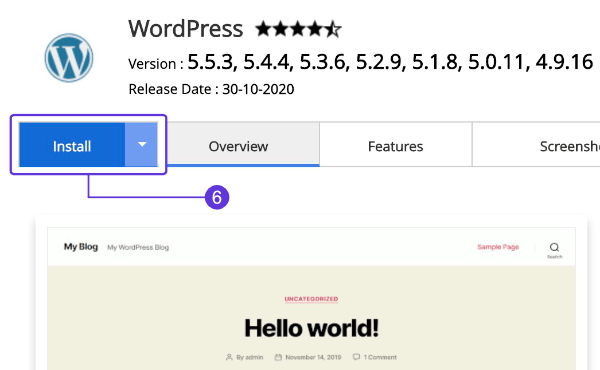
5. Click “WordPress” under “Scripts”
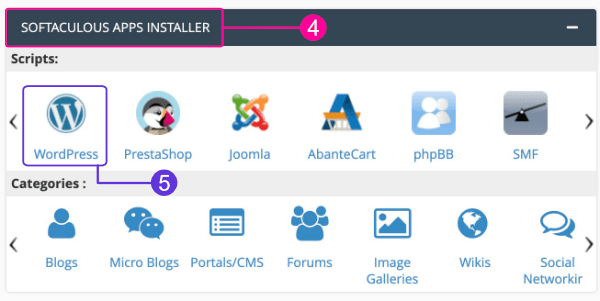
6. Click “Install”
7. Choose your protocol and website
8. Add your Site Name and Description
9. Choose a strong Admin Username and Password
10. Click “Install”

I suggest you use any free email service like Gmail or Outlook for your Admin Email instead of your domain email.
That way, you’ll always have access to your info. You know… just in case.
Also, you can always change these settings later inside your WordPress dashboard.?
STEP 7
Choose Your WordPress Theme
The seventh step in this how to start a blog guide for beginners is choosing and installing your WordPress theme.
What is a WordPress Theme?
A WordPress theme is a group of files that dictates the overall appearance of your website.
Some themes are simple and come with a standard look out of the box, while others have a few more settings and features.
Why is Choosing a Good Theme Important?
Besides making your website look nice, a WordPress theme will also affect your site speed.
In fact, after your hosting provider, your theme is what will have the most effect on your site speed.
What to Look for in a WordPress Theme
A good WordPress theme should be:
- Fast and lightweight – as mentioned earlier, the speed of your site will have an impact on your search engine rankings and visitors’ experience.
- Well coded – you don’t want themes full of bugs and security vulnerabilities. Only choose themes from respected developers.
- Mobile responsive – a theme should look good on every screen size out of the box or with little tweaking. Nowadays, people consume content not only on their laptops, but on tablets and smartphones as well. Plus, Google also favors mobile-friendly websites.
- Simple – a lot of themes come with tons of fancy layouts, colors, animations, and features you won’t really use. The problem with this is that if you can’t disable these features, your website is going to load the even if you’re not using them, which will decrease your page speed. Plus, too many flashy features can compromise usability.
- SEO-friendly – here’s something not many bloggers know or will tell you. Most of the SEO features you need are handled by your theme.
- Well supported – as a beginner, you’re going to need all the support you can get, trust me. So aim for services that provide good support.
Why is Web Design so Important?
Your website’s design is the first thing visitors will see and use to judge your business.
All it takes is a few milliseconds for someone to decide if they want to trust your blog or not.
In fact, people judge a site’s aesthetic and perceived functionality in 17-50 ms, according to research done by the University of Basel and Google.
A professional looking website will help build trust with your visitors by showing them that you take your business seriously.
This doesn’t mean that you have to add a lot of animations, transitions, and effects to your website.
As I mentioned earlier, keep it clean and simple.
Now…
While design is important, you don’t want to waste several months trying to achieve the perfect website.
Just design something that looks good, launch it, and start writing content so you can start earning some money.
Chances are, your design will never be perfect anyway.
I wasted a lot of time designing my fitness site and ended up changing everything after the launch.
And guess what?
I’ll be doing a complete redesign of that website again.
Free vs. Paid WordPress Themes
While paid themes aren’t always better than free themes, it’s usually the case.
Free themes tend to come with fewer customization options and less or no support at all.
Paid themes not only have more features, but typically include better support as well.
Developers of paid themes also have motivation to keep updating their themes to keep them compatible with newer versions of WordPress, servers, and plugins.
Some free themes are eventually abandoned by their developers, so you could run into compatibility issues with plugins and security vulnerabilities, which will force you to switch themes.
Free themes are almost never a good idea for serious websites. You’ll always get to a place where you want to add certain design or functionality to your site that isn’t provided in the free theme.
You’ll then have to decide whether you want to install another bloated plugin that could slow your site, experiment with random codes you found on Google, or move to a premium theme.
My advice?
If you can spend an extra ~$60, go with a premium theme. If you can’t, then at least go with a free theme that has a premium version you can upgrade to later.
Don’t worry, both of the themes I recommend have a free version.
Best WordPress Themes
The two themes that I recommend are GeneratePress and Kadence.
The Genesis Framework is also good but it’s a little difficult to customize if you don’t know how to code, so I don’t recommend it for beginners who are just learning how to start a blog.
GeneratePress
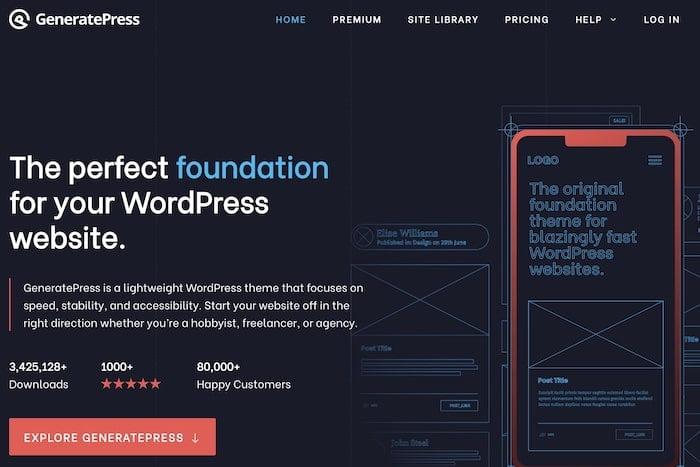
GeneratePress Premium is what I use on both of my websites. (my review)
Not only is it well-coded, fast, SEO-friendly, and lightweight, but also has incredible support.
Honestly, GeneratePress’ support is one of the best supports I’ve ever experienced.
Tom – the lead developer – and his team always go above and beyond for their customers.
They also have a friendly Facebook group where users post questions and help each other.
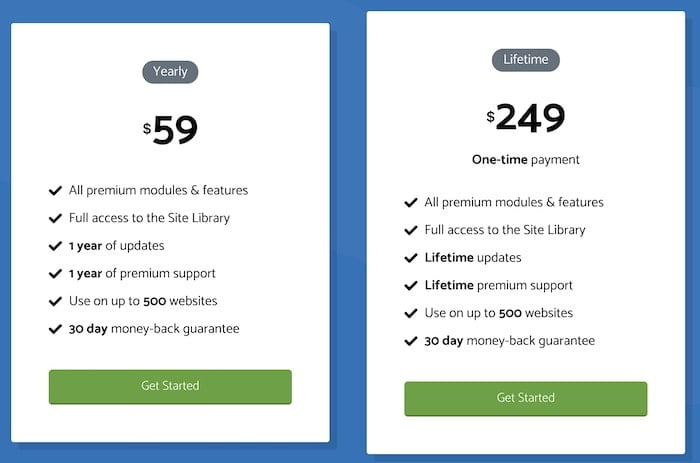
GeneratePress is free, but there’s also a premium version that’s only $59 for one year of support and updates and can be used on up to 500 websites that gives you access to a ton more features.
They also offer a 30-day money-back guarantee.
The premium version also gives you access to more than 50 pre-made website templates you can use.
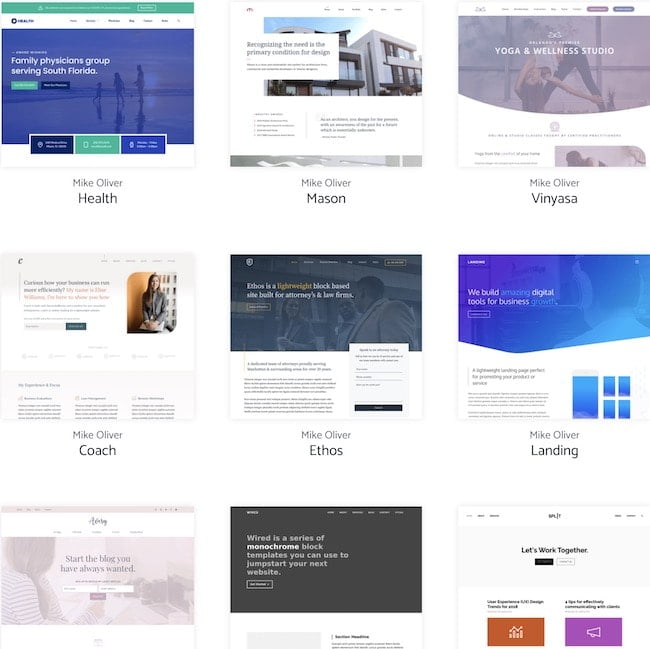
All you have to do is install one of them, replace their content with yours, and you have a professional-looking website.
Underperforming WordPress Themes
I want to quickly go over a few themes I don’t recommend going with.
Divi
This is the theme you’ll see promoted by almost every “big” blogger.
At $89/year, they’re more expensive than the themes mentioned above.
The issue with Divi, though, is that it’s extremely bloated, slow, and it’s a mess switching themes later because it leaves behind a lot of shortcodes.
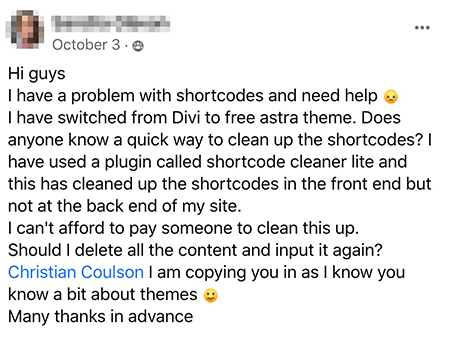
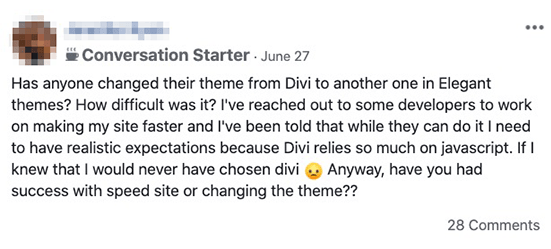
Just like Bluehost, they offer a pretty high and recurring affiliate commission, which is why it’s promoted so aggressively.
Other themes to avoid:
- Avada
- Anything from ThemeForest
- Envato Themes
- Jupiter X Theme
If you want other options or want to learn more, you can read my article on the best WordPress themes.
Lol.
I know I’m throwing A LOT of information at you, but I just want you to start on the right foot so you don’t end up having to spend more money and time fixing a mess later.
How to Install Your WordPress Theme
Installing WordPress themes is pretty simple, here’s how to do it:
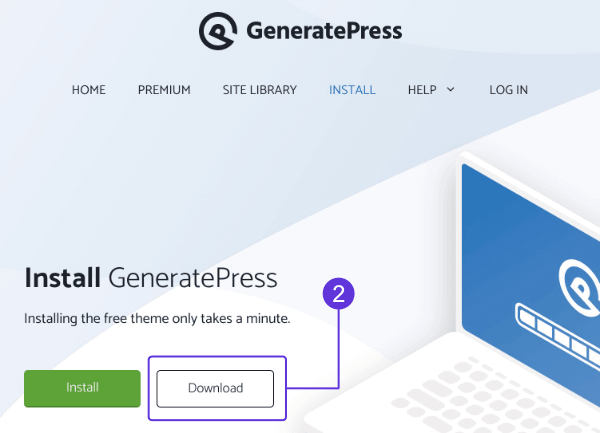
1. Go to generatepress.com/install-generatepress/ (or the website of the theme you want to install)
2. Click “Download”
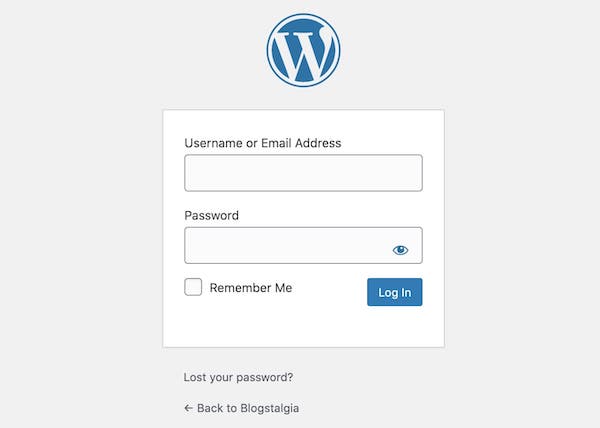
3. Log in to your WordPress dashboard (you can do this through your host account or by adding /wp-admin at the end of your blog’s name. (e.g., YourBlog.com/wp-admin.
4. Click “Appearance” on the left admin sidebar
5. Click “Themes”
6. Click “Add New”
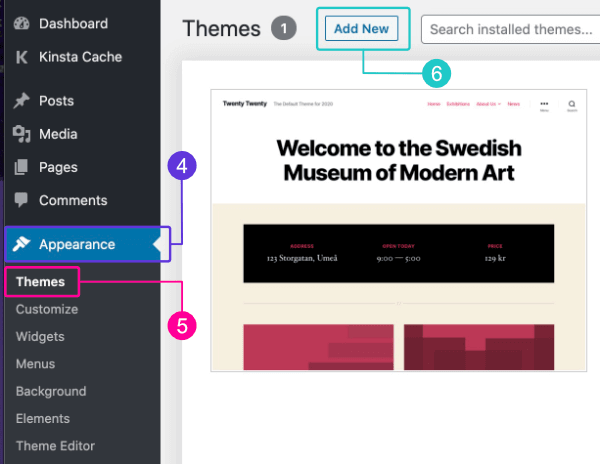
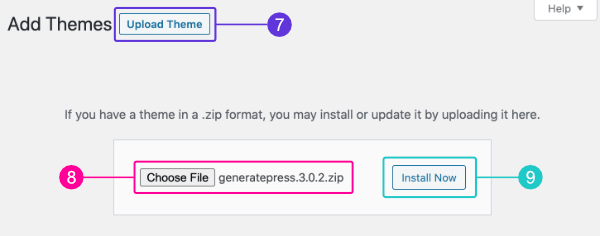
7. Click “Upload Theme”
8. Click “Choose file” and select the zip file you downloaded on step 2. (you can also just drag and drop it)
9. Click “Install Now”
10. Click “Activate”
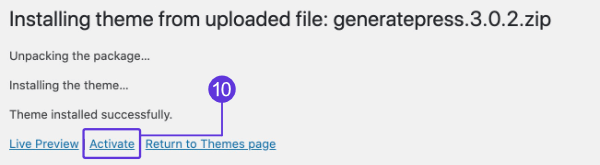
That’s it! You’ve successfully installed your blog’s theme.
How to Install GeneratePress Premium
To install GeneratePress Premium, you first need to install the free version by following the steps above.
That’s because GeneratePress Premium is actually a plugin that extends the functionality of the free version.
Once you’ve installed the free version, follow these steps to install the premium one:
1. Go to GeneratePress. I get a small commission at no extra cost to you if you purchase the theme through that link.
2. Select the option you’d like (yearly or lifetime) and click “Get Started”
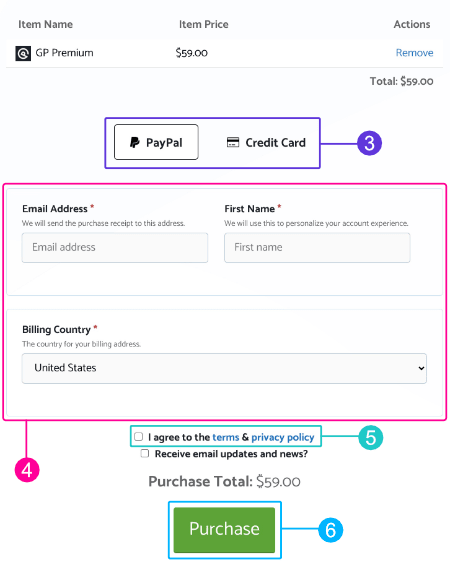
3. Select your payment method
4. Fill out the required fields to create your account
5. Check the “Agree to the terms & privacy policy” box
6. Click “Purchase”
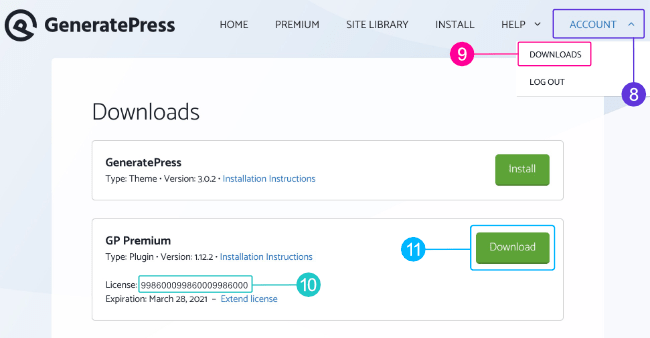
7. Log in to your GeneratePress account
8. Click “Account” on the upper-right corner of the screen
9. Click “Downloads”
10. Copy your license key
11. Click “Download”
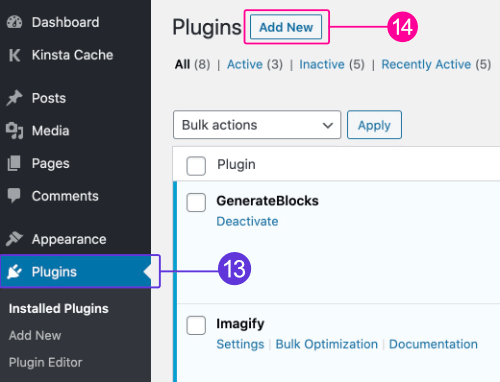
12. Log in to your WordPress dashboard
13. Click “Plugins” (yes, plugins)
14. Click “Add New”
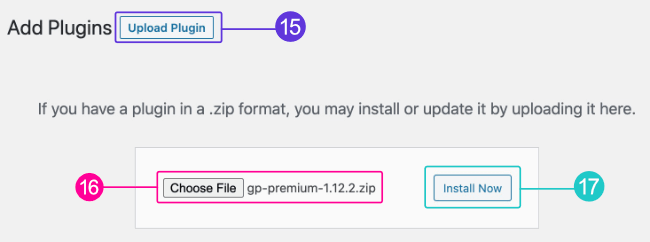
15. Click “Upload Plugin”
16. Click “Choose File” and select the GP Premium zip file you downloaded
17. Click “Install Now”
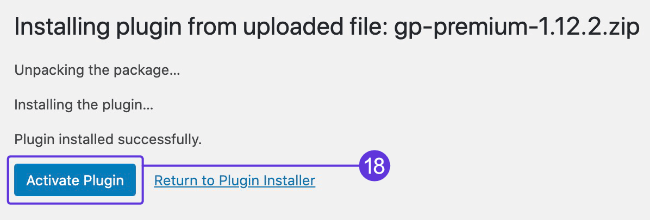
18. Click “Activate”
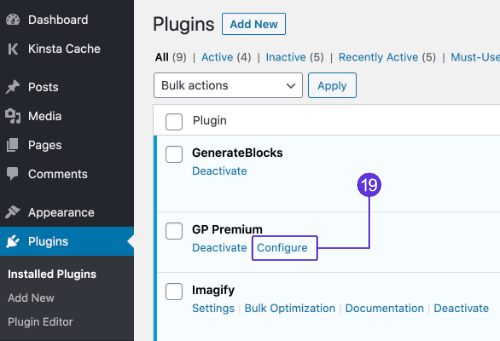
19. Click “Configure”
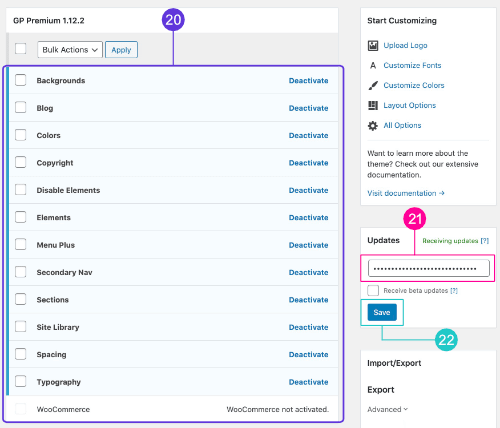
20. Activate all the modules
21. Paste your license key from step 10
22. Click “Save”
You’re done!
Now, GeneratePress is an extremely powerful theme, so I suggest you take some time to go through their Documentation and my full review to learn everything you can do with it.
STEP 8
Set up Your Blog
The eighth step in this how to start a blog guide for beginners is setting up your blog.

In this section of the how to start a blog guide, I’ll be teaching you how to create your essential pages, set up your blog’s main settings, install plugins, and find free blog images.
I know all of this can seem a little overwhelming at the beginning, but trust me, every beginner blogger goes through the same thing.
Don’t get discouraged, don’t give up, just keep pushing and learning.
It’ll definitely be worth it.
I highly recommend you spend some time later going through my WordPress tutorial for beginners.
The tutorial will give you a more in-depth look at WordPress as well as best practices to keep your website secure and loading fast.
Creating Your Essential Pages
Before you get inspired and start writing blog posts, you’ll want to make sure that essential pages, such as your About and Contact page, are filled with information about you and your business.
Let’s go over the pages that every blog should have and discuss why they’re important.
Your homepage will be the main page of your site.
Generally, this page should have a call-to-action (CTA) telling users to subscribe to your email list or check out your main product or service.
After that, you’d want to link to your most popular content and really provide value to your visitors.
Then it’s really up to you what else you want to add.
Building Your Homepage
If you purchased GeneratePress Premium and installed one of their pre-made templates, you should be good to go.
If not, then you’d have to build your own using a builder, such as Atomic Blocks.
There are also drag-and-drop page builders like Elementor, but they can slow your site a bit, so I’d rather use Gutenberg blocks builders like Atomic Blocks or GenerateBlocks.
Again, I highly recommend you check out my WordPress tutorial.
Setting up Your Homepage
When customizing your blog, you can choose to display your blog posts or a custom static page as your homepage.
I always recommend using a static page.
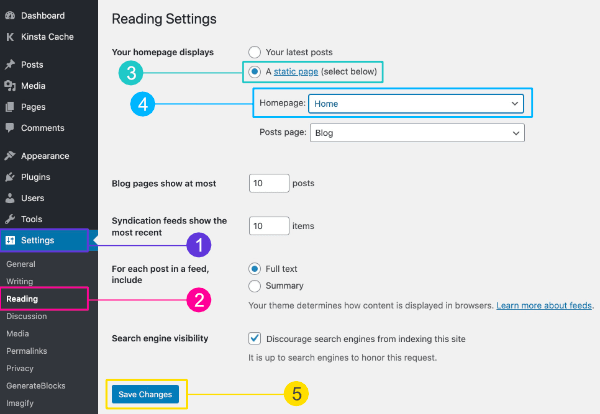
After you’ve designed your homepage, you’d want to go to your WordPress dashboard > Settings > Reading > Your homepage displays > A Static page > and select the name of your homepage from the drop-down menu.
Your blog’s About page isn’t really about you, but about what you can do for your customers/visitors.
Here are some things you want to include in your About page:
- Provide value – mention what problem you can help them solve. Can you help them lose weight? Get out of debt? Find their soulmate?
- Who you help – let them know exactly who your target audience is. Is it men, women, mom, teens, college kids, couples?
- Establish authority – tell them how you know what you know and why they should listen to you.
- About you – after you’ve covered the above points, you can finally talk a little bit about you and your values.
- Next steps – tell your readers where they should go next. Take your eCourse? Read an article? Subscribe to your email list?
Here’s a more in-depth guide I wrote about how to write a killer about page.
A contact page is a little bit more simple, yet still important.
Your Contact page should have at least a simple contact form your visitors and potential customers can use to reach out to you.
There are several contact form plugins you can use, a well-coded, lightweight, and free one is WP Fluent Forms, which is the one I use on this site.
I would stay away from Contact Form 7 as it tends to load on every page on your site, not only where you add it.
Lastly, there are three legal pages you should include on your site:
- Privacy Policy
- Terms & Conditions
- Disclaimer
The only one that’s required by law is the Privacy Policy; however, other pages like Disclaimer and Terms & Conditions can really help you protect your blog from expensive lawsuits.
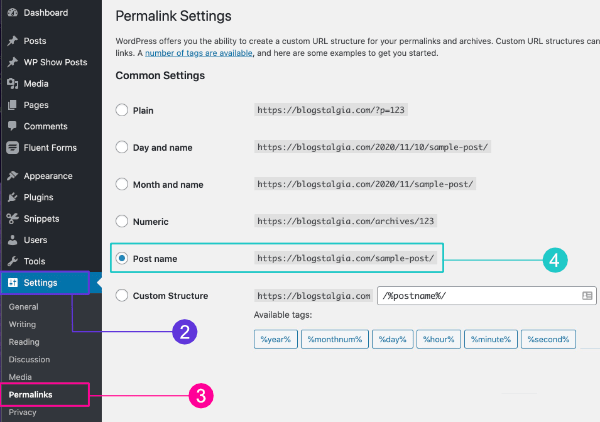
Setting up Your Permalinks
Permalinks are the URLs of pages and individual posts published on your blog.
By default, WordPress permalink has the following structure:
https://YourBlog.com/?p=123
This isn’t very good because it doesn’t tell visitors and search engines what the page or blog post is about.
You want to change this to a structure that includes the name of the page or blog post, like this:
https://YourBlog.com/Sample-Post/
1. Log in to your WordPress dashboard
2. Click “Settings” on the left sidebar
3. Click “Permalinks”
4. Select the “Post name” option
5. Click “Save Changes”
Setting up Your Custom Email
If you signed up with NameHero, you can create free unlimited custom email addresses with your domain name.
However, I highly recommend keeping your email and web hosting separate, mostly because it gives you better deliverability and spam protection.
So if you can afford $6/month for the Google Workspace Starter plan, I’d go for it.
But don’t worry if you can’t, I’ll teach you how to set up both.
1. Log in to your NameHero account
2. Click on your website
3. Click “Login to cPanel” on the left sidebar
4. Scroll down to the “Email” tab
5. Click “Email Accounts”
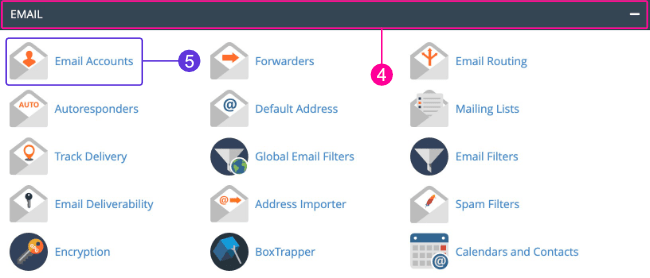
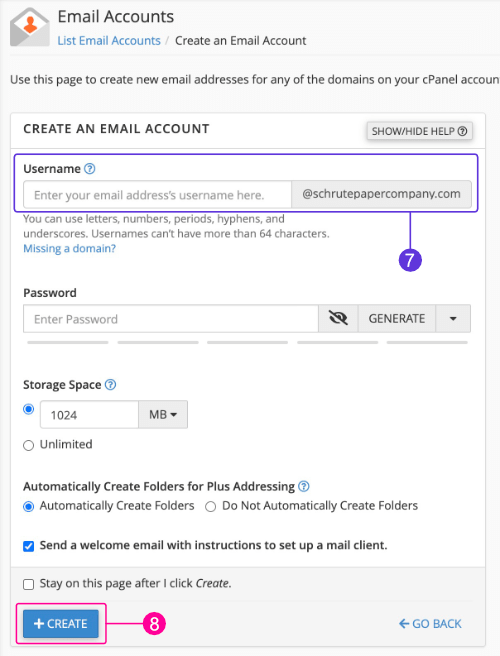
6. Click the blue “+ CREATE” button on the right
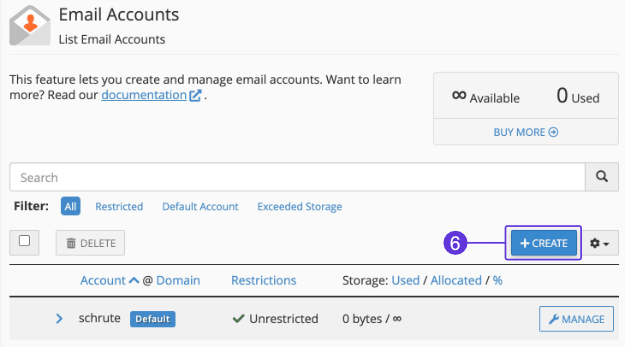
7. Enter the username you’d like
8. Click “+ CREATE” at the bottom
Setting up your professional email with Google Workspace requires a few extra steps, so I’ve made it a completely different guide.
You can check it out here.
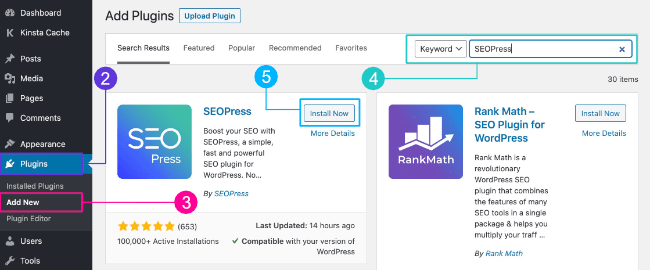
Installing Plugins
Plugins are bits of code that add extra functionality and features to your blog without you having to know how to write code.
The plugins you should install on your blog depend on the features you want to add, so I can’t tell you exactly which ones to use.
However, here are a few plugins I believe every beginner learning how to start a blog should have:
- WP Fluent Forms – free plugin that allows you to add contact forms to your site.
- SEOPress – free plugin that helps with search engine optimization (SEO). Yoast SEO is another popular one, however, I prefer SEOPress.
- WP Rocket – WP Rocket is a paid caching plugin that helps speed up your site. If you’re using NameHero, which is the host I recommended, or any other host that uses LiteSpeed web servers, you can use LiteSpeed Cache instead, which is free.
- WordFence – free firewall and malware scanner to help keep your site secure
- Atomic Blocks – free Gutenberg Blocks plugin to help you customize your blog.
- WPvivid – free full and offsite backup plugin. UpdraftPlus is another popular one, but it doesn’t back up your entire site.
Here’s an extensive list I made of the best WordPress plugins for any functionality you might want to add to your blog.
Now… you do NOT want to install every plugin you find.
Not only can some plugins significantly slow your site speed, but they’re also the most popular way hackers get control of your blog.
In fact, plugin vulnerabilities represent 55.9% of known entry points.
That’s why you should always use well-coded plugins from respected developers and not whatever some “big” blogger recommends.
Also, since they can often slow your site, I’d stay away from multi-purpose plugins and only install ones that have the exact feature you need.
Nothing more. Nothing less.
1. Log in to your WordPress dashboard
2. Click “Plugins”
3. Click “Add New”
4. Type the name of the plugin on the search bar
5. Click “Install”
6. The same “Install” button will then turn into an “Activate” button you must click to, well, activate the plugin
There are both free and paid plugins, however, most of them are free.
Even paid plugins often come with a free version that’s a little more limited.
Unless you require something super special, most free plugins should be enough for your blog, especially if you’re starting out.
Finding Free Photos for Your Blog
Images are a great way to keep your audience engaged and give a little more life to your blog content.
However, you should NOT use random images you find on Google on your blog without the owner’s permission.
Last thing you want is to get sued for copyright infringement.
Don’t worry, though.
There are several websites where you can find free stock photos, such as:
1. Unsplash
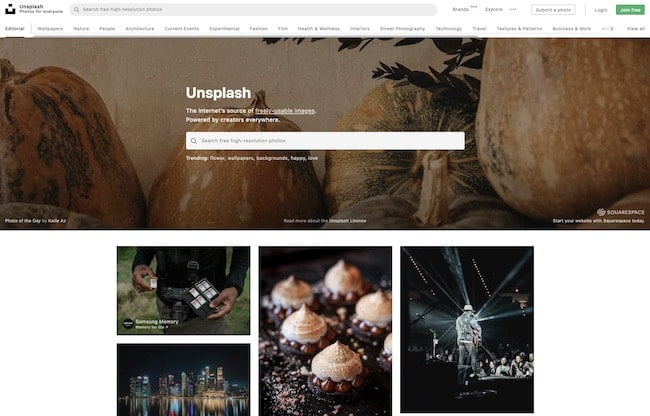
Unsplash is my favorite site to find free stock photos.
This is because the photos you find there don’t look like generic stock photos. Instead, they have a more real/natural look.
2. Pixabay
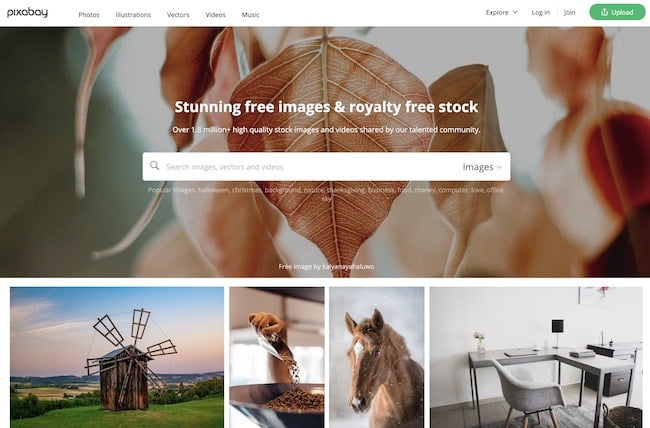
With over 1.8 million free images, vectors, and videos, Pixabay has one of the largest collections.
While the quality of their images is pretty good, they’re not as good as Unsplash.
3. Pexels
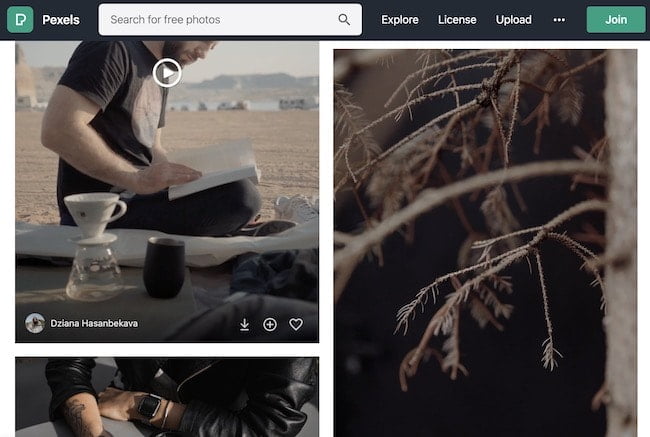
Pexels is another great source to find free photos and videos that doesn’t require attribution to the photographer.
They also allow you to modify and edit the photos and videos if you’d like.
STEP 9
Write Your First Blog Post
The ninth step in this how to start a blog guide for beginners is writing your first blog post.
One of the reasons many bloggers fail to make money with their blogs is that they write about anything that comes to mind.
However, most of the blog posts you write should have a purpose, such as:
- Getting subscribers
- Making an affiliate
- Getting visitors to enroll in your free course
- Making money with ads
- Selling your own product
Some articles that are great for making money are review articles, “best of” lists, comparison articles, “how-to” guides, before and afters, and tutorials.
Another thing you must do is write about content that’s being searched for.
There’s no point in writing about the best ice cream flavor to eat while cutting your nails if no one is searching for that.
Finding content or terms that people are searching for is referred to as “keyword research.”
I’ve already written an extensive guide on how to write a blog post that converts, so I’m not going to cover all of that here again.
After you’ve learned how to start a blog, I really suggest you go read that guide, as it goes over things like:
- Keyword research
- On-page SEO (for better search engine rankings)
- Creating your outline
- Crafting attention-grabbing headlines
- How to write faster
- And a lot more
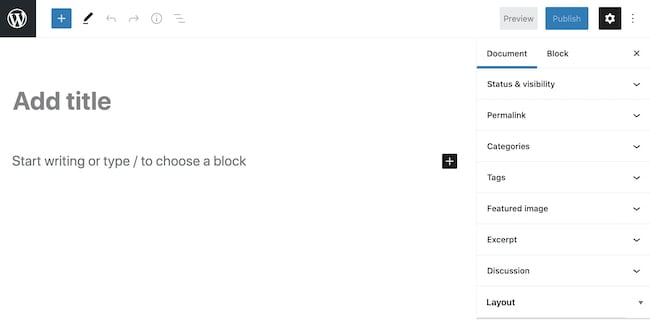
1. Log in to your WordPress dashboard
2. Click “Posts” on the left sidebar
3. Click “Add New”

You should then be taken to the blog post editor where you can add the title and content of your article, set categories and tags, add a featured image, and more.
Blog posts are the main way you’ll be sharing your knowledge/information with your audience.
These are typically reserved for dynamic content (content that’s updated regularly).
They also have a published date and can be assigned different categories and tags.
Pages, on the other hand, are used more for static content (content that doesn’t change often), such as your homepage, contact page, about page, and legal pages.
STEP 10
Promote Your Blog
The tenth step in this how to start a blog guide for beginners is promoting your blog.

Learning how to start a blog is super easy compared to driving traffic to it. In fact, this is most likely where the majority of your effort will be.
I mean…
Your blog posts could be cooler than a penguin eating ice cream in the Himalayas while riding a honey badger, but it won’t matter if no one’s reading them.
Here are some traffic sources and recommendations for those starting a blog with absolutely no audience at all:
Pinterest isn’t only for women to look up recipes, okay?
There’s plenty of other content, such as weight loss articles, coding/programming, home decor, getting out of debt, DIY, and more.
Several guy-focused brands like Lowe’s and Harley-Davidson are also killing it on there.
In fact, a little more than 60% of the traffic to my fitness site comes from Pinterest.
Here are some things that make Pinterest a great traffic source:
- It’s a search engine – Pinterest is not a social media platform, but a search engine like Google. This means that your blog posts will have a longer shelf-life and will still be found years after being published.
- It’s easier to rank – it’s easier and faster to get traffic from Pinterest than it is from Google. This is because Pinterest’s algorithm isn’t as advanced as Google’s, and it focuses more on engagement metrics than backlinks and technical SEO.
- Higher-income users – 41% of adults who use Pinterest earn more than $75,000 per year.
- Can be automated – scheduling tools like Tailwind will automatically publish your Pins for you.
- Less competition – bloggers are fighting each other to get on the first page of Google, which leaves Pinterest users with way less competition.
Check out my Pinterest for Bloggers: A Beginner’s Guide article to explore more and get started with Pinterest.
Google is probably the best source of traffic available.
The only downside is that, well, it can be a bit competitive and tough to rank for popular keywords.
Even if you decide to use Pinterest as your main traffic source, I highly recommend you at least learn the basics of Google SEO, so you don’t have to do a lot of re-work when you eventually decide to add Google to your strategy.
I started out with Pinterest without knowing much about Google SEO and had to go back and delete/update over 100 articles on my fitness site so they’d be optimized for Google.
You can check out how to write blog posts that are optimized for Google here.
Social Media Platforms
Social media platforms like Instagram and Facebook are not very good at driving traffic to blogs, but they’re great for connecting and building trust with your audience.
This is because people rarely leave the platform to read a blog post and your content only stays there a few hours after being published unless it goes viral.
And even if you have a blog post go viral, it will eventually die down.
These social platforms are also great if you have the budget to use their ads.
Using Facebook and Instagram ads can be very beneficial, but if you want free organic traffic, Pinterest and Google will be your best bet.
Guest Blogging
Guest blogging is basically writing and publishing content on another site, typically within the same niche, as a guest.
This will not only give you access to the hosts audience, but will also help improve your Google rankings.
This is a great, but time-consuming strategy to promote your blog.
I’ve written an extensive guide on guest blogging if you’d like to get started with it.
Connect With Others in Your Niche
Engaging with other bloggers in your niche is a great way of building friendships and help each other promote content.
Here are a few ways to get involved and connect with others in your niche:
- Niche-related forums
- Quora
- Facebook groups
- LinkedIn groups
- Leaving comments on other blogger’s posts
I created a Facebook group for bloggers and entrepreneurs to connect and help each other out.
Build Your Email List
I can’t recommend this enough.
Once you start getting a few visitors, you must start collecting their email addresses.
That way, if something ever happens to your social media accounts or Google updates their algorithm, you’ll always have a way of reaching out to your audience/customers.
Not only that, but it ensures that you have consistent traffic.
For example, every time you publish an blog post, you can send your email list a link to it.
The email marketing platform I use is ConvertKit, as it is one of the best when it comes to deliverability.
You can use them for free up until you reach 1,000 followers.
The only downside is that you can’t use their Visual Automations features, so you can only send broadcasts.
Reach Out to Your Friends
Letting your friends know that you’ve started a blog is a great way to get a few initial readers and subscribers.
In fact, that’s how to got the first subscribers to my fitness site.
I contacted some of my friends and people I knew and told them about what I was doing.
When doing this, though, message each of your friends individually, don’t just send a broadcast message.
Broadcast messages typically get ignored. If you care and take the time to message your friends and people you know, they’ll be more likely to take the time to check out your page, subscribe, and share it with others.
STEP 11
Make Money Blogging
The eleventh step in this how to start a blog guide for beginners is making money blogging.

Let’s face it, the reason you want to learn how to start a blog is to make money online.
Don’t worry, here are the most common ways you can monetize your blog:
- Ads – displaying ads are one of the easiest ways to make money. All you have to do is enable them and you’re good to go. The only downside is that you might need at least 10,000 monthly visitors to see some slightly good earnings.
- Affiliate marketing – selling other people’s products is one of the most popular ways to make money online. They have way higher earning potential than ads. However, they require a little more work. If you’re a new blogger, this is one of the best places to start.
- Selling your own services – great way of making money since it doesn’t require a lot of traffic. I actually started making money by offering fitness coaching services (and still do).
- Selling your own products – creating your own products, such as courses, printables, and eBooks will most likely yield the highest earnings since you’ll be in control of pricing. However, I recommend you start with affiliate marketing to see which products your audience is most interested in. Once you’re making good sales from those affiliate products, you can create your own and just switch them.
- Sponsored posts – bloggers and companies are always looking for sites to promote their content. Accepting sponsored posts is a great way of earning some extra cash. The only downside is that you might need to have a nice amount of visitors for advertisers to be willing to pay you for placing a sponsored post on your blog.
There are many other ways of making money with your blog, each with its own pros and cons.
I wrote a more in-depth guide on how to make money blogging, which I highly recommend you check out.
STEP 12
Join a Blogging Community

I know, I know… the title says this is an 11-step guide on how to start a blog, not a 12-step guide.
Look at this section as a bonus, okay?
As I mentioned earlier, joining a community of like-minded individuals and entrepreneurs looking to connect, help each other out, and grow together is extremely beneficial.
I know I just met you, and this is crazy.
But here’s our Facebook group.
So join us, maybe?
FAQs About Starting a Blog
The last thing we’ll cover in this beginner’s guide on how to start a blog are some frequently asked questions about blogging.
1. How Do You Start a Blog for Free?
You can start a blog for free with platforms like Wix, Tumblr, and Blogger.
This is great if you just want to blog as a hobby; however, if you want to make money blogging, you’ll have to move to a self-hosted solution, just like we discussed earlier.
You can click here to review the “choose your web host” section of this beginner’s guide to blogging.
2. How Do Bloggers Get Paid?
There are plenty of ways bloggers get paid, some of the most popular ones include:
- Selling other people’s products (affiliate marketing)
- Selling their own eCourses, eBooks, and templates
- Allowing advertisers to display ads on their site
- Offering their own services, such as fitness coaching, web design, and graphic design
- Accepting sponsored post
You can click here to review the “make money blogging” section of this how to start a blog guide.
3. How Much Does It Cost to Start a Blog?
You can start a blog with as little as $50 depending on where you register your domain name and host your website.
- Domain name registration: $12 per year with Google Domains
- Web hosting: plans start at $3.58 per month with NameHero (billed yearly)
4. How Much Do Bloggers Make?
According to Glassdoor, the average salary of a blogger is $33,000/year; however, there are some making over $10,000/month, others making $1,000-5,000/month, and others making absolutely nothing.
5. How Do I Learn WordPress?
I’ve written an extensive WordPress tutorial for beginners you can check out.
I recommend you do so whenever you have some free time and can sit down comfortably with a nice cup of coffee.
How to Start a Blog: Final Thoughts
While growing a blog isn’t easy (growing a business is super tough), it’s definitely worth it.
Just like I mentioned at the beginning of this article, sometimes you just have to take action and start grinding.
A few years from now, you’ll be either running a successful business or looking back at this day and wondering what would’ve happened if you didn’t back down and went for it.
The timing will never be perfect, so get your poop together and start your blog.