
Learning how to write a blog post that keeps your audience engaged can be a little challenging nowadays.
It seems like everyone has the attention span of a puppy trying to play with everything in sight.
However, it isn’t impossible.
And you definitely don’t need a fancy writing ritual to become a pro.
I wish I could tell you that I wake up at 5 am every morning to the smell of hot waffles.
That after I wake up, birds come flying in to bring me a hot cup of coffee made with beans from the beautiful mountains of Colombia.
That after I’ve had my coffee, I walk outside to become one with nature and write the best blog posts in the Milky Way galaxy.
But in reality, I just sit in front of my computer.
Contents
- How to write a blog post
- Understand your audience
- Satisfy user intent
- Create your outline
- Write a catchy blog post title
- Write an amazing opening
- Finish off strong
- Make your blog posts easy to read
- Make your blog posts scannable
- Create a beautiful design
- Make your site responsive across devices
- Choose quality over quantity
- Use numbers when talking data
- Write with a purpose
- How to write a blog post for SEO
- Editing and publishing your blog post
- How to write a blog post fast
- Free blog post template
Disclosure: You should always assume that pretty much every link on this site is an affiliate link, and if you click it and buy something you like, I’ll earn some money to help me buy a DeLorean, build a time machine, and travel back to the 90s so I can watch Hey Arnold! and eat Dunkaroos again.
How to Write a Blog Post in 2020 (With Free Blog Post Template)
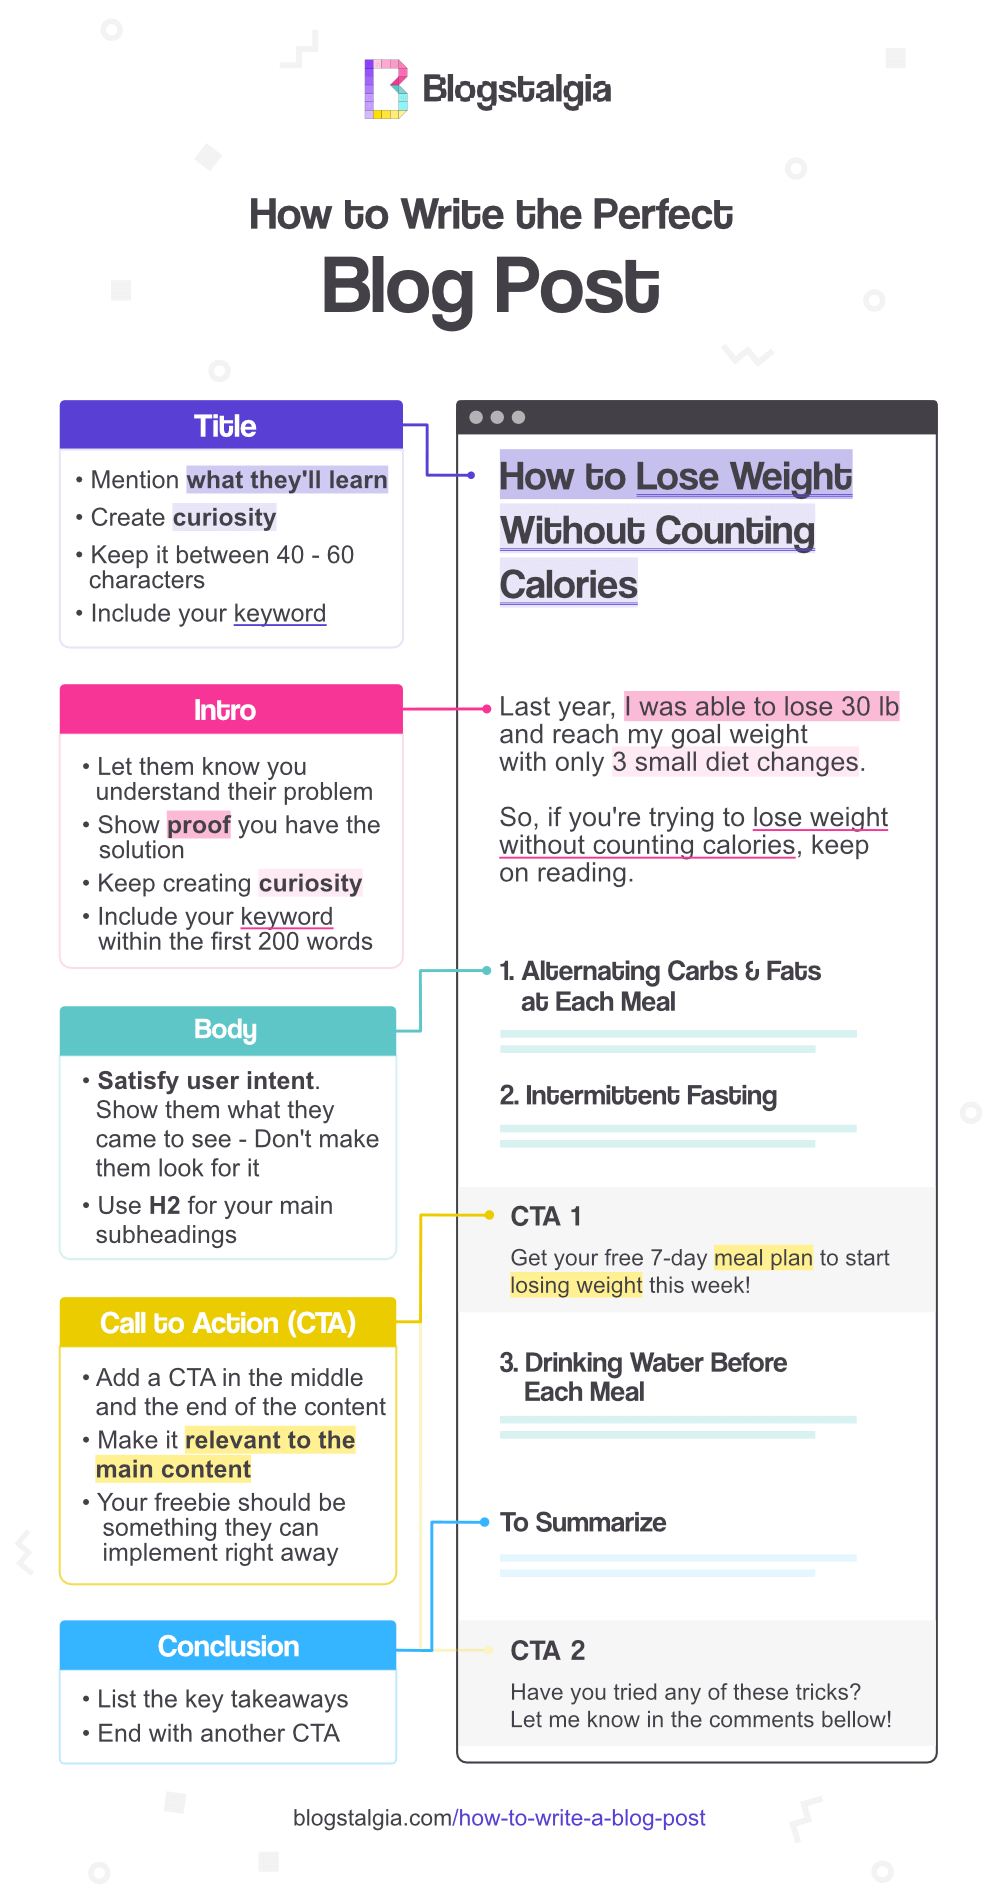
Step 1: Understand Your Audience
The first step in learning how to write a blog post is to figure out who you’re writing to.
Writing to please everyone is a common mistake among beginner bloggers. Doing this will leave you with a very disengaged audience.
If you try to please everyone, you’ll end up pleasing no one.
Here are three important things you must know about your audience:
What’s Their Level?
Are you writing to beginners, intermediates, or experts in your niche?
For example, if your target audience are beginner bloggers, you probably don’t want to be talking about NGIX web server or Apache HTTP server in your blog posts.
Keep things simple and easy to understand.
And if your target audience are experts, you can skip things like “click the little x to close the browser window.”
This will help you remove unnecessary bloat and keep your message clear.
What’s Their Age Range?
Making a bunch of Michael Scott references from The Office in your blog posts might make no sense to your audience if they’re older.

On the other hand, making references to the Backstreet Boys might leave a younger audience wondering what the heck you’re talking about.
Just kidding, everyone knows the Backstreet Boys… right?

Are They Businesses or Regular Consumers?
When writing to other businesses, you want to use a more professional approach. You’ll likely be targeting more than one person within an organization.
For regular consumer, you can take a more relaxed approach, depending on your niche.
Step 2: Satisfy Search Intent
The second step in learning how to write a blog post is to satisfy search intent.
Search intent in SEO is the main goal someone has when typing a question into a search engine.
For example, let’s say I want to lose weight fast but need to lose it by next week for my friend’s wedding.
I’ll go to Google and search for “how to lose weight fast.”
If your blog post shows up in first, but when I click through it’s actually a post on how to lose weight in 12 months, I’m going to bounce and find another one.
Why?
Because you didn’t satisfy my search intent. 12 months isn’t considered fast weight loss.
If Google sees that lots of people are bouncing off your website after searching for “how to lose weight fast,” it’ll know something’s wrong with that result and drop your rankings.
Here’s how to satisfy user intent:
1. Get In Their Heads
First, you need to figure out what people in your niche are looking for.
You can use a free tool like KeywordTool.io to see what are some of the most popular keywords being searched by them.
For example, if your niche is dog training, you can type “dog training” and see a list of other related keywords people are searching for.
2. Don’t Make Them Look for It
Second, make sure you cover the main topic of the blog post right after your awesome introduction.
Have you ever visited a blog post looking for something and left a few seconds after you couldn’t find it?
Me too!
If I’m searching for “how to write a blog post,” you can be confident that I know what a blog post is and what its benefits are.
So there’s no need to mention those (at least at the beginning).
Take this post for example, I wrote an engaging introduction and immediately moved to how to write a blog post.
I didn’t waste your time telling you what a blog post is or why it’s good to write them.
After answering their main question, you can go ahead and cover other questions they might have.
Which brings me to my next point.
Grow Your Business on the Side
Free 5-day blogging bootcamp!
3. Answer Their Next Questions
Third, you want to satisfy secondary intent.
Secondary intent are any other questions your visitors might have after getting the answer to their main question.
“Christian, I’m not a mind reader! How am I supposed to know this?”
Don’t worry, I’m going to show you 6 ways to find more relevant questions.
However, I honestly believe the Google Search method I’ll show you first is enough.
- Google Search
A few years ago, people had to use different tools and search other places to find this information.
Lucky for you, Google has gotten SO good at telling you exactly what people want to see.
To find this information, simply search for your keyword on Google and look at the “People also ask” box.

Then, scroll down to the end and look at the “Searches related to *your keyword*” section.

You can also use the free version of the Keywords Everywhere extension.
After installing it, you’ll be able to see related keywords to your search on the right sidebar of your browser.
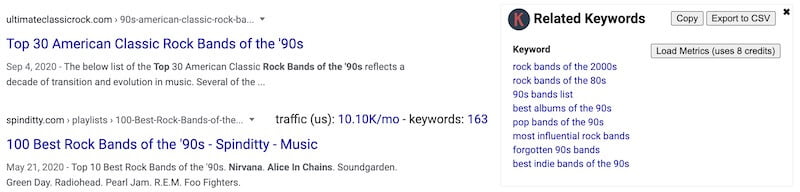
Now, don’t add all the questions you find, just add the ones you think match your article the best.
- Google Autocomplete
Start typing your keyword or niche into Google and let it autocomplete your search.

See what suggestions Google gives you and add the most relevant ones.
These predictions are great because they’re based on what millions of other people have searched for.
- Amazon Book Reviews
Do an Amazon search of books in your niche and read through some of the 3-star reviews to see what people are saying.
Was there something people wished was covered, but it wasn’t?
“Why should I focus on 3-star reviews, Chris?”
Those 3-star reviews typically come from people who found value but wished there was more. They’re more willing to give a biased review of what they liked and didn’t like.
Reviews that have 1 or 5 stars are either super wonderful or extremely hateful.
People who leave a 5-star reviews probably had all their questions answered.
And those leaving 1-star reviews typically complain without giving useful feedback.
- Quora
When looking how to satisfy secondary intent, Quora can be a useful option.
Search for your keyword or niche in Quora and see what other people are asking or want to learn more about.
- Ask Your Audience
What better place to ask for feedback than your own group of raving fans.
If you have an email list, consider sending them a survey asking them what topics they’d like you to cover.
- Ask Your Friends
Don’t have an audience? Don’t worry, you can go ahead and ask your friends.
In fact, this is what I did when I started my fitness website.
I personally messaged over 100 of my friends to ask them what their biggest struggle was when it came to losing weight and staying fit.
That’s also how I got my first 100 subscribers.
And yes, I messaged them individually instead of sending a broadcast.
This takes more time but it’ll get you better results as they’ll see that you care about them and their feedback.
Which you should… because they’re your friends!
If you take the time to message them, they’ll gladly take the time to give you feedback.
People send broadcast messages, requests, and invitations all the time so it’s second nature to just ignore those.
Don’t Skip the Details
You want to be their one-stop shop, so make sure you write an in-depth blog post.
Add all the relevant information you think they’ll find useful, don’t just add fluff.
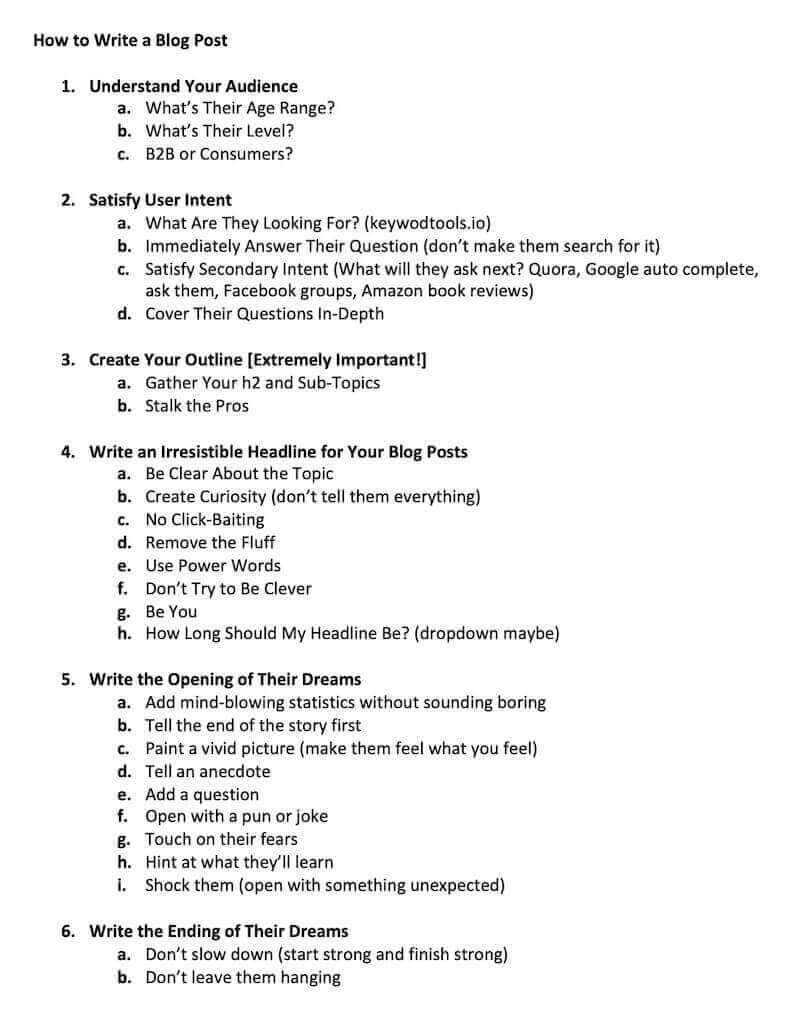
Step 3: Create Your Outline
When learning how to write a blog post, you must create your outline first.
An outline allows you to categorize the main points and organize paragraphs into an order that makes sense.
This saves you a TON of time during the writing process as it prevents you from:
- Bouncing between ideas and not writing effectively
- Mentioning things twice
- Forgetting important subtopics or examples
- Forgetting to add some related keywords
This is especially important if you’re writing long-form blog posts.
To create an outline, you need to gather your headings (H2s) and subtopics.
Here’s how to do it:
1. Stalk the Pros
Search for the keyword you plan to write about and see who’s ranking on the first page of Google.
Then, see what their headings (H2s) are, and pick the most relevant ones.
You won’t be copying their H2s or content, you just want to get some ideas to outline yours.
You’ll be adding your own twists and experiences in your blog post.
2. Use Google Suggestions
To find long-tail keywords, check out Google’s “People also searched for” and “Related topics for *your keyword*” sections.
If you’re following this blog post in order, you should have this already.
3. Write It in Google Docs or Word
After you’ve gathered your headings and subtopics, you should have something like the image below:
Step 4: Write a Catchy Blog Post Title
Could you imagine spending hours writing an amazing blog post just to have no one click through to read it?
Yeap, that’d be terrible.
That’s why you must write awesome title that makes people want to see that’s on the other side.
Here are 9 rules to help you write an awesome title for your blog posts:
1. Be Clear About Your Topic
When writing your blog post’s title, include your keyword so that people know exactly what topic you’re going to cover.
Plus, it always helps with SEO.
2. Shh… Don’t Tell Them Everything
While you want to be clear about the topic of your blog post, you don’t want to give everything away.
You must create curiosity for people to want to click through.
How to Write a Blog Post Title That Creates Curiosity
Curiosity titles might be a little tricky to write depending on the topic. But don’t worry, here are a few tips to help you write one:
- Challenge traditional wisdom – a great way to create curiosity is to go against what most people believe. Just make sure that you have resources and data to back up your claims.
- Tease the reader – another rule for creating curiosity is not to give them the answer as soon as they visit your blog post. Tease out the reader’s curiosity in stages.
- Look for examples – pay attention to the blog post titles you see every day and study the ones that pull you in. Then, use something similar with your own titles. But again, make sure that you deliver what you advertise.
EXAMPLES:
Let’s look at two actual examples and analyze them.
Are Vegetables Making You Gain Weight?
This title creates curiosity because veggies are considered healthy and are eaten in bulk by people wanting to lose weight.
The thing is, eating too many veggies (fiber) can cause constipation and bloating, which leads to weight gain.
So don’t worry it’s not a “click-bait” title (more on this later).
Can’t Find Your Soulmate? Stop Doing These Things
This other title creates curiosity for those who are still single but want to find the perfect partner.
Are they looking for their soulmates in the wrong places? Are they doing something that’s scaring their partners away?
I guess they’ll have to click through to find out.
3. No Click-Baiting
You don’t want to sacrifice your brand’s reputation for a few clicks.
Plus, if you don’t deliver what you promised in the title, those clicks are not going to end in a sale or sign-up anyway.
If you want to build a successful blog, you must build trust with your audience and have them see you as an authority, not a sketchy person looking for clicks.
EXAMPLE:
Here’s another way I could’ve phrase the title for the vegetables post:
Vegetables Are Bad for You
That title definitely creates curiosity, but it simply isn’t true.
Eating too many vegetables can cause some temporary discomfort, but they’re not bad and most people will be okay eating them.
4. Put Yourself in Their Shoes
There was a point in your life when you were looking for the same things they are.
Think about things that got your attention and things you wanted to learn when you were starting out.
Try to remember topics that made you go… aha!
5. Add Numbers
Update your article titles to the current year so that people can see that your content is still relevant and not outdated.
Needless to say, you must make sure that everything inside the blog post is actually up-to-date.
EXAMPLE:
Best WordPress Themes in 2020
How to write a Blog Post in 2020
6. Don’t Be Afraid of Parentheses
Is there something extra your blog post has that others don’t? Use a parenthesis or brackets to let visitors know that.
EXAMPLE:
If you write a blog post titled “How to Lose Weight Fast,” you could add a time frame in parenthesis.
Something like:
How to Lose Weight Fast [50 Pounds in 1 Day]
Or let’s say you found during your keyword research that people were also looking for a meal plan.
In that case, you could write something like:
How to Lose Weight Fast [With 7-Day Meal Plan]
7. Keep Headlines Short

You should keep your headlines between 4 to 6 words or 40 to 60 characters.
This, however, will depend on your style and what your audience likes. So use it only as a guideline.
8. Use Power Words
Don’t add unnecessary words that add no value to your reader.
Instead, add powerful words to incentivize your reader to take action and see what amazing goodies are behind that link.
Here’s a list of power words for your headlines:
| Persuasive | Happiness | Trust | Fear |
| Amazing | Alive | Reliable | Agony |
| Astounding | Ecstatic | Faithful | Lunatic |
| Brilliant | Inspiring | Scientific | Despair |
| Life-changing | Light | Facts | Anxious |
| Marvelous | Profound | Absolutely | Miserable |
| Surprise | Sadness | Excitement | Greed |
| Mind-blowing | Tearful | Exciting | Affordable |
| Spectacular | Heartbroken | Fasinating | Budget |
| Remarkable | Devastating | Intriguing | Bargain |
| Astonishing | Sadly | Thrilling | Bonus |
| Terrific | Deceptive | Bold | Unlimited |
9. Don’t Be Clever
Write a blog post headline that makes sense to everyone who sees it regardless of their age, location, or experience level.
Again, be clear on what they’ll get once they visit your blog post.
Don’t use frankenwords, slang, rhymes, metaphors, or anything that might affect clarity.
10. Be Yourself
Do you want to write a blog post title that’s more serious? Then go for it!
Do you want to write a blog post title that’s more fun and exciting? So be it!
At the end of the day, you want to write in a way that feels comfortable and natural to you.
Some people will like it, other might not. But you won’t be able to please everyone.
So don’t stress too much about it.
Step 5: Write an Amazing Opening
Now that you’ve got your readers inside your blog post, you must make sure they stay there.
At least until they’ve finished reading.
But this is one of the toughest things to do. You need to craft a captivating and intriguing introduction.
Here’s how to write a blog post with a great introduction:
1. Add Mind-Blowing Statistics or Facts
When learning how to write a blog post, many beginner bloggers start their posts with statistics or facts.
While this is okay, there are some rules you must follow to make the most out of this type of introduction.
2. Open With Interesting Facts
When opening up with statistics or facts, you must make sure they’re actually interesting, because not all of them are.
EXAMPLE:
Here’s a boring way to start a blog post about weight loss:
According to the NHANES 2016 statistics, 39.6% of American adults are were obese.
Why isn’t this good?
Because most people are aware that obesity is a problem in the US and don’t see that as anything new or mind-blowing.
A better way to open the blog post would be:
Did you know that 70% of people who lose weight gain it back within a year, 85% within 2, and 95% within 3? But not you, because you’re about to learn how to keep the weight off!
What makes this opening great is that not many people are aware of this fact.
And I case you were wondering… yes, those are actual statistics.
3. Use Facts Unrelated to Your Topic
Another great way to open a blog post is to use an unrelated statistic and somehow connect it to your topic.
EXAMPLE:
Let’s say you’re writing a blog post on how to increase website traffic.
You could start with something like this:
A Lamborghini can reach a speed of 220 mph, and go from 0 – 60 in 2.9 seconds. Let’s hope your web traffic increases that fast!
4. Spoil the Ending of The Story
Find a way to tell the end of the story without ruining the surprise or saying how you got there.
EXAMPLE:
I increased my traffic by 200% and almost fell off my chair when I found out. I even surpassed my original traffic goal. All thanks to sending a few emails.
The above example tells you what happened without giving too much away.
Even though I tell you how much my traffic increased and hint at what I did, I don’t go into specifics.
I don’t tell you what was inside those emails or who I sent them to.
Plus, a 200% increase in traffic is impressive for those looking to get more leads.
A boring way of saying this would have been:
After 8 long months of A/B testing over 10 strategies to bring traffic to my website, I finally reached a 200% increase. The best technique was Guest Blogging.
The problem with this second introduction is that there’s jargon (A/B testing) and I gave away what the blog post’s about (A/B testing traffic building strategies).
Plus, I tell you that the best strategy was sending guest post pitches to other bloggers.
5. Paint a Vivid Picture
Help your visitors imagine what they’re reading and drag them into your story.
This is how I started this blog post; I added a lot of imagery.
First, I mentioned a puppy playing with everything it could find. I’m sure you’ve seen those cute puppy videos on Facebook or Instagram.
Then, I talked about a fictional pre-writing routine to get inspiration.
I even added a photo of me spilling coffee. But don’t worry, you don’t have to go to that extreme.
6. Tell an Anecdote
By telling an anecdote, you can resonate with your reader.
Share something that happened to you, in your life. This will make you the expert on how to apply the story.
People are more interested in learning about the failures and successes of people like them than celebrities or big business owners.
They’ll resonate better if you told them how you went from $0 to $100,000 in one year than telling them how Lebron did it in one week.
7. Open With a Pun or Joke
Show them that you’re a normal person and not a big company putting out content just to make some profit.
I love starting my blog posts with jokes and puns, that’s just my personality.
EXAMPLE:
In my blog post titled: “The Best Ad Networks for Bloggers,” I start off by asking my readers this question:
Why does Marvel love using the Hulk for advertisement?
…
Because he’s basically a giant Banner!
So don’t be afraid of being yourself once in a while.
8. Ask a Thought-Provoking Question
Just like my previous example, my blog post opener was both a question and a joke.
When someone asks you a question, you almost can’t help but to think of an answer.
Your reader will do the same.
Don’t ask easy questions that can be answer with a “yes” or “no,” make them dig deep into their brains and think.
Try to make the question relevant to the topic of your blog post.
EXAMPLE:
If you could only write blog posts about one topic for the rest of your life, what topic would it be?
This opening question is great because it encourages the reader to think about all the niches he/she is interested in and come up with an answer.
Would you enjoy writing blog posts about *your niche* for the rest of your life?
This second question can be answered with a simple yes or no. It isn’t a thought-provoking question.
9. Ask a Multiple-Choice Question
Another great way to open a blog post is to do so with a multiple-choice question. It makes them feel like they’re responding to a poll.
EXAMPLE:
Here’s an opening I wrote for a blog post on my fitness website:
Pop quiz! How many calories does the average restaurant meal contain?
a) 1,200 calories
b) 400 calories
c) 800 calories
d) Calories are a mythIf you answered 400 calories, please let me know which restaurants you go to, I would love to go eat there.
The correct answer is 1,200 calories!
The blog post’s title is “5 Tips to Keep Your Calories Low When Eating Out,” so it was relevant to my readers.
Remember, you want your questions to be relevant to your blog post’s topic.
10. Touch on Their Fears
Chances are, people landed on your blog post because they fear something.
How to Double Your Traffic in 1 Month
People looking at this might be afraid of not being able to get traffic and make their business succeed.
Stop Looking for Your Soulmate in the Wrong Places
Those clicking on this headline have a fear of ending up alone.
Fear is used by many marketers as a way to get people to buy their products, why? Because it works.
Now, you don’t want to be a sketchy person.
When you trigger fear, your blog post should provide a solution to their problem and take those fears away from them.
EXAMPLE:
…but maybe you’re right. Maybe you don’t have the genetics and metabolism to reach your goal weight.
So, when writing a blog post’s introduction, you want to make sure to touch on their fears.
11. Write Your Blog Post Introduction Last
When learning how to write a blog post, many beginners feel like they need to start from the top and can’t move down until they finish the current section.
The thing is, you don’t know exactly what you’re going to talk about until you start writing the body of your blog post.
It’s easier to write the introduction once you’ve finished writing the meat and potatoes of your blog post.
You can’t introduce someone you haven’t met.
12. Hint at What They’ll Learn
Your introduction should end with a clear vision of the place your readers will get after learning your techniques.
But remember, don’t give it all away.
You can tell them what will happen, but not how it’ll happen. To learn the how, they must read the blog post.
EXAMPLE:
Writing lots of short blog posts hoping one of them goes viral and gets you lots of traffic is ludicrous.
There are better and more efficient ways to increase website traffic.
This will definitely make your reader want to keep on reading.
13. Shock Them
While there’s a lot of information on the internet, some of it might or might not be true. However, there are always a few topics that most people agree on.
Find topics in your niche that are conventional wisdom and challenge them.
EXAMPLE:
Most blogging experts say that you should write blog posts with more than 3,000 words if you want to rank in Google.
But this isn’t necessarily true, so you could open up with something like this:
After analyzing thousands of websites, we found that writing blog posts with less than 3,000 words generate the more social shares and increases traffic, which boosts your Google rankings.
You could also write something like this:
Are 3,000+ words blog posts really better for SEO?
Step 6: Finish Off Strong
When learning how to write a blog post, many beginner bloggers make the mistake of writing a weak ending.
In fact, even expert bloggers do this.
They seem to be hyped at the beginning but as they approach the end, it feels like they’re just adding paragraphs to reach a word count.
It shouldn’t be this way.
Remember, readers have the attention span of a puppy.
And if one of those puppies makes it to the end, you better reward them with an EPIC ending.
Here’s how to write a blog post ending that’s epic:
1. Recap Your Most Important Points
If you tend to write long-form content, it might be hard to remember everything you’ve covered.
Make it easier for the reader and write a few lines or paragraphs describing the key takeaways.
Now, you want to do this in an engaging way, don’t just repeat everything they just read.
EXAMPLE:
To increase your traffic by 200% in the next month, you must send one guest post pitch every day to websites with high domain authority relevant to your niche.
2. Add a Call to Action
The ending of your blog post is the perfect place for a call to action.
Why?
Because if someone has made it this far down your post, it means they’re highly engaged and ready to take action.
Use this opportunity to persuade them into signing up for your freebie.
EXAMPLE:
You’re busy, I get it.
I know learning how to write blog posts can be time-consuming. And that’s why I’ve created these blog post templates for you.
You’ll be able to write engaging and high-converting blog posts faster than Stanley gets in line for Pretzel Day.

3. Ask a Question to Encourage Comments
Not only can you start with a question, but you can also end with one.
Asking questions at the end of your blog posts are a great way to keep the conversation going.
Just like opening question, ending question should be thought-provoking.
Also, keep it to one or maybe two questions tops.
If people see too many questions, they’re going have a hard time choosing which one to answer and end up leaving.
You want to do the thinking for them.
I personally like posting only one question.
EXAMPLE:
What’s your biggest challenge when it comes to learning how to write a blog post?
4. Don’t Leave Them Hanging
I know it’s normal for TV shows to leave us with a cliffhanger so we have tune in later to find out what happens.
But not for bloggers. Don’t do this to your audience.
Always give them a satisfying answer to what you promised them on your blog post’s introduction.
What you can do is suggest additional related reading, but don’t make them bounce from blog post to blog post to find an answer to their problem.
Step 7: Make Your Blog Posts Easy to Read
A great way to send your visitors packing is to greet them with a 10,000-word academic essay with no separation between sections, tiny font, and unformatted images.
When learning how to write a blog post, you must keep the following things in mind to make it readable:
1. Subheadings are Your Best Friend
If you’ve been following this blog post step-by-step, you should already have your subheadings from step 3 (Create Your Content Outline).
Making use of subheadings is one of the most important things when learning how to write a blog post.
They will allow your readers to stop and catch a breath.
It will also help them know when they’ve moved to a different section.
Here are a few subheading rules you want to keep in mind when writing a blog post:
- Add them every few paragraphs – you should not go over 300 words without adding a subheading. That’s like watching all the Harry Potter movies without taking a bathroom break. Remember, you can add different heading levels, not just h2.
- Make them interesting – the rules for writing a great subheading are the same as writing a great blog post title. You want to create curiosity and make them want to read more about it. Don’t give everything away.
- Don’t abuse the curiosity advice – while you want to create curiosity, don’t do so at the expense of clarity.
EXAMPLE:
Let’s say you’re writing a blog post about how to lose weight and these are your subheadings:
1. Benefits of Losing Weight
2. Do 30 Minutes of Cardio Every Day
3. Don’t Eat Sugar
The first subheading is to simple and broad, the second gives everything away, and the third doesn’t create curiosity (that’s the most common weight loss advice).
Instead, you could write something like this:
1. Three Health Risks Losing Weight Will Reduce
2. How to Lose Weight Without Dieting
3. “Healthy” Foods That Are Making You Gain Weight
The first one is now more specific as it touches on health risks instead of just benefits.
The second one talks about losing weight without dieting but doesn’t tell you how. Under that subheading, you can add the advice to do 30 minutes of cardio each day.
The third one creates curiosity. It makes the reader wonder what those foods are.
2. Stick to Your Format
What type of blog post are you writing?
Is it a how-to guide, listicle, review, or science-based article?
Whatever it is, you must make sure that you stay consistent throughout the whole post.
Failure to do so will make your readers think that you just slapped a bunch of random sections together.
Don’t try to create a Frankenpost.
EXAMPLE:
Let’s say you want to write a blog post titled “10 Tips to Lose Weight Without Exercise” and come up with the following outline:
- Eat More Vegetables
- Walk 30 Minutes Every Morning
- Drink More Water
- Why Drinking Tea is Great for Weight Loss
See how the last point, while related to the post, creates a disconnect and ruins the flow?
A better way to write that last point would be:
- Drink 1 Cup of Tea Every Night
Make sure that you start each subheading with the same action as the others.
3. Keep Your Post Consistent
Every section in your blog post must be kept within the same length and include the same elements.
EXAMPLE:
Let’s keep using out “10 Tips to lose Weight Without Exercise” example from above.
If the first tip you write is two paragraphs long, the second is six, and the third is one, you can make your work look sloppy.
Step 8: Make Your Blog Posts Scannable
Less than 20% of people read blog posts word for word. Most people scan, and I’m pretty sure you’re one of them.
Don’t worry, I am too.
The first thing I do when I land on a blog post is look at the headings and any bold letters and images I can find.
If I see it’s relevant, I go ahead a read it.
Here’s how to write a blog post that’s scannable:
1. Keep Sentences and Paragraphs Short
Short sentences are easier to read and less complicated to understand.
Also, consider keeping your paragraphs between 2-4 sentences long and adding a few one-liners to grab the eye.
This is especially important now that more people are reading content on their phones.
Look at this blog post, most paragraphs are just 2-3 sentences long.
2. Use Simple Words
Another mistake beginner bloggers make when writing blog posts is using jargon to sound smart.
If your content is great and provides value to your reader, you don’t have to worry about sounding smart.
Use common and simple words to convey your message.
3. Load up on Bullet Points
If you’re writing a list of things, consider using bullet points instead of cramming everything in a sentence.
Bullet points will make your message clearer and easier to scan.
4. Emphasize Important Messages
Use bold letters, italics, or color highlights to emphasize important words or key takeaways in your paragraphs.
But don’t overdo it.
If you have too many things fighting for attention, you’ll end up confusing your reader.
I’ve seen this so many times, even in blog posts written by big bloggers.
5. Add Infographics
A picture is worth a thousand words, right?
Use infographics as a fun way to present your message and get your visitors attention.
Step 9: Create a Beautiful and Easy-to-Navigate Design
Humans are visual creatures. Most of us process information based on what we see.
An unprofessional looking website design can give people the wrong impression about you. People will stop trusting you and seeing you as an authority.
The quality of your website design should match your blog post’s quality.
So it’s important that you take this into consideration when learning how to write a blog post.
Drag them in with a visually appealing site.
Here’s how to create a blog post that’s visually appealing:
1. Use Images
Images are great to grab your visitors’ attention and convey a message.
You can also use them to break paragraphs.
When using images, though, make sure to not over use them or pick unrelated images.
Here are a few places you can find free images:
I suggest using images from Unsplash as they are more “natural-looking” than free generic stock photos.
2. Be Conscious About Your Layout
Put your most important elements towards the top, and only use the sidebar to put valuable information to your readers.
Don’t pack your sidebar with unrelated recent posts, opt-ins, ads, and social sharing buttons.
Not only can this slow your site, but also distract your user.
Plus, if most of your audience is visiting from their phones, they won’t even see it unless they scroll all the way to the end.
3. Don’t Forget About Margins and Spacing
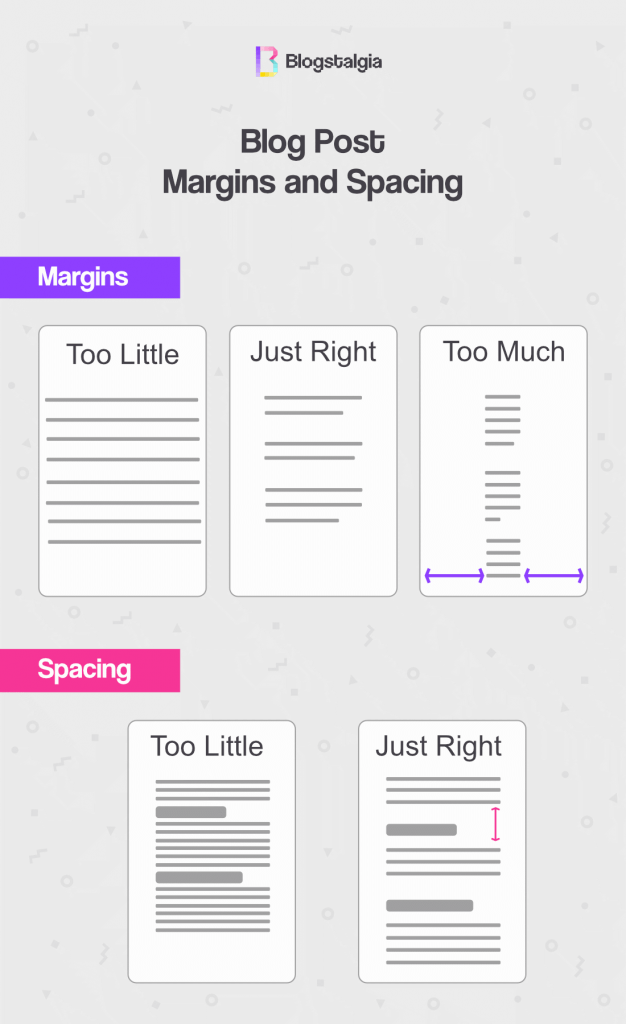
Margins are the blank spaces along the sides of your blog posts.
Tiny margins can make your content look like a bunch of single lines while big margins can make it look crammed.
Test out different sizes and see what looks the best.
Spacing is the white space between lines and paragraphs. Proper spacing will make your design easier to read.
Step 10: Make Your Site Responsive Across Devices
When you’re a beginner blogger learning how to write a blog post, it’s easy to forget about making it responsive.
I see a lot of beginners starting with themes that are not mobile responsive or require some extra work from their part, which can be overwhelming.

A great theme should be responsive without you having to change anything at all.
I personally love GeneratePress, and it’s the theme I use on both of my websites. (my review)
Not only is it mobile responsive, but it’s one of the lightest and fasted themes currently available, especially on mobile.
Tom, the lead developer, and his team are always on top of everything.

I’ve designed both of my sites myself without hiring a web designer.
You can check my article on the best WordPress themes here.
Step 11: Choose Quality Over Quantity
When learning how to write a blog post, a mistake many beginner bloggers make (and even some pros) is writing long-form content for the sake of “ranking” in Google.
Truth is, the length of your blog post depends on your target keyword and niche.
The easiest way to find out the perfect length is to google your keyword.
After that, check the blog posts that are ranking and see how many words they have.
Your word count should be around theirs. You can maybe add 300-400 words or some infographics to make it better.
Don’t just add random fluff.
If you write a quality post that people love, they’ll share it and potentially link back to it.
Google will see that and slowly increase your rankings.
Step 12: Use Numbers When Talking Data
Have you ever read a blog post or bought a course where the creator said things like:
When you start getting enough traffic, you can begin testing different opt-ins.
Like, okay… but what’s considered enough? Is it 10 visitors per day? 500? 1,000?
When talking about data, make sure to be specific. Give people a baseline or something to compare their numbers to.
A better way to convey the above information would be:
When you start getting around 500 sessions per day, you can begin testing different opt-ins.
Step 13: Write With a Purpose
When learning how to write a blog post, you must keep your goal in mind.
What’s the purpose of this particular piece you’re writing?
Is it to get subscribers? Sell an affiliate product? Promote your podcast? Get followers on social media? Sell your products? Gain backlinks?
This will help you tailor your post to help you achieve the end goal.
However, if you believe a particular blog post will be useful to your audience, but doesn’t serve any other purpose, you should still write it.
As I’ve mentioned before, it’s about your audience, not you.
While most of your content should have a purpose, don’t shy away from helping your readers out just because you can’t get anything out of it.
They’ll appreciate and trust you if you’re genuinely trying to help them, which is very rare nowadays.
How to Write a Blog Post for SEO (On-Page SEO)
Now that we’ve covered everything about how to write a blog post that’s engaging and user-friendly, I’d like to quickly go over on-page SEO.
Here are a few on-page SEO best practices:
1. Add Your Keyword to the Post Title
Make sure that you add your main keyword in the blog post title. The closer to the beginning, the better.
2. Keep Your URL Slug Short & Descriptive
For example, if your blog post title is “How to Lose Weight Fast,” your URL slug could be
YourWebsite.com/lose-weight-fast/
Instead of
YourWebsite.com/how-to-lose-weight-fast/
Or
YourWebsite.com/433-25-sfbci/
To change the default format of your URL slug, simply log in to your WordPress dashboard > Settings > Permalinks > “select Post name” > Save Changes.
3. Include Your Keyword Close to the Start
When writing a search engine optimized blog post, include your keyword within the first 200 words of your post.
4. Add Other Related Keywords
Remember the other keywords you found when creating the outline of your blog post?
Well, you want to add those throughout your post where it makes sense (don’t overdo it).
5. Add Internal Links
It’s good SEO practice to link to other related articles you’ve written. Not only will this reduce your bounce rate, but also help pass “link juice” from one page to another.
Bounce rate is a metric that measures the percentage of people who land on your site and leave without taking any other action, such as viewing other pages or signing up for an opt-in.
Link juice is a term used in SEO to refer to the value passed from one page or site to another. This value is passed through hyperlinks.
Search engines view links as “votes” by other websites that your page is valuable.
6. Add External Links
Make sure to link to high-authority sites to support any claims you’re making. Especially if you’re going against conventional wisdom.
7. Don’t Forget Alt Texts and Image Titles
Always add relevant and descriptive alt texts and titles to your images. Google reads all of these things to understand what your page is about.
Editing and Publishing Your Blog Post
1. Take a Break
For real, don’t try to check your masterpiece right after you’ve finished writing it.
Set aside your blog post for a day before editing and checking it.
That way, you can come back to it with fresh eyes and catch any errors more easily.
2. Embrace the Ugly First Draft
When learning how to write a blog post, don’t expect too much of yourself the first time out.
Crafting an awesome piece of content will take some editing and adjusting.
Both beginner and expert bloggers have terrible first drafts, but that’s just part of the game.
So don’t get discouraged.
3. Accept That Your Blog Post Will Never Be Perfect
I often see beginner bloggers mention they’re afraid to hit publish because they think they can do better.
And you know what?
They’re right…
You can always improve something and make it better.
But it’s unlikely that your blog post will ever be “perfect,” and you need to be okay with this.
Now, this doesn’t mean you should write and publish a sloppy blog post, it means you shouldn’t be too hard on yourself.
Besides, it’s a blog post, not a book.
You can always come back and make changes if you want, even after publishing it.
4. Publish at the Right Time
While publishing a blog post at the right time isn’t the best way to increase overall traffic, it can give you a tiny boost.
Between 8 am and 11 am EST seems to be the best time to publish a blog post for more traffic, according to Kissmetrics.
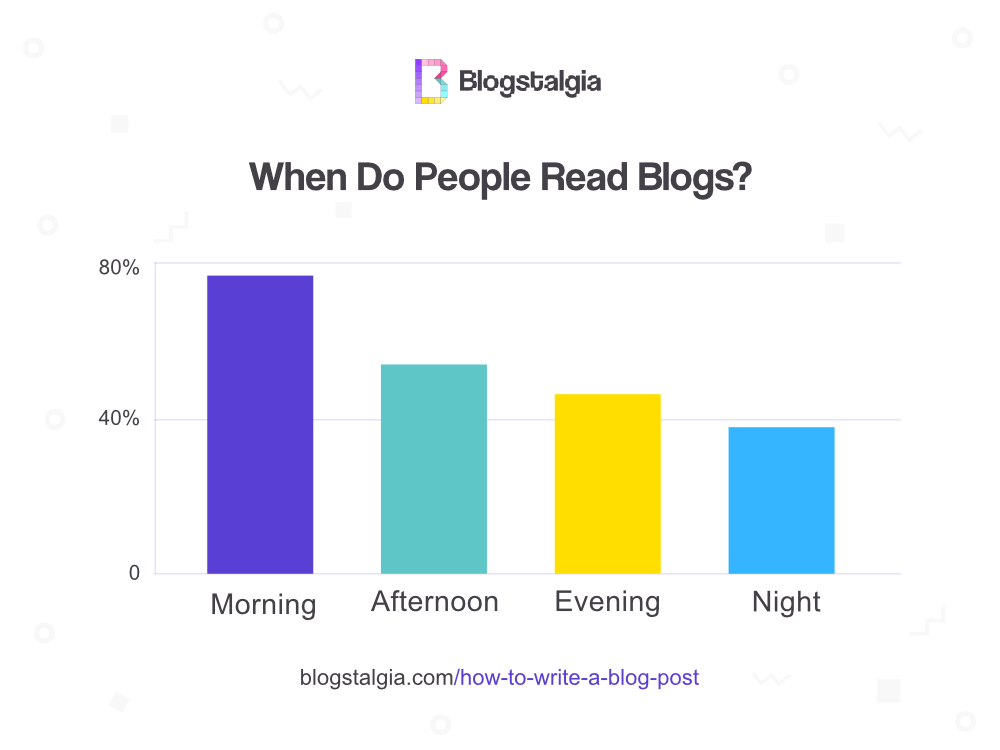
However, this will depend on your niche, the location of your audience, and your traffic source.
For example, my fitness blog actually gets the most traffic between 8 pm and 1 am ET.
But my traffic doesn’t come Google only, about half of it comes from Pinterest.
My recommendation is to test it out yourself.
If you don’t have an audience yet, start out by posting in the morning and see how it goes.
But again, this isn’t something to stress about. Ranking in Google is a long-term game, the timing of your post won’t make much difference.
How to Write a Blog Post Fast
I’m not going to lie, writing high-quality content can take a lot of time.
Especially if you have a full-time job, kids to take care of, or school assignments to finish.
But don’t worry, here are a few tips to help you learn how to write a blog post faster:
1. Research First, Write Second
“The harder the think, the easier the ink.”
I don’t remember exactly where I saw this quote, but it’s completely true.
The more time you spend researching your blog post, taking notes, and getting all the information you need, the easier will be to write it.
That’s why I mentioned how crucial it is that you make a great outline.
2. Don’t Stop Writing
Once you start writing your first draft, make sure that you don’t stop.
If at some point you feel the need to go fact check something, just mark it and keep writing.
You can come back to it after you’re done writing.
This will help prevent you from losing momentum and cutting your inspiration.
3. Don’t Write and Edit at the Same Time
Not going to lie – I used to be guilty of this, especially when writing shorter blog posts.
Here’s what my process used to look like:
Write paragraph 1
Edit paragraph 1Write paragraph 2
Edit paragraph 2Make sure that paragraph 1 and 2 flow well
Edit both paragraphsWrite paragraph 3
Edit paragraph 3Make sure that paragraph 3 flows with paragraphs 1 and 2
This was extremely inefficient and time-consuming.
The best thing you can do is sit down and write your first draft without stopping after every sentence to optimize it.
After that’s done, you can go ahead and make the edits.
4. Write Your Introduction Last
You can’t write a great introduction without knowing exactly what your blog post’s about.
Yes, you have an outline, but you still don’t know what the body’s going to be like.
If you write the introduction first, I can almost guarantee that you’ll change it and tweak it after you’re done writing your blog post.
5. Write Every Day
One of the best tips for learning how to write a blog post fast is to make writing a habit.
And to make it a habit, you must write every day, not just once a week.
You don’t have to write a lot, just write often.
Setting aside 30 minutes each day to write is far better than writing for 5 hours just one day a week.
Doing something once a week isn’t really a habit. And it’ll be just a matter of time until you stop doing it altogether.
6. Set a Timer
I love setting a timer on my computer for one hour and fifteen minutes.
I write without any distractions during that time and then take a 15-minute break when the timer goes off.
After the break is over, I repeat.
Most people do this with shorter times, though.
Between 25 to 45 minutes of work followed by 5 minutes of rest and then repeat four times.
This is called the Pomodoro technique.
The reason I go for one hour and fifteen minutes instead is that that’s how long most of my classes in college were.
7. Learn to Take a Break
I understand you want to get stuff done. I respect the grind, trust me.
But sometimes you can get burned out and be super unproductive.
Learn to step back whenever you need to, and don’t be afraid to take a few days off.
Have you been starting at the computer screen for several hours without writing anything?
Better just take a break, relax, and come back later.
Free Blog Post Templates
I know learning how to write a blog post fast can be a pain sometimes.
That’s why I’ve made 4 free blog post templates for you to use.
The file includes a template for:
- “How-to” blog posts
- Pillar blog posts
- “What is” blog posts
- List blog posts
Final Thoughts on How to Write a Blog Post
Learning how to write a blog post can be overwhelming, but once you’ve practiced enough, you’ll see how cool and enjoyable it is.
Besides, if you’re going to be a blogger, you should at least like writing a little bit.
I’m not a perfect writer.
English isn’t my native language, and my background is in engineering so my writing can sometimes come out a little technical.
But the more I write, the better I get.
I just know that I love helping others and sharing my knowledge.
Now, before closing out this post, I’m going to leave you with a quick summary of what you’ve learned today.
- Understand your audience – know their expertise level, age range, and whether they’re businesses or regular consumers.
- Satisfy user intent – don’t wait to show them what they came to see.
- Satisfy secondary intent – answer other questions they might have.
- Create your outline – do keyword research to find your headings and subheadings.
- Write an Irresistible Headline – create curiosity, be clear about the topic, and keep it short and sweet.
- Write a great opening – open with an anecdote or question, touch on their fears, tell the end of the story first, or add mind-blowing statistics.
- End strong – add a call to action or ask them a question, but don’t ever leave them hanging.
- Make your blog posts easy to read – use subheadings, stick to your format, and keep your blog posts consistent.
- Make it scannable – use bullet points, subheadings, infographics, bold letters, italics, or color highlights.
- Create a beautiful design – build a great layout, choose the right font type and size, and use margins and spacings.
- Make your blog posts responsive across devices – more and more people are consuming content on tablets and phones, so make sure that your website looks great on all of them. My choice of a responsive theme is GeneratePress.
- Quality over quantity – don’t fill your blog post with useless information just to reach a specific word count.
- Use numbers – be specific when talking about data. Don’t use phrases like “once you get enough” or “a decent amount,” be specific.
- Write with a purpose – are you looking to gain subscribers? Sell an affiliate product? Have people follow you on other platforms? Sign up for your podcast?
- Write a blog post for SEO – don’t forget to add other related keywords, alt texts, and titles to your images.
Phew! Okay, I think that was it.
Writing this blog post on how to write a blog post (forgive me for being so meta) took me about 40 hours, and that’s without adding or creating the graphics.
I hope you enjoyed it and make good use of it.
If you have any other tips, let me know in the comments section below!

This is such an informative and well-written article! We appreciate the thorough research that went into this. Thanks for sharing your knowledge!