
If you’re a beginner, creating a WordPress website and navigating the dashboard might seem super complicated, but I promise it’s easier than it looks.

In fact, the whole point of using a content management system (CMS) like WordPress is that you can build and manage your website without needing to know anything about programming.
In this WordPress tutorial for beginners, we’ll go through the steps for creating a professional, fast-loading, and secure WordPress website for your business.
Contents
- How to get a domain name and web hosting
- How to install WordPress
- Front end vs. back end
- How to log in to WordPress
- How to navigate the dashboard
- How to install WordPress themes
- How to customize your WordPress theme
- How to install WordPress plugins
- How to create WordPress pages
- How to create blog posts
- How to create WordPress categories and tags
- How to create WordPress menus
- How to improve WordPress speed
- How to improve WordPress security
- How to update WordPress
- How to backup WordPress
Absolutely, the platform itself should be easy to navigate for a beginner. If it wasn’t, it wouldn’t be powering almost 40% of all websites on the internet!
In this WordPress tutorial, I’ll go over each section of your WordPress dashboard so you know exactly what they do.
I’ll also go over some recommendations and best practices for managing your blog.
In short, WordPress is the simplest and most popular way to create your own website, blog, or e-Commerce store.
If you’re more of a techie person, then WordPress is an open-source content management system (CMS).
This means that anyone can use or modify the WordPress software for free.
A content management system is a tool that lets you build and manage a website without having to know anything about coding.
Using the platform itself isn’t really difficult and can be learned quickly.
It will take you about 45-60 minutes to go through this WordPress tutorial. You can keep referring back to it if you need help with a specific section.
Well, this is what this WordPress tutorial it’s all about!
It took me a few weeks to write this so I hope you enjoy it, and if there’s something you’d like me to add, let me know in the comments section at the end of this article!
How to Get a Domain Name & Web Hosting
The first thing we’ll cover in this WordPress tutorial is getting your domain name and web hosting.
- Domain Name – the address people will type into their browsers to visit your site. For example, blogstalgia.com is my domain name.
- Web Hosting – this is the space where your website lives on the internet. Think of your website as a house, your domain name as the address, and web hosting as the plot of land.
In this tutorial, we’ll be getting our domain name from Google Domains and hosting from NameHero.
I do get a small commission at no extra cost to you if you purchase NameHero using this link.
This helps me maintain this site and keep providing others like you with free guides and tutorials.
Plus, it’ll create good blogging karma for you ?
Registering Your Domain Name
As I mentioned earlier, we’ll be using Google Domains, and here’s why:
- It’s good – everything runs through Google’s Cloud DNS.
- It’s cheap – no hidden fees or expensive renewal prices. You pay the same every year.
- Separate hosting and domain – it’s good practice to keep your domain and email separate from your hosting provider.
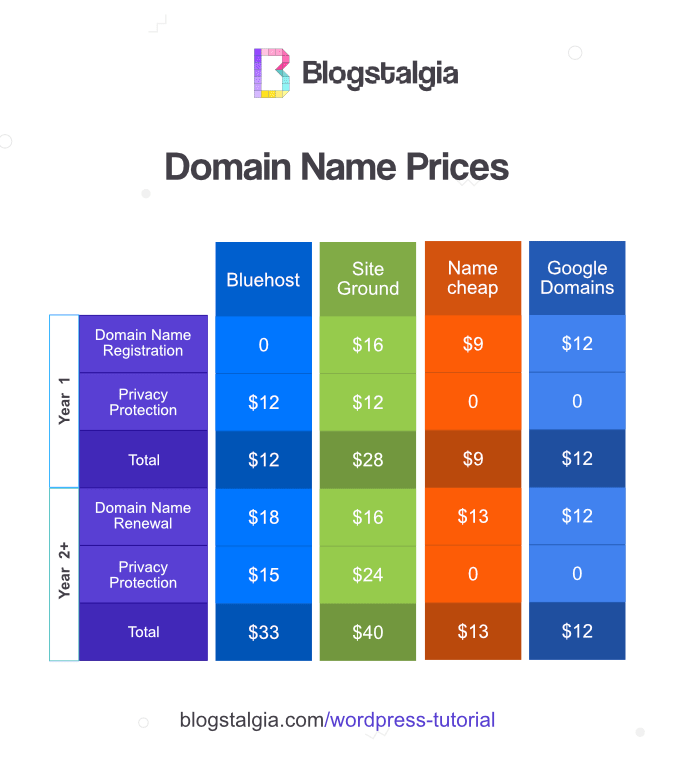
- Has free privacy protection – without privacy protection, all your personal information will be available on the internet, and you will receive tons of calls, texts, and emails from marketers trying to sell you stuff.
A lot of hosting companies offer free domain name registration; however, they make you pay a lot for privacy protection, and their renewal rates are 2-3x more expensive than Google Domains.
Namecheap is also a pretty good and popular one.
Regardless of which one you choose, the registration process will be the same. The only difference is that the user interface will look a little different.
Here’s how to register with Google Domains:
STEP #1 – Go to Google Domains
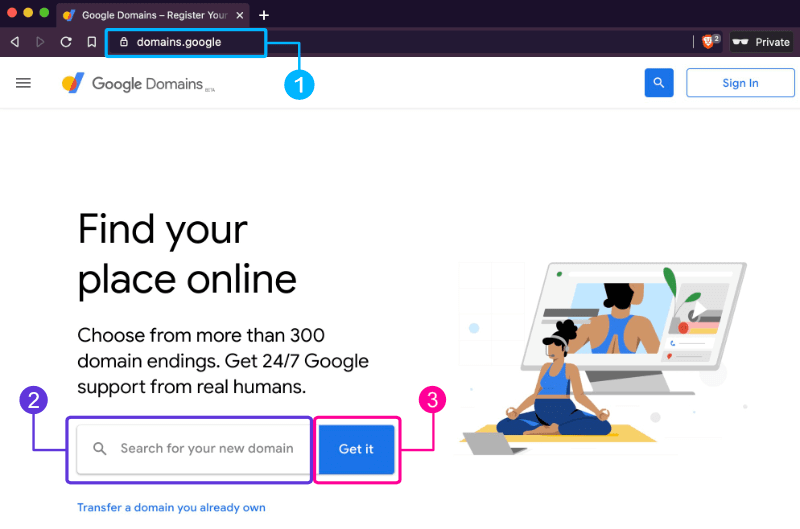
- Go to domains.google
- Type in the domain name you’d like
- Click on “Get it”
STEP #2 – Select Extension & Add to Cart
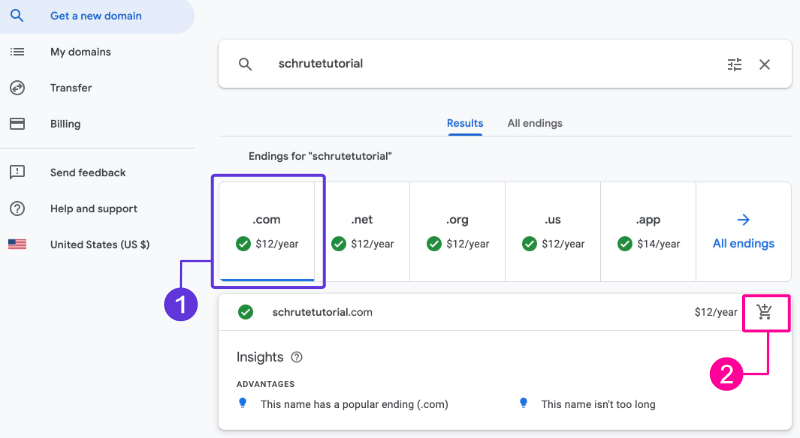
- Select the extension(s) you’d like to buy. I always recommend going with “.com.”
- Click on the little cart with the “+” icon
If the “.com” extension of your domain name is already taken, which probably will, it might be tempting to go for a different one like “.net.”
However, I highly recommend you find a different name with the “.com” extension instead.
By default, most people will search for your site using the “.com” extension, which means they’ll likely end up on a different site while searching for yours if you have a different one.
“.net” is currently the 4th most popular extension and it was meant to be used by networking businesses, internet service providers, or networks of online communities.
Using it for something different might not be too good for your brand. It might be a little weird if you tried to sell clothing out of a “.net” website.
“.org” is the 7th most used extension and it was intended to be used by non-profit organizations, charities, or social awareness websites.
Again, using this extension for your business might throw off your visitors.
There are organizations that use “.org” for their non-profit activities and the “.com” extension of the same domain for commercial activities.
“.biz” might be the closest thing to a “.com” extension you’ll find. Biz is an acronym for business and was meant to be used by business websites.
However, “.biz” isn’t really popular (not even in the top 10 most used extensions) so people might not remember it when looking for your site.
STEP #3 – Go to Cart

- Click the cart icon at the top of the screen (or the “Go to cart” pop-up at the bottom).
STEP #4 – Review Cart
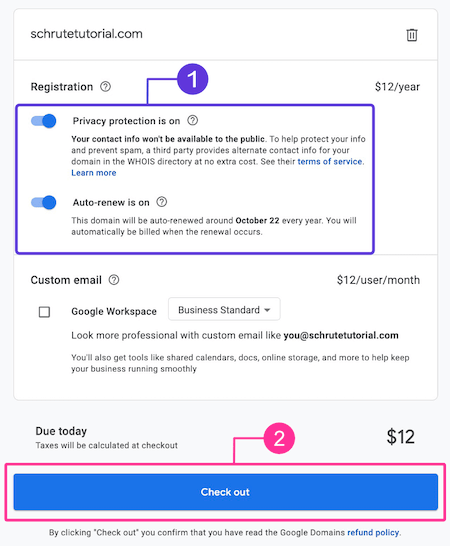
- Make sure that “Privacy protection” and “Auto-renew” are ON.
- Click on the huge “Check out” button.
The host we’ll be using – NameHero – offers free custom emails with your domain, so you don’t have to purchase Google Workspace (formerly G-Suite).
However, as I mentioned earlier, it’s a good idea to keep your emails separate from your host, and here’s why:
- If your site goes down, you can still communicate with your customers.
- No need to transfer emails and risk losing them when switching hosts.
- No emails taking up disk space that could be used by your site.
- The interface and functionality of the email software provided by web hosts is pretty bad.
If you can afford the $6/month for Google Workspace, then I’d go for it. But don’t worry if you can’t.
You can also take 10% off your first year of the Starter Plan using this code:
R4N4JDDH4363K3M
or this code for the Standard Plan:
AAPR9FAFM3GUM73
STEP #5 – Check Out
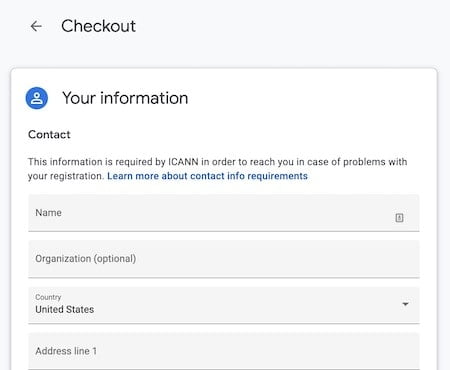
- Add all your contact information
- Click “Save & Continue” at the bottom of the form
- Add your payment information
- Click the “Buy” button at the bottom
Before being able to access the checkout page, you might be asked to login using your Gmail account.
So just go ahead and login or create a new one if you don’t have one.
That’s it! You’re now ready to sign up for hosting.
Getting WordPress Hosting
Your web hosting provider will have the most impact on your website’s speed and security. So it’s probably a smart idea to choose a good one.
As I mentioned earlier, we’ll be using NameHero. (my review)
STEP #1 – Go to NameHero & Choose Your Plan
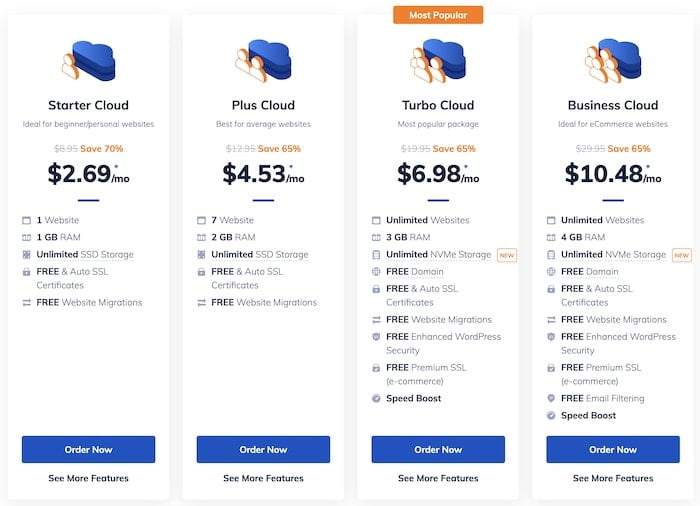
- Go to NameHero – I get some affiliate commission at no extra cost to you if you purchase it using this link.
- Select Your Plan – the cheapest plan, Starter Cloud, should be enough if you’re starting out.
The price you see will vary depending on which promotion they’re running, typically, you could expect a 60-70% discount from the original price (for new customers).
STEP #2 – Set up Your Domain
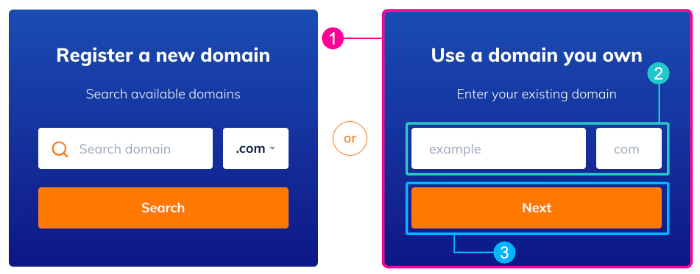
- Use a domain you own – select this option unless you decided to register your domain with NameHero.
- Enter your domain and extension
- Click the “Next” button
STEP #3 – Choose Your Plan’s Length and Options
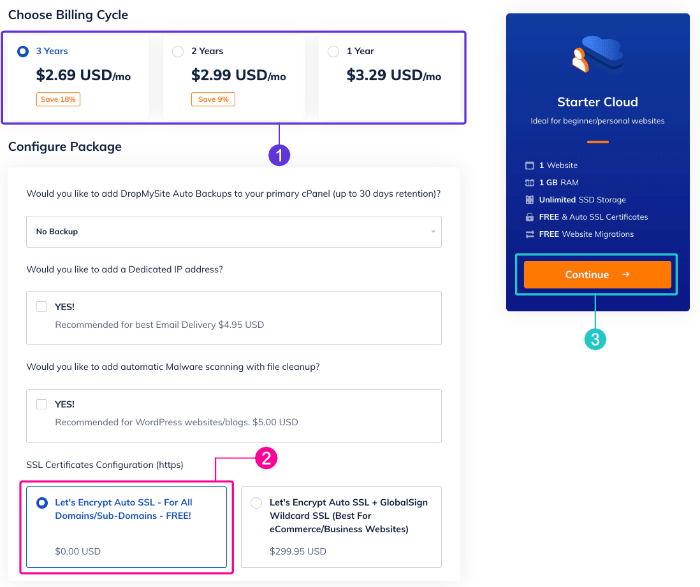
- Select how many years of hosting you’d like to purchase.
- Let’s Encrypt Auto SSL – from the “Configure Package” section, only select the free SSL option.
- Click “Continue”
It’s up to you how many years of hosting you want to get. The longer plans will give you a better value for your money.
Also, the huge discount is only for new users, so a lot of people take advantage of it by signing up for the 2 or 3-year plan.
After your plan is up, you’ll have to renew at the regular price.
Personally, I don’t like paying for things too far in advance because I don’t know what could happen in the future.
So even though NameHero is a solid host, I still always choose the 1-year plan.
But again, it’s up to you.
STEP #4 – Review & Checkout
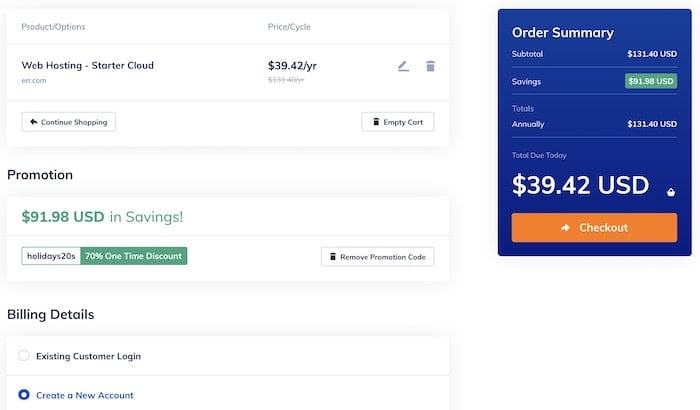
- Review your plan
- Add your payment info
- Click the orange “Checkout” button
- That’s it!
Updating Your Nameservers
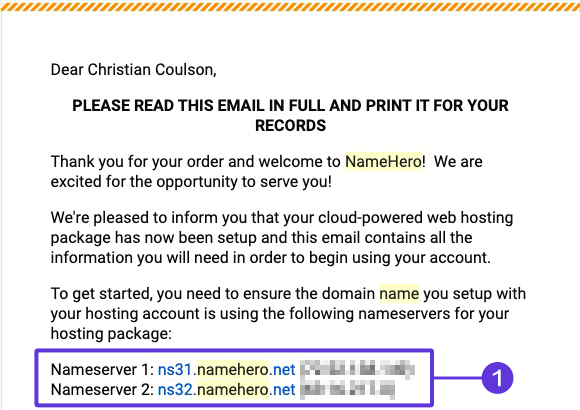
After purchasing your NameHero plan, you should get a welcome email that includes your login information, nameservers, and more.
Let’s quickly go over the steps to update your nameservers.
note: you don’t need to do this if you got your domain name from NameHero. Also, remember to change your password!
STEP #1 – Login to Your Domain Registrar
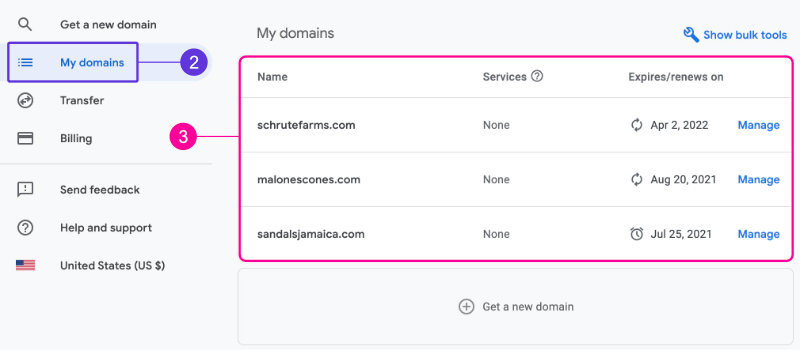
- Log in to Google Domains (or whoever you registered your domain name with)
- Click on “My domains”
- Click on the domain you’d like to update nameservers for
STEP #2 – Update Your Nameservers
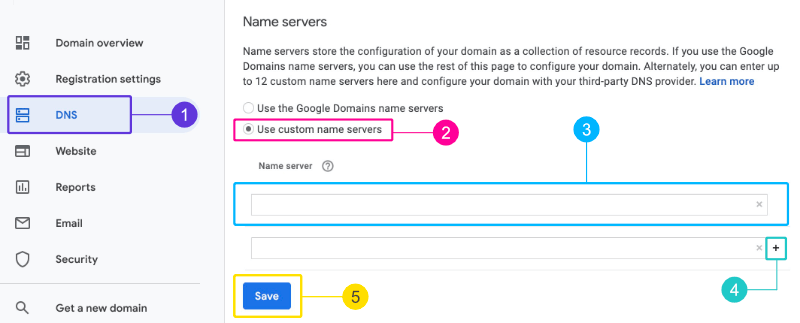
- Click on “DNS”
- Select “Use custom name servers”
- Copy and paste the nameservers found in your welcome email
- Click on the “+” icon to add more nameservers
- Click “Save”
Here’s an example of what your nameservers should look like:
ns31.namehero.net
ns32.namehero.net
Keep in mind that it can take up to 24 hours for changes to propagate.
How to Install WordPress
Next in this WordPress tutorial, we’ll take a look at how to install WordPress.
1. Log in to Your Hosting Account
- Log in to NameHero client area
Your login details will be in the same welcome email where you found the nameservers.
2. Select Your Domain
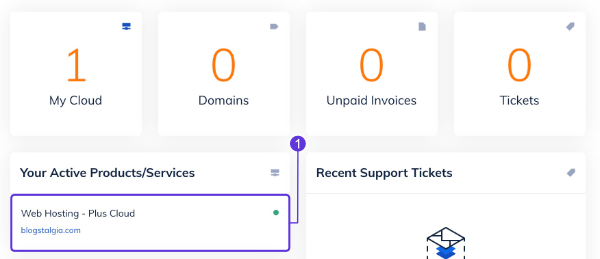
- Select the domain where you want to install WordPress
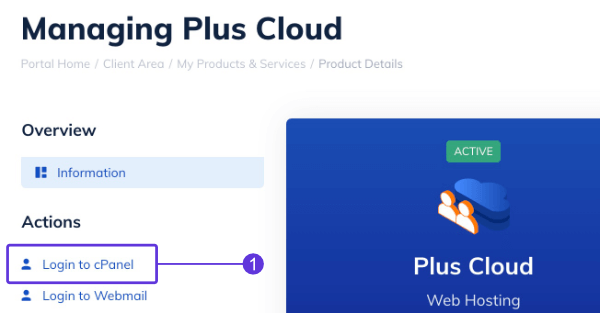
3. Login to cPanel
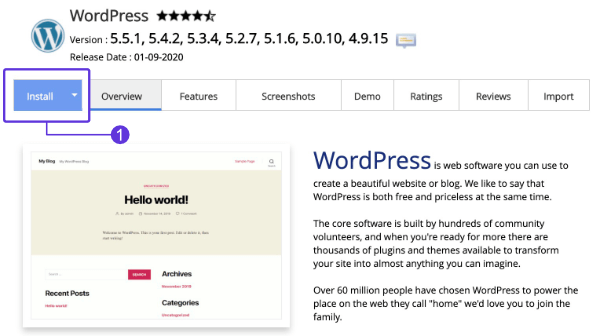
4. Click the WordPress logo Under “Scripts”
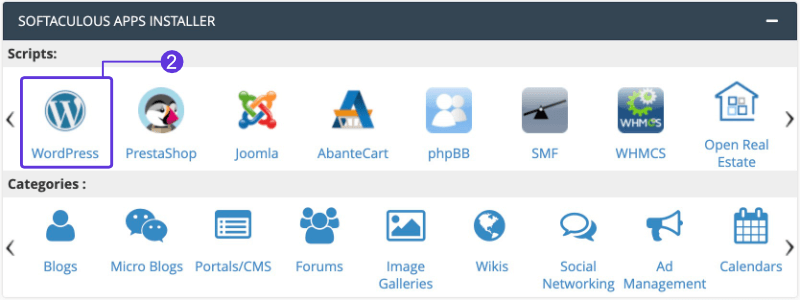
- Scroll down until you see the “Softaculous Apps Installer” tab
- Click the WordPress logo found under “Scripts”
5. Click Install
- Click the blue “Install” button located at the top
6. Fill Out the Fields
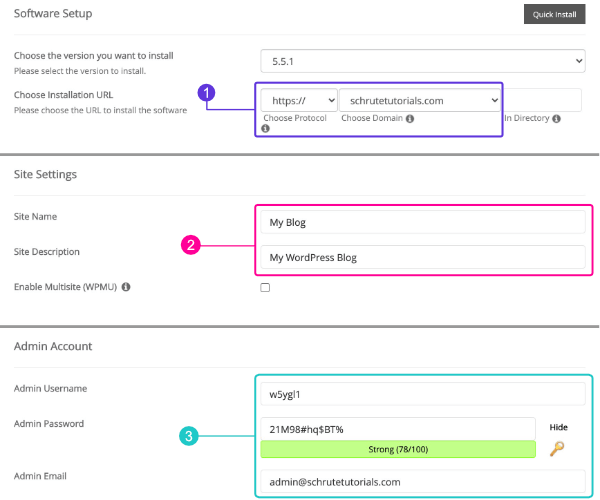
- Choose your protocol and domain where you want to install WordPress
- Change the Site Name and Site Description
- Change your Admin Username, Admin Password, and Admin Email
That’s all I recommend changing, everything else you can leave default.
7. Click Install
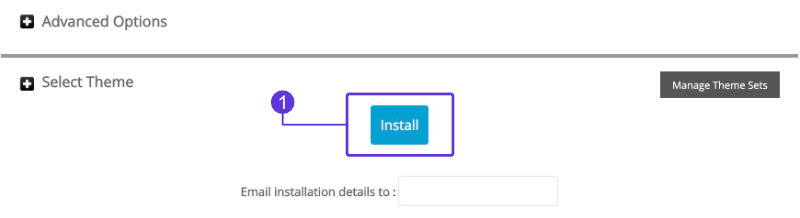
- Scroll down to the bottom of the form and click “Install”
That’s it! You’ve now successfully installed WordPress.?
WordPress Front End vs. Back End
The next step in this WordPress tutorial is understanding the difference between the front end and the back end of your website.
WordPress Front End
When people talk about the front end of your website, they’re referring to everything that a user can see when they visit YourWebsite.com.
The front end of your site includes things like your posts, pages, media, comments, theme, menus, and widgets.
WordPress Back End
The back end, also known as the WordPress dashboard or admin area, is like your workstation.
To change how the front end of your website looks, you’ll need to access your WordPress back end and make the changes.
Unless you’ve added an account for someone else, you’ll be the only one with access to your WordPress back end.
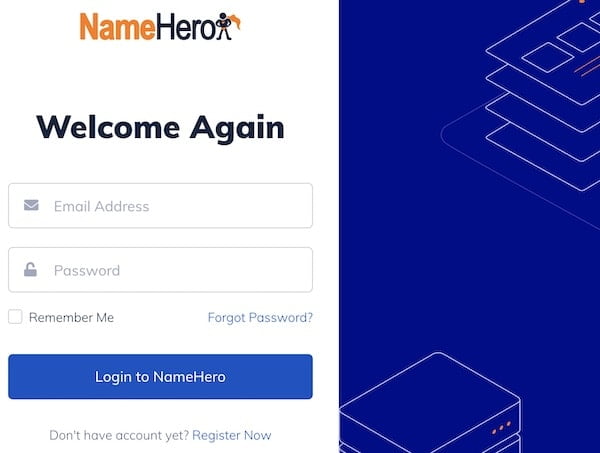
How to Log in to WordPress
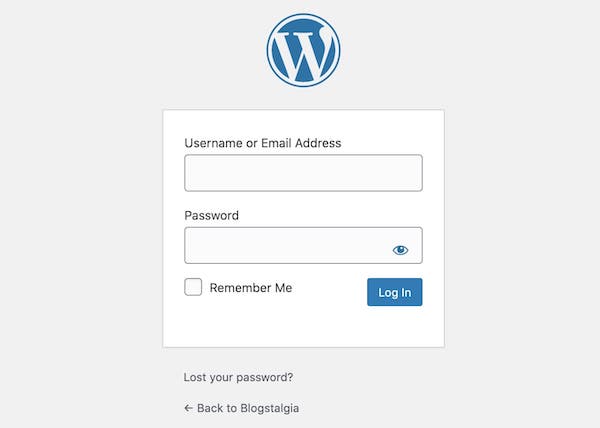
The easiest way to login to your WordPress dashboard is by adding /wp-admin at the end of your website’s address and enter your username and password.
YourWebsite.com/wp-admin
You should then see a WordPress login page similar to the image below.
Another way to access your WordPress dashboard is typically through your host’s client area.
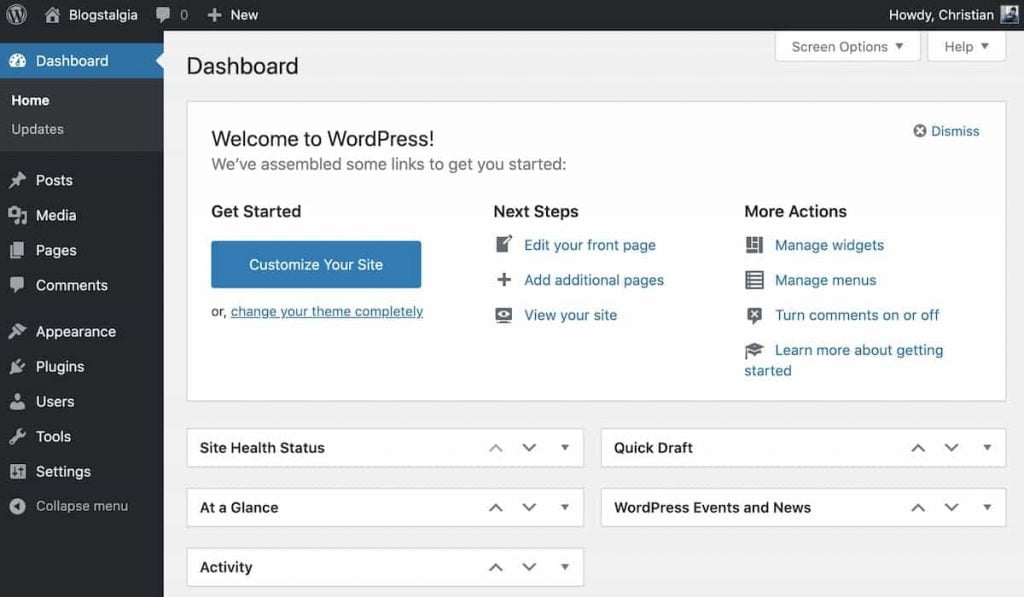
How to Navigate the Dashboard
Once you’re inside the WordPress dashboard, you’ll see three main areas:
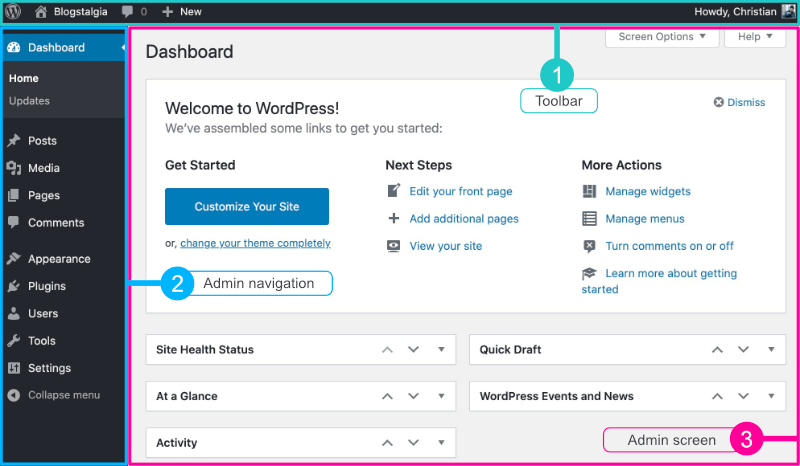
- Toolbar (this is located at the top)
- Admin navigation (column on the left)
- Admin screen (the huge space to the right of the admin navigation and below the toolbar)
1. Toolbar

The toolbar will look a little different depending on which area of your site you’re on.
Different plugins and themes will also add some shortcuts in your toolbar for easy access.
Here’s what each one of the default icons do:
- The WordPress Logo (W) – learn more about WordPress and WordPress.org, access their documentation (how to use WordPress), contact support, and leave feedback.
- Site Name – takes you to your live site (the front end) if you’re on the back end or to your WordPress dashboard if you’re on your live site.
- Comments – shows all the comments awaiting moderation. Once you click it, you’ll be able to approve, delete, mark as spam, edit, and reply to comments.
- New – quick way to add new images or create a new post, page, or user.
- Your Name – edit your profile and log out of WordPress.
2. Admin Navigation
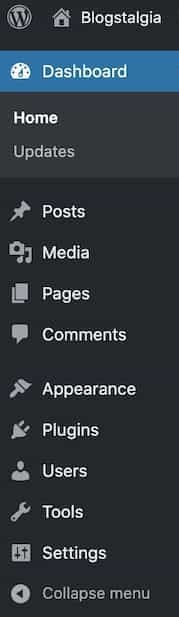
The admin navigation column on the left is where you’ll be spending most of your time.
The look of your navigation will also vary slightly depending on which theme and plugins you have installed.
Let’s go over the default items you’ll find.
Updates
Just like the apps on your phone, WordPress is also updated from time to time to introduce new features, bug fixes, and security improvements.
Minor updates are automatically installed; however, since major updates can sometimes break your site, they have to be installed manually.
In this section, you’ll be able to update WordPress, themes, and plugins to their latest versions.
We’ll go over this in much more detail in the “How to Update WordPress” part of this WordPress tutorial.
Posts
Here you’ll find all the tools you need to write, organize, and publish blog posts.
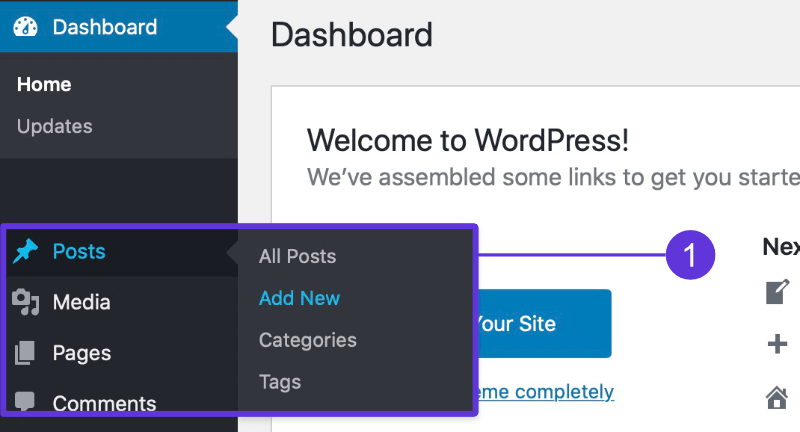
Let’s go over the 4 options you’ll find in this section:
- All Posts – opens a list of all the blog posts you’ve written and lets you edit, delete, and preview them. You can also edit several posts at once by using the “Bulk Actions” option located in the top-left corner of the admin screen. The option to search for posts by name or filter them by dates and/or categories is also available here.
- Add New – opens a blank new document where you can start writing your blog posts. You can also access this from the “All Posts” section.
- Categories – allows you to add, view, and edit all the categories your posts are listed under. We’ll go into more detail about this in the “How to Create Categories and Tags” section of this WordPress tutorial.
- Tags – lets you add, view, and edit all the tags your posts are listed under. The main difference between tags and categories is that tags are used to identify a post by some specific keyword(s), whereas categories are used to broadly group blog topics. We’ll talk more about this later.
Media
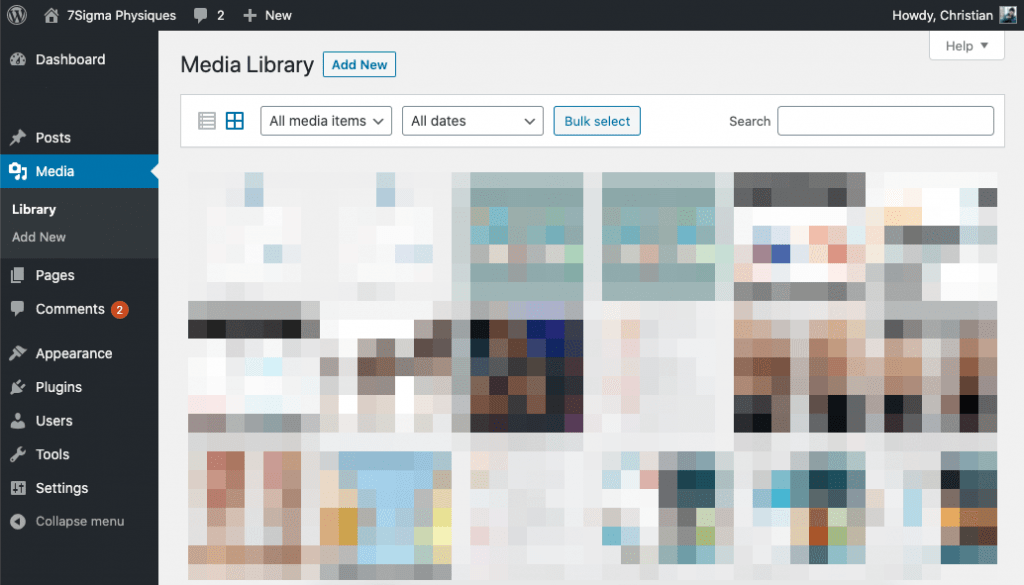
In this section, you’ll be able to manage all of your media files, such as images, documents, and videos.
You can upload the files and then add them to your blog posts, pages, sidebars, and headers.
Here are the 2 options you’ll find under this section:
- Library – allows you to view and edit all the files you’ve uploaded (you can even edit images). The toolbar at the top of the admin screen is where you’ll find the options to filter them by date or file type as well as search for a specific image or do bulk edits.
- Add New – lets you upload your media files. You can drag and drop them or click on “Select Files” to browse your computer.
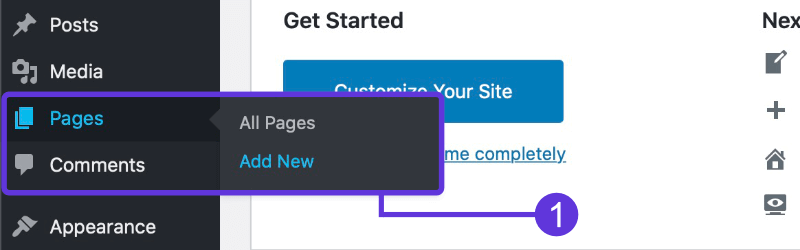
Pages
Pages and posts look similar in WordPress because they use the same editor; however, pages are typically used for static content.
Static content is the content on your site that doesn’t change much, such as your home page, about page, contact page, and legal pages.
Pages are typically located in your site’s navigation menu, which is normally near the top of your site.
Here are the 2 options you’ll find in this section:
- All Pages – it’s basically the same as the “All Posts” option we covered earlier except for pages.
- Add New. opens a blank new document where you can start creating your page.
We’ll cover this in more detail in the “How to Create Pages” section of this WordPress tutorial.
Comments
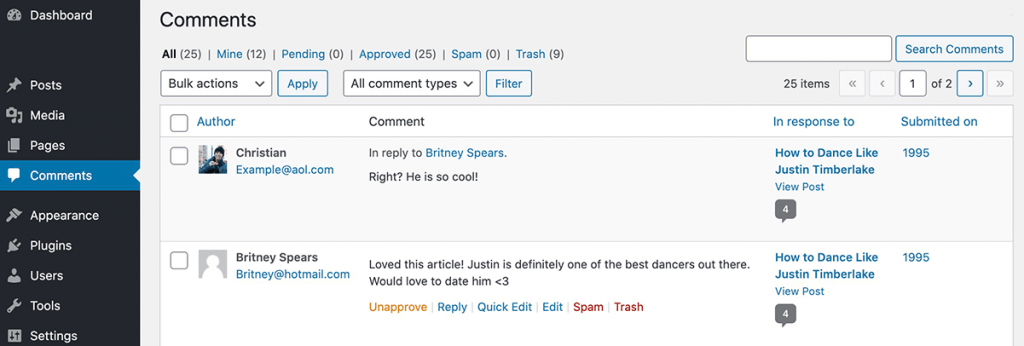
The comments section in WordPress is where you’ll approve, mark as spam, delete, and edit comments.
A comment section is a great place for you to interact with your audience and build trust.
It’s good practice to regularly check for comments and reply promptly to your audience to show that you care about them.
There’s also the possibility of receiving spam comments linking to someone else’s website.
You can just mark these as spam and delete them.
However, if you keep getting too many of them to the point where it becomes annoying, you can install a free plugin like Akismet to prevent some spam comments from reaching you.
Appearance
The appearance section in your WordPress Dashboard is where you’ll handle most of the layout and design of your blog.
Here, you’ll be able to search for and install new themes and change things like your colors, header images, fonts, and widgets.
Here are the options you’ll find inside this section:
- Themes – allows you to search, preview, and install themes from the WordPress directory. You also have the option to upload and install themes found somewhere else.
- Customize – the options you see when you click “Customize” will depend on the theme you have. For example, some themes might not let you change your font type.
- Widgets – these are block elements you can add to your site’s sidebar, footer, and header. For example, you could add a list of your recent posts, social icons, opt-in forms, etc.
- Menus – allows you to edit your navigation menu, typically located at the top of your site. We’ll talk more about this in the “How to Create Menus” section of this WordPress tutorial.
- Theme Editor – this is typically used by more experienced users. Here, you’ll find your theme’s core files, such as style.css, functions.php, footer.php, and header.php. You can use this to add CSS and PHP codes to change the look and functionality of your site.
We’ll take a more in-depth look at these options in the “How to Customize WordPress” section of this WordPress tutorial.
Plugins
Plugins allow you to easily add extra functionality to your site without needing to know how to code.
For example, you could add a plugin like LuckyWP Table of Contents to add a table of content to your site or Novashare to add social sharing buttons.
Here are the options you’ll find in this section:
- Installed Plugins – shows you a list of active and inactive plugins you’ve installed. Here you can add, upload, activate, deactivate, delete, and update plugins.
- Add New – allows you to search for (or upload) and install new plugins.
- Plugin Editor – this is typically used by more experienced users. Here, you’ll be able to add some code to edit plugins.
We’ll talk more about this in the “How to Install WordPress Plugins” section of this WordPress tutorial.
Users
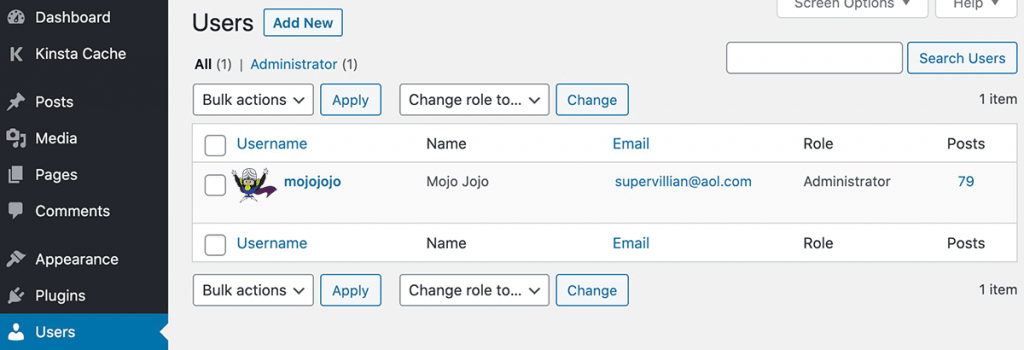
This is where you can add new users to your WordPress blogs, change your email and password, and assign different roles to other users you’ve added.
Beginners sometimes ask me what to do after someone from a plugin’s support team asks them for Admin access to their WordPress site.
If you’ve been having problems with a plugin and their support team hasn’t been able to fix it via email or live chat, it’s not uncommon for them to ask for access to take a closer look at the issue.
In this case, it might be fine to create them an account and delete it after they’re done.
Just make sure that it’s a reputable company or developer. If they aren’t, then it might be better to ask someone else for help or switch plugins.
Here are the roles you can give your WordPress users:
- Administrator – should only be held by you, the owners of the site, or someone you trust. An administrator can add and remove other users (even those with the same role), delete content, edit core files, change, themes, edit plugins, and even lock you out of your own site. Basically, they can do anything.
- Author – can upload files, write, edit, publish, and delete their own articles.
- Contributor – can only edit and delete their own blog posts, but they can’t edit or delete published ones. This is great if you plan on having people help you with content creation.
- Subscriber – has the most limited capabilities. They can only read and comment on blog posts or pages.
- Editor – second role with most capabilities. They can write, publish, and delete blog posts from them and other users; approve and delete comments; create categories and tags; upload files; and read private posts and pages. Since editors can delete posts, it’s a good idea to give this role to people you trust.
Tools
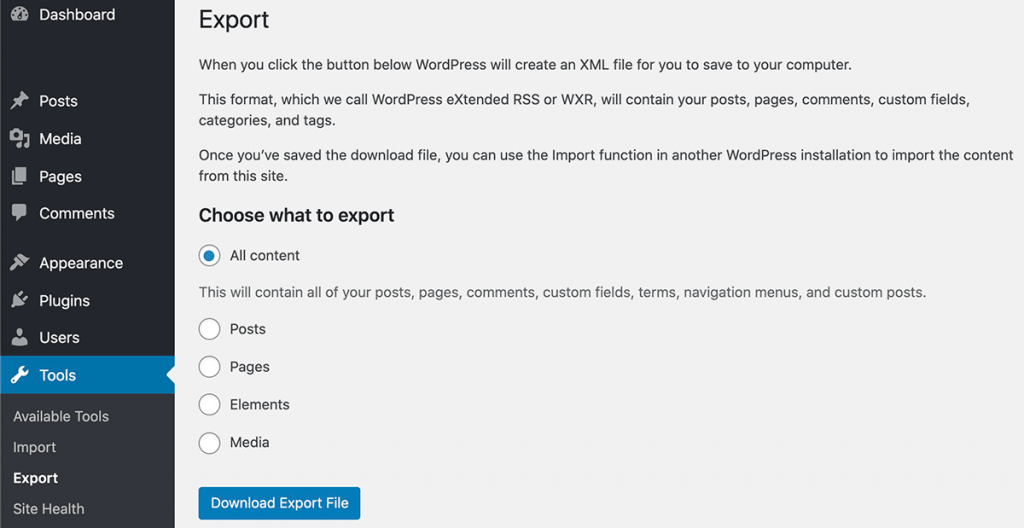
This section includes tools to perform some non-routine management tasks, such as importing and exporting content.
Unless you’ve installed a plugin that comes with tools, there’s not much to this section.
Here are the options you’ll find here:
- Import – if you’re coming from a platform like Blogger or Tumblr, you can easily install their importer and import your content. You can also import content from another WordPress site.
- Export – allows you to download your site’s content and save it on your computer as a backup or to upload it to another site. This only saves your content, such as posts, pages, comments, custom fields, terms, and navigation menus. It is not a full site backup.
- Site Health – allows you to see if there are things you should fix to improve your site’s performance and security. For example, you could see if your site’s HTTPS is working properly or if your SQL server is up to date.
Settings
The Settings menu in your WordPress dashboard is where you’ll configure settings for different sections of your website.
Here are the options you’ll find here:
- General – allows you to change your site title, tagline, WordPress address, site address, language, timezone, and date and time format.
- Writing – WordPress automatically assigns a category and format to your blog posts if you forget to do so. Here, you can set what you want the default categories and post formats to be.
- Reading – allows you to set your website’s home page to either a static page or your latest blog posts. You can also select the number of posts you want to show and whether to display the full post or just a summary.
- Discussion – lets you set your default post settings and other comment settings.
- Media – allows you to change the default sizes for the images you upload.
- Permalinks – permalinks are the permanent URLs of each specific blog post or page on your site. This section lets you set the structure of these URLs.
My Recommended Settings
Most of these settings are personal preference, so it’s up to you how you want to set them up.
The only thing I recommend is to add the https version of your site under WordPress Address (URL) and Site Address (URL) if you’re using https, which you absolutely should.
Also, set your URL structure to “Post Name.”
By default, your URLs will look something like this:
http://YourDomain.com/?p123
When choosing a permalink structure, the best is to select one that includes the title of your pages and blog posts in the URL.
This will help Google and your visitors understand your site and what they’re looking at.
I recommend using the “Post Name” structure, which would make your URLs look something like this:
http://YourDomain.com/sample-post/
Once you’ve selected “Post Name,” do not go back and change it again later.
Changing your permalink structure can potentially affect your SEO and cause lots of errors and broken links if you don’t take the necessary precautions.
3. Admin Screen
The admin screen is just the huge space to the right of the admin navigation and below the toolbar where all the settings will be displayed.
How to Install WordPress Themes
A WordPress theme is what determines the overall design and function of your site.
Here’s how to install a WordPress theme:
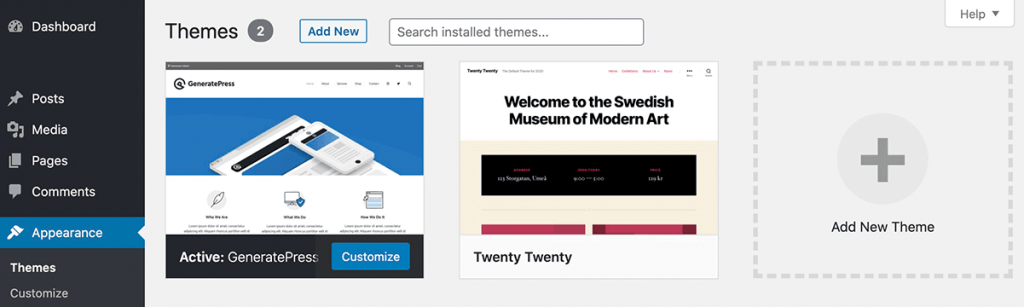
1. Go to Appearance > Themes
Every year, WordPress releases a theme that should active by default on all WordPress installations.
For example, if you installed WordPress in 2020, you should see their Twenty Twenty theme installed.
To find and activate a new theme, move on to the next step.
2. Click on Add New
Clicking “Add New” or “Add New Theme” should take you to the WordPress library.
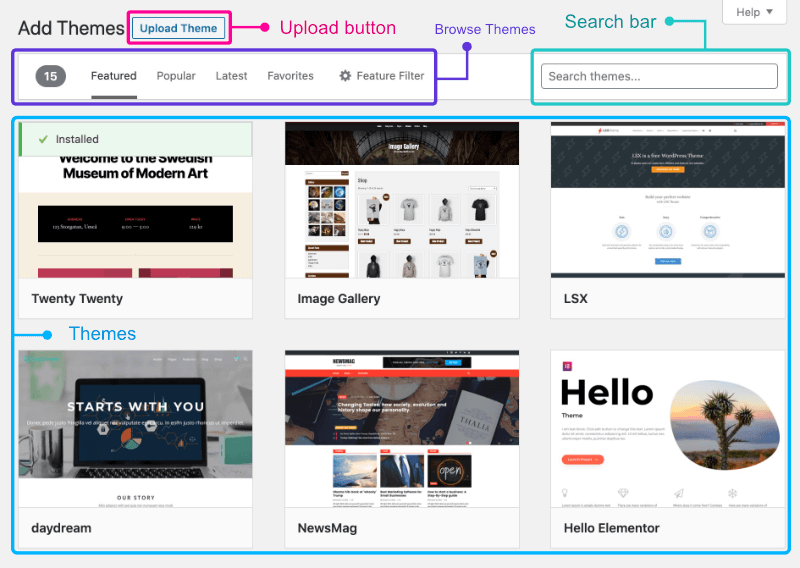
Here, you’ll be able to browse some themes as well as search or upload a specific theme.
Your hosting company and theme will have the most impact on your website’s speed and security.
Therefore, it’s important that you choose a theme that’s well-coded, lightweight, fast, secure, actively maintained and mobile responsive.
My recommended theme is GeneratePress and is the one we’ll be installing in this WordPress tutorial. (my review)
If you’d like to explore other options, you can check out my article on the best WordPress themes.
Once you’ve decided on a theme, you can move on to the next step.
3. Click on Install
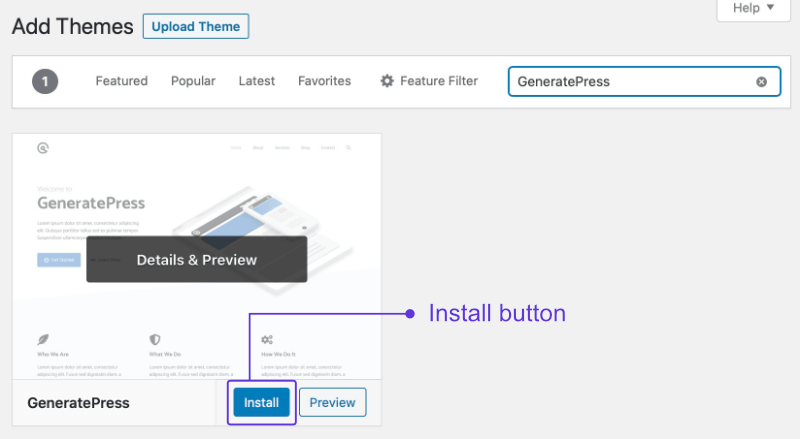
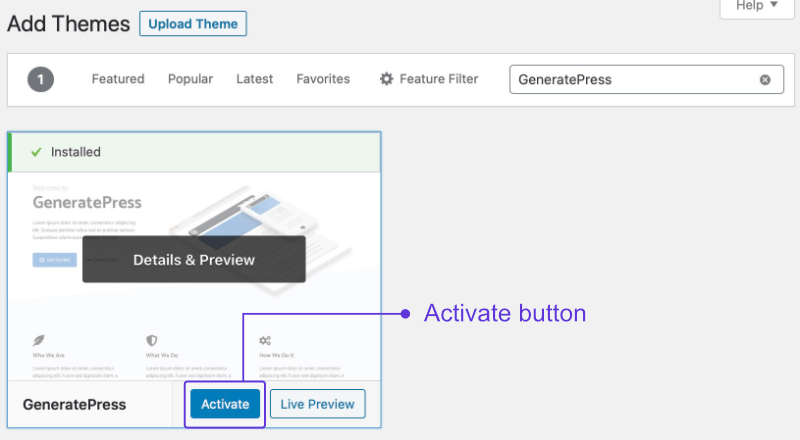
The theme should now be installed, but not active.
Once you click on “Install,” the same button will turn into an “Activate” button, which you have to click again to, well, activate the theme.
How to Customize Your WordPress Theme
There are two ways you can access the Customizer to make changes to your theme:
- Dashboard > Customize Your Site
- Appearance > Customize
Both of these paths will take you to the same place.
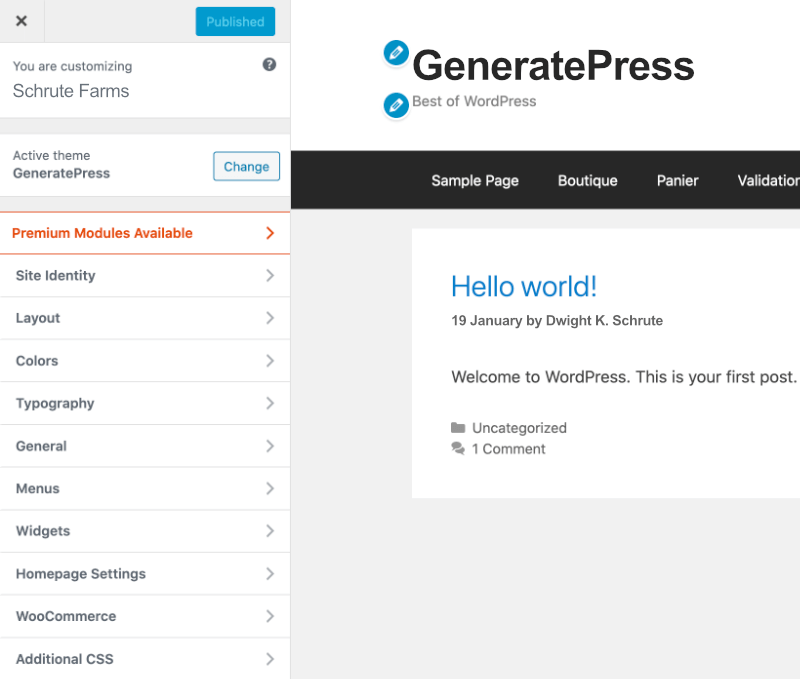
Now, the options you see here will vary depending on the theme you have installed.
Typically, you’ll see options to change your pages and posts layout, colors, fonts, background images, menus, and widgets.
You’ll also see a section called “Additional CSS” where you’ll be able to add custom codes to make some additional style changes.
If you ever ask someone for help customizing something and they tell you to add a CSS code, this is where you’ll paste it.
Widgets
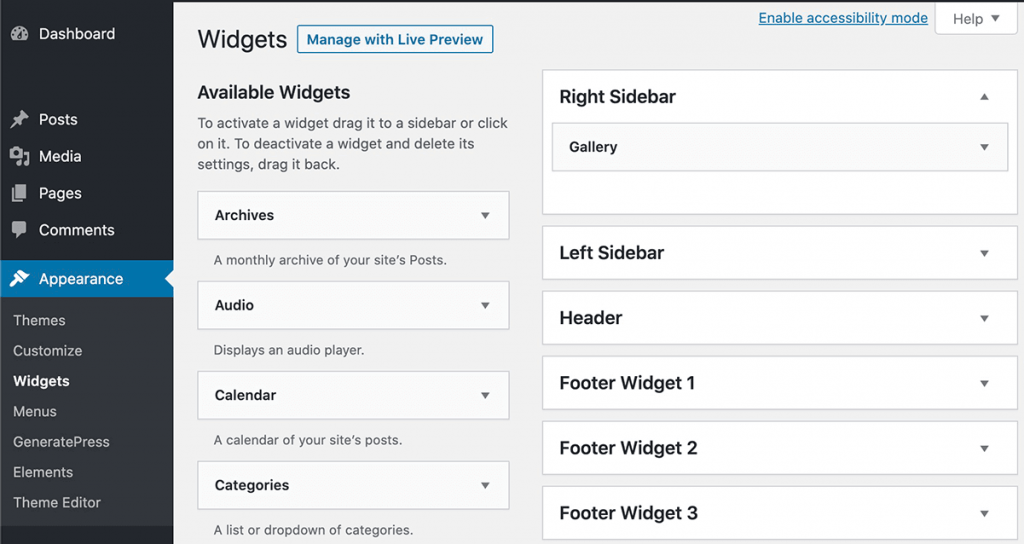
Widgets in WordPress are simple block elements you can add to your website’s sidebars and footer.
Some themes will also allow you to add widgets to other areas, such as your header, top bar, and off-canvas panel.
There are three ways you can access your widgets:
- Dashboard > Customize Your Site > Widgets
- Appearance > Customize > Widgets
- Appearance > Widgets
Widgets are used as an easy way to add things like:
- A list of most popular posts
- Opt-in forms
- Banner Ads
- Social Icons
- Search bars
- Links
Some WordPress plugins will also come with their own widgets so that you can easily place them where you want.
The cool thing about widgets is that you can add all these extra functionalities without knowing how to code.
You can simply drag and drop the widgets in your desired area (again, depending on your theme).
Theme Editor
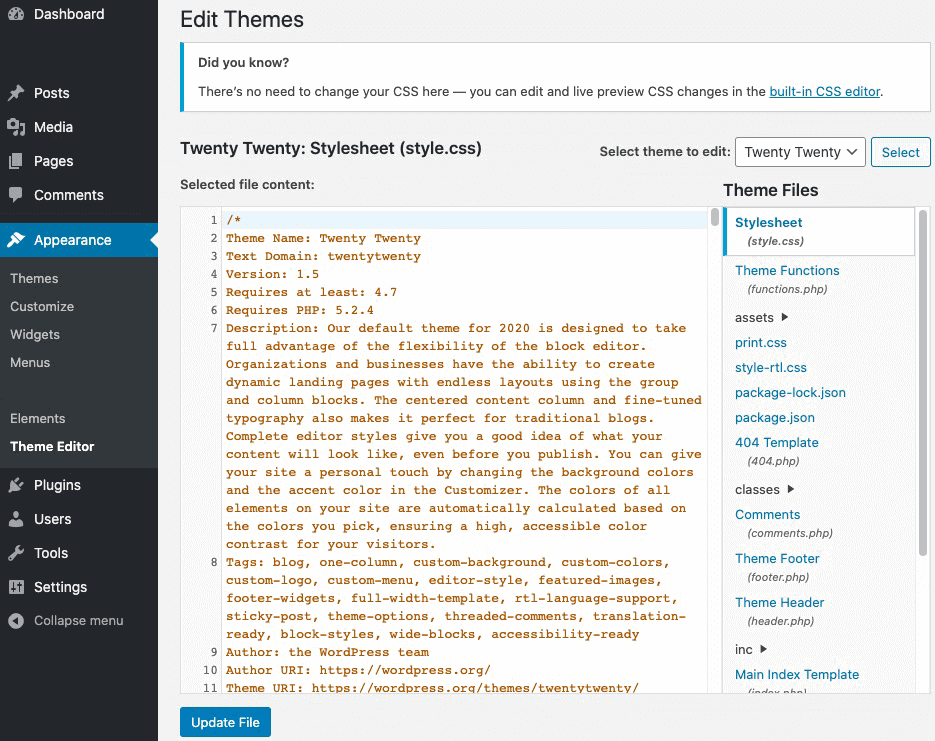
Don’t worry, you’ll rarely be using this. In fact, you shouldn’t really mess with it.
The theme editor is typically used by more experienced bloggers and developers.
Here you’ll find your theme’s core files, such as:
- Stylesheet (style.css)
- Theme Functions (functions.php)
- Theme Footer (footer.php)
- Theme Header (header.php)
- And more
When adding CSS codes or tracking codes, people will sometimes tell you to add them in your functions.php, header.php, or style.css files.
This is the section where you’ll find these files inside your WordPress dashboard.
Some plugins and themes will allow you to add codes without having to access these files at all.
Google Analytics Example
For example, to add the Google Analytics tracking code, you need to go to Appearance > Editor > Theme Header (header.php) > and paste the code before the </head> tag.
Another way is to use a free plugin like Insert Headers and Footer to do it.
However, it’s recommended that you keep the number of plugins you use to a minimum as some of them can slow your site.
The GeneratePress theme has a feature called “Hook Elements” that allows you to insert content into any available hook on your website without modifying the file on WordPress core.
You can learn more about GeneratePress hooks element here.
How to Install WordPress Plugins
A WordPress plugin is a small piece of software that can be uploaded to your site to add more functionality and customizations without having to know how to code.
You can add plugins to help you:
- Add social media buttons
- Speed up your WordPress website
- Improve security
- Backup your entire website
- Add a table of content to your blog posts
- And more
Here’s how to install WordPress plugins:
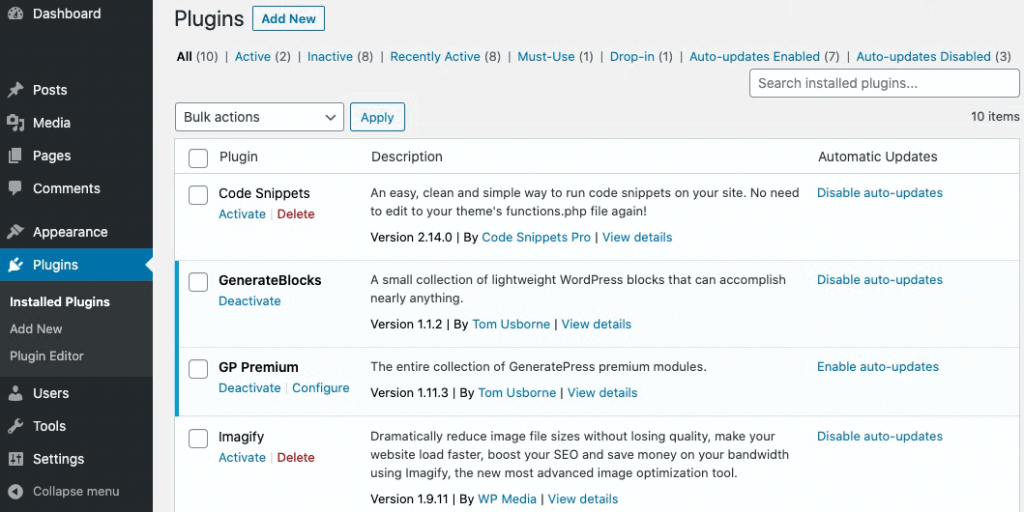
1. Go to Plugins > Add New
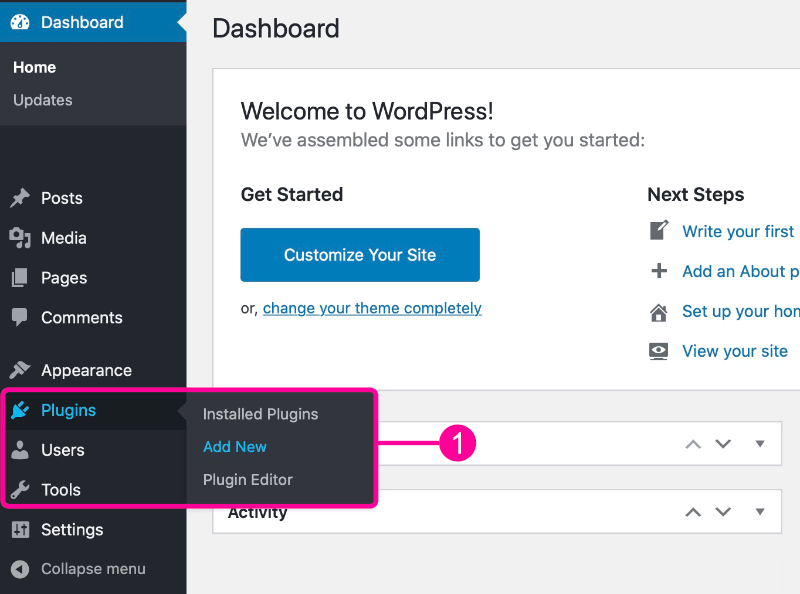
This will take you to the WordPress Plugin Directory.
Here you’ll be able to browse some of the most popular, recommended, favorites, and featured plugins.
You also have the option to search or upload a specific plugin.
2. Search for Your Desired Plugin
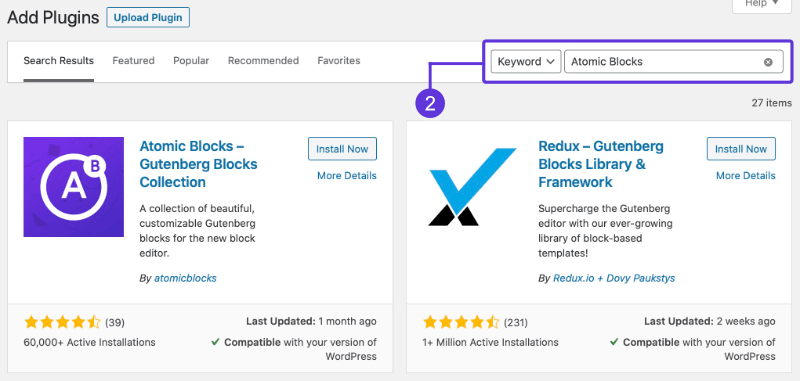
In the search bar located at the top of the admin screen, type the name of the plugin you want to install.
In this example, I’ll be installing the Atomic Blocks plugin, which adds extra customization features to your site, such as testimonial blocks, author box, accordions, pricing blocks, and more.
3. Install and Activate Your Plugin

Once you’ve found the plugin you want to install, click on “Install Now.”
After the plugin has been installed, the same button will turn into an “Activate” button, just like it did with the theme.
Click on “Activate” to, well, activate the plugin.
That’s it!
Delete Default Plugins
When you visit your “Installed Plugins” section, you might notice some plugins that you didn’t install, such as Akismet and WordPress Importer.
This is because some WordPress installations come with some pre-installed plugins.
You can safely deactivate and delete all of them.
WordPress Plugins – Speed and Security
Now, you don’t want to install every single plugin you find.
Having too many poorly coded and bloated plugins can slow down your site and put you at risk of getting hacked.
When installing plugins, try finding lightweight ones that have been created by great developers.
Also, a lot of popular plugins that come with tons of features will add unnecessary bloat to your site and slow it down.
So make sure you only install plugins that do exactly what you need them to do, nothing extra.
It’s also important that you always keep your plugins updated to prevent hackers from accessing your site through a known vulnerability.
Which WordPress Plugins Should I Install?
It depends on what you’re trying to accomplish, who’s your host, and what theme you’re using.
For example, some web hosts like Kinsta handle backups, security, and caching (for website speed) on the server-side, so you don’t have to worry about installing plugins to do this. (my Kinsta review)
That being said, here are a few plugins I believe most people should have:
- WP Fluent Forms – embed contact forms on your site.
- SEOPress – helps with search engine optimization (SEO).
- BackWPup – full and offsite backup plugin.
- WordFence – firewall and security scanner.
- WP Rocket – WP Rocket is a caching and optimization plugin that improves your site speed. If you’re hosted at NameHero, use LiteSpeed Cache instead.
- Code Snippets – easily add JavaScript, CSS, and HTML without having to edit your theme’s core files.
Again, I can’t tell you exactly which plugins to install without knowing what features you’re trying to add.
However, I’ve written an extensive list of the best WordPress plugins and what they do so you can figure out which ones you need and should install.
Are Plugins Free?
While most plugins are free, there are a few paid ones.
The advantage of paid plugins is that you can be confident that the developer is constantly working to improve it and fix bugs.
However, there are plenty of awesome free plugins from reputable companies and developers as well.
Again, just check my article on the best WordPress plugins for bloggers.
There you’ll see a list of both free and paid plugins to help you achieve what you need.
How to Create WordPress Pages
Pages are typically used for static content (the content on your site that doesn’t change often), such as your home page, about page, contact page, and legal pages.
Here’s how to create WordPress Pages:
1. Go to Pages > Add New
2. Using the Page Editor
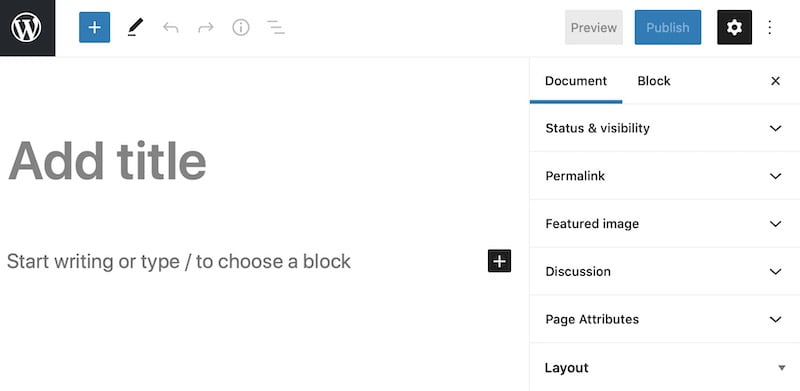
You should now be inside the page editor. Here, you’ll be able to add your page’s title and content, change the layout, and insert blocks.
Adding Titles and Content
This is pretty self-explanatory, right? To add a title and content, just click on their respective sections and start typing.
Adding Blocks
Gutenberg blocks are editor blocks that allow you to format your pages and blog posts in the new WordPress block editor – Gutenberg.
To add blocks to your page, you can simply click on any of the “+” signs you see throughout the editor.
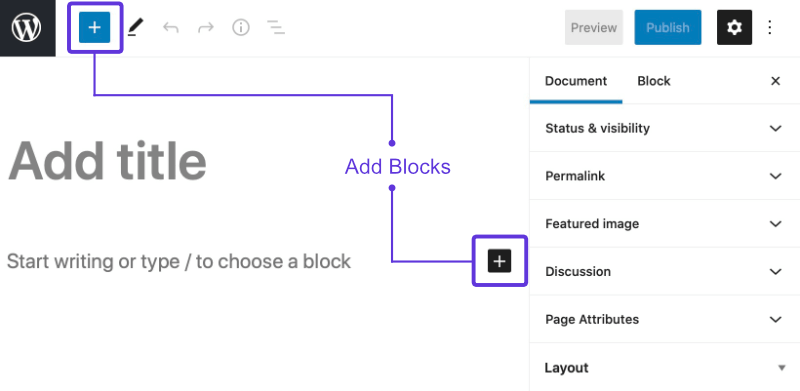
By default, WordPress includes a set of basic blocks like paragraph, image, quote, list, table, button, and more.
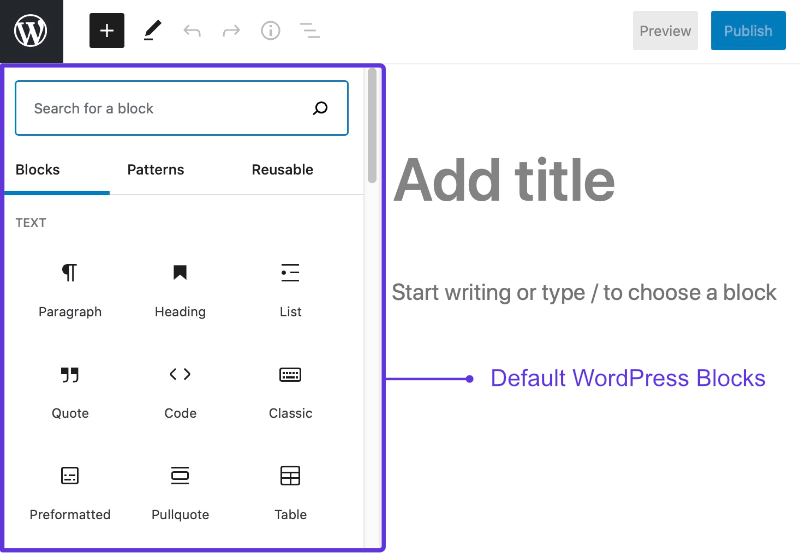
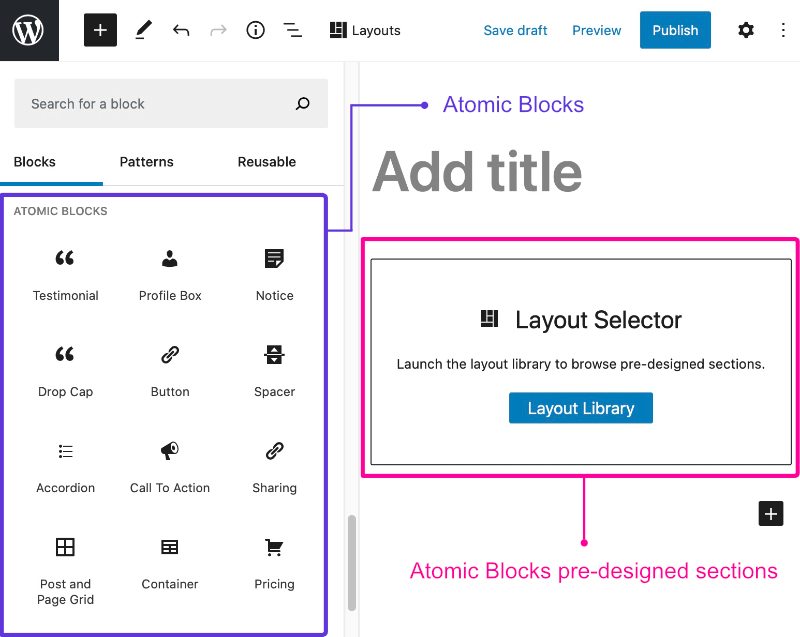
If you need to add even more blocks, you could install a Gutenberg Blocks plugin like Atomic Blocks, Advanced Gutenberg, or GenerateBlocks.
For example, the Atomic Blocks plugin we installed earlier includes testimonial blocks, accordions, pricing tables, author box, and more.
I’d stay away from page builders like Divi or WPBakery.
Not only do they tend to be bloated and slow your site, but they replace WordPress’ default editor with their own editor, which means that you’d have to learn how to use it.
Settings Sidebar
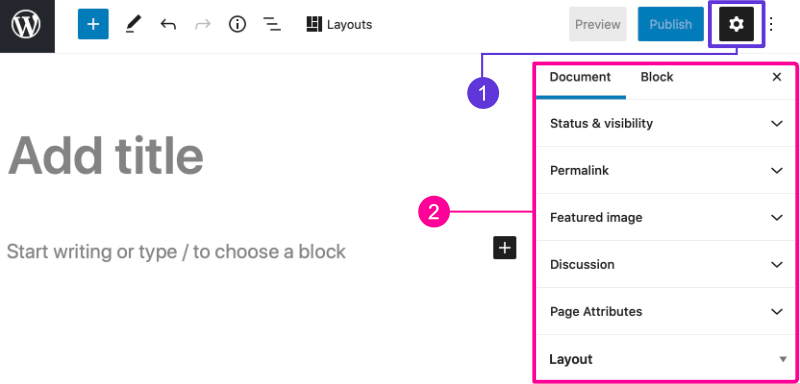
To open the settings sidebar, click on the little gear icon in the top-right corner of the editor.
Once you open it, you’ll see these two tabs:
- Document – allows you to change things like your permalink and select a featured image. Depending on your theme, you might have other features. For example, GeneratePress Premium allows you to disable elements like your menu, header, top bar, and footer, which is useful when creating landing and sales pages.
- Block – allows you to customize your blocks. The options you see here will depend on the block that’s currently selected.
More Tools & Options
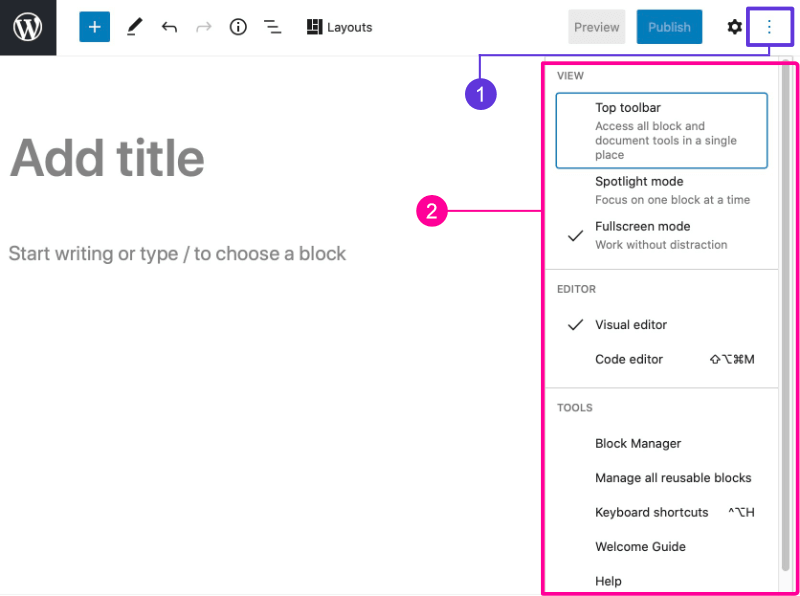
To access other tools and options, click on the three vertical dots located in the upper-right corner of the editor.
Here, you’ll be able to switch from the visual editor to the code editor, change the view of the editor, and more.
How to Create Blog Posts
Beginner bloggers often get confused between posts and pages.
Posts and pages look similar in WordPress because they both have the same editor; however, blog posts are used for content that changes more often.
Here are a few of things that make posts different from pages:
- They have a publish date
- Are displayed in reverse chronological order (from newest to latest) on your blog
- They’re used to help your audience. Think of “how-to” guides, tutorials, recipes, reviews, etc.
- Can have different categories and tags
Here’s how to create WordPress blog posts:
1. Go to Posts > Add New
2. Using the Blog Post Editor
Since the blog and page editors are similar, I won’t cover it again.
The only difference is that in the settings sidebar, you’ll be able to select categories and tags for your posts.
Under “Status & Visibility,” you can also schedule your posts to be automatically published at a later date.
Headings and Subheadings
When writing a blog post, make sure to use Heading 2 (H2) for your main subheadings and H3, H4, etc… for lower-level subheadings.
H1 is reserved for your title.
A lot of beginners use headings to change the size of their text. Don’t do this.
If you need to change your font size, use the Customizer.
How to Create WordPress Categories and Tags
Categories and tags are the two primary ways to group content on a WordPress site.
The difference is that categories are general labels, while tags are more specific (describe your posts in more detail).
- To create a category, simply go to Posts > Categories
- To create a tag, simply go to Posts > Tags
Categories
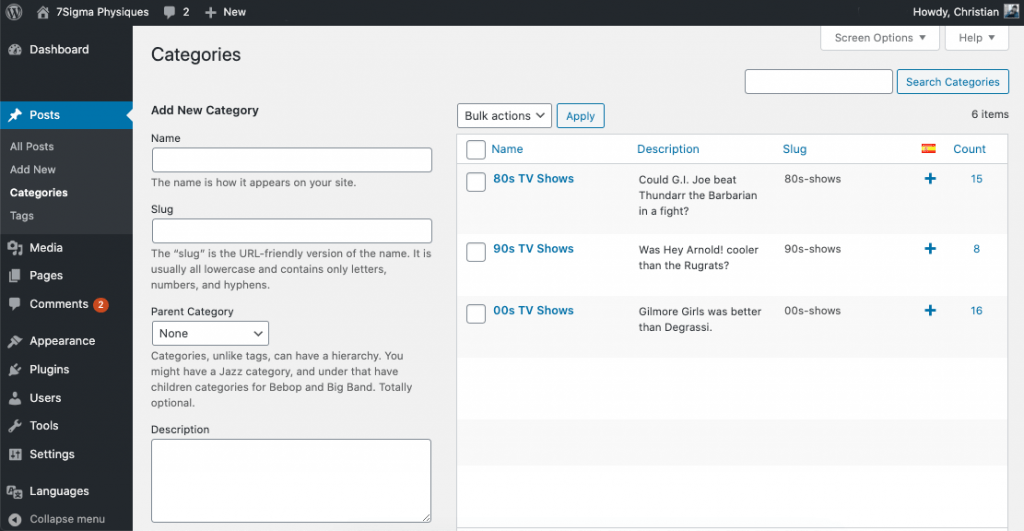
Categories are used to sort and group your blog posts into different sections. Think of them as the general topics you’ll be covering in your blog.
For example, my fitness blog has the following categories:
- Nutrition
- Fitness
- Keto Diet
- Weight Loss
You can create as many categories as you want.
A blog post can belong to many categories at the same time. However, it’s not recommended to have a blog post in more than 2-3 categories.
I recommend just adding it to the most relevant one and using tags to further organize them if you want.
Keeping your content organized will help users and search engines navigate your site with ease, which will help your SEO.
Lastly, all your articles must have a category.
If you don’t choose a category for an article, WordPress will automatically place it in a category titled “Uncategorized.”
Tags
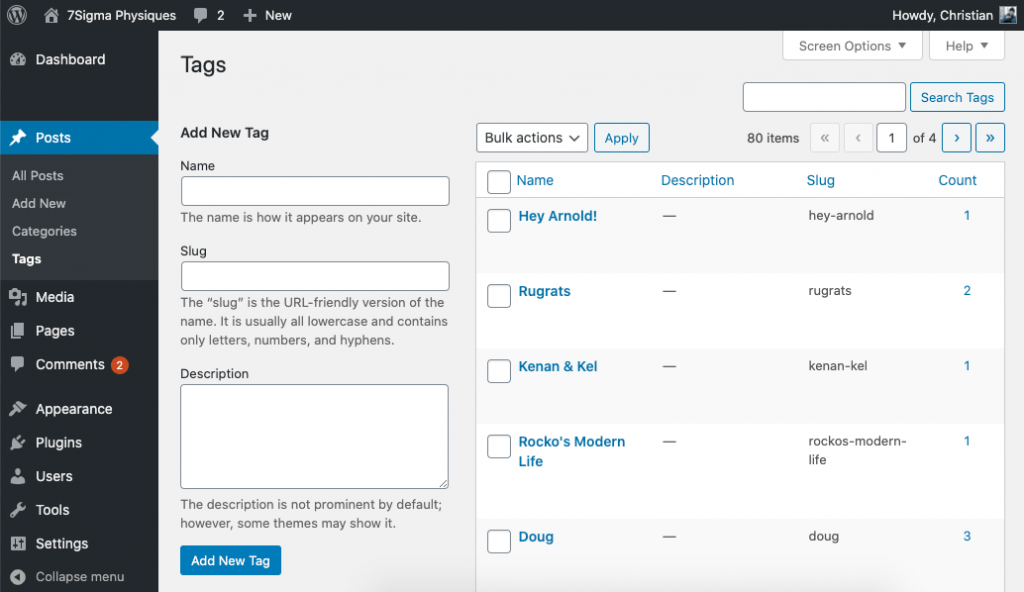
Tags are useful if you want to identify a blog post by some specific keywords.
A lot of beginner bloggers make the mistake of using Tags in WordPress the same way they use hashtags on Instagram or Twitter.
They end up adding a bunch of random tags to their blogs posts thinking it will help their SEO.
While it’s okay to add multiple tags, you should keep them relevant and under 10 per blog post.
Another difference between categories and tags is that tags are not required, so you can have blog posts without them.
Categories and Tags Example
For example, my fitness blog has a category titled “Weight Loss.”
If I decide to write a post titled “How to Lose Weight on a Budget for Moms”
I could add it to the Weight Loss category and then add tags, such as “Weight Loss for Moms” and “Weight Loss on a Budget.”
Next in this WordPress tutorial, we’ll go over how to create menus.
How to Create WordPress Menus
The primary menu, also known as header menu, is where people typically place links to their most popular pages or posts.
Once you’ve created the pages you want to place on your menu, you have to manually build your menu.
Here’s how to do it:
1. Go to Appearance > Menus
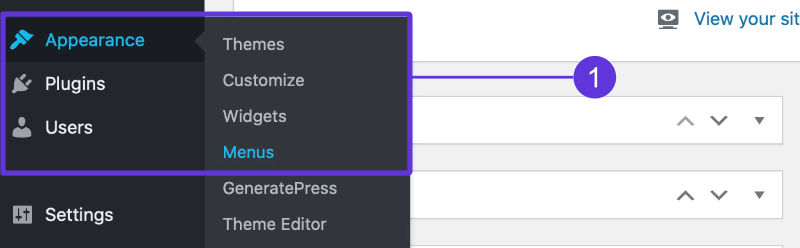
2. Add a Name & Set the Location
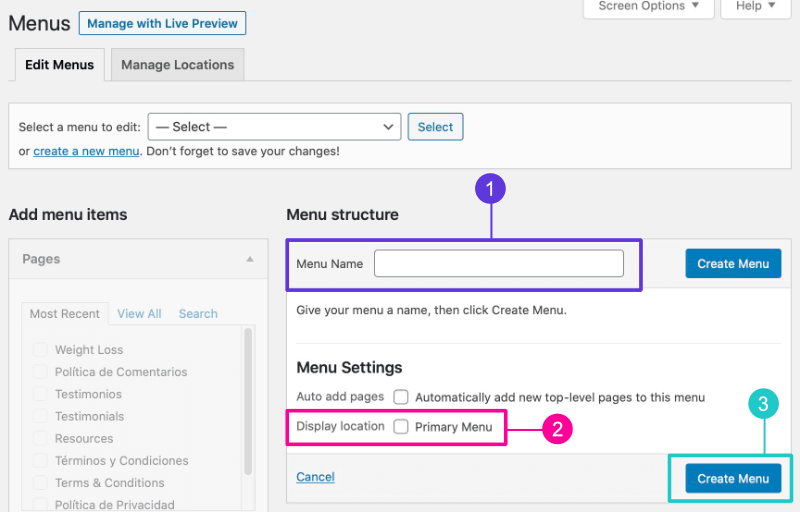
Give your menu a name, choose where you want it displayed, and click on “Create Menu.”
Depending on your theme, you might have different names for the locations.
Most of the time, it’ll be something along the lines of “Primary Menu” or “Header Menu.”
3. Add Your Links
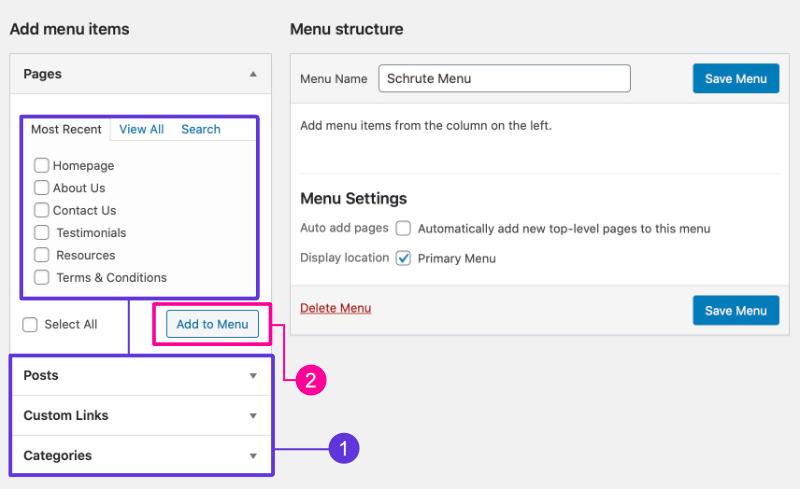
After creating the menu, you’ll be allowed to add pages, posts, custom links, or categories to it.
Just check the items you want to add and click on “Add to Menu.”
4. Arrange Your Items
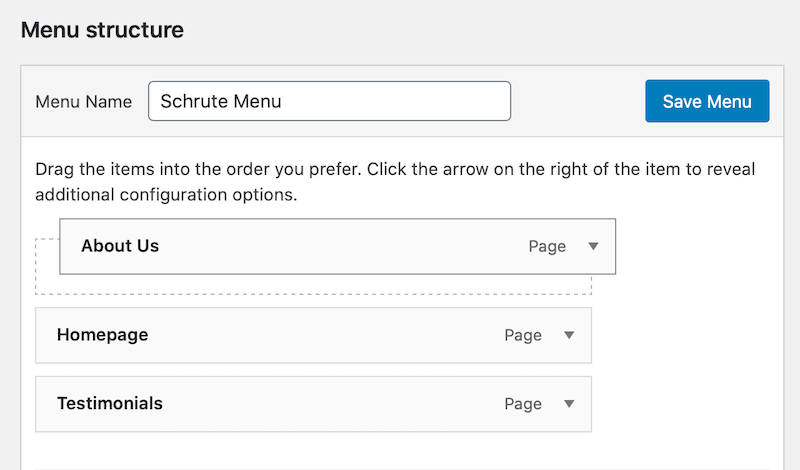
You can simply drag and drop your menu items to rearrange them.
5. Create Submenus
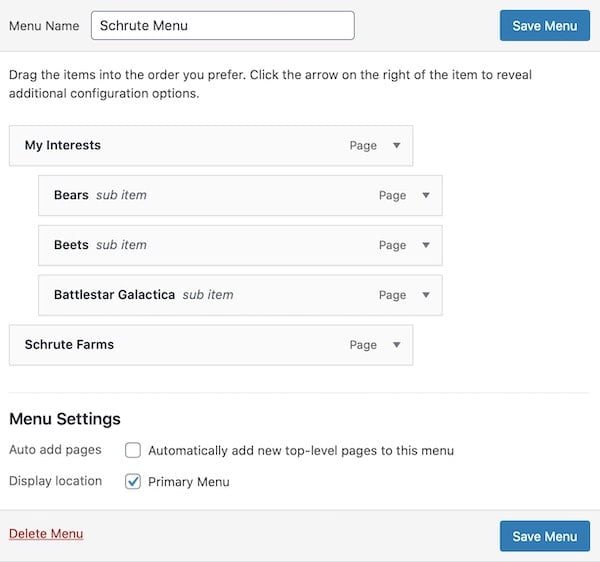
After adding your menu items, you can drag them around to create submenus.
For example, once you’ve added a page, you can add another page and move it a little to the right below the first page to create a subcategory.
6. Change Your Label Names
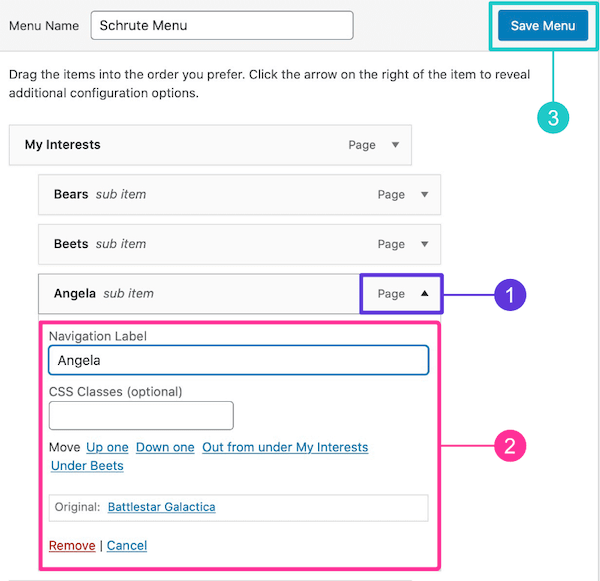
Clicking the arrow on the right of the item will open up other options, such as changing the name of the label and adding CSS classes.
How to Improve WordPress Speed
A lot of “six-figure” bloggers will talk you into buying a lot of expensive but underperforming tools, plugins, themes, and hosting just so they can earn some affiliate commission.
Adding a bunch of unnecessary tools to your site and choosing a subpar hosting provider can significantly slow your site.
Speeding up your site can be an extremely frustrating and complicated process if you don’t know what you’re doing or have a lot of stuff to clean up.
It’s not uncommon to see optimization experts charge between $400-1,000 to speed up WordPress sites.
The best thing to do is to start optimizing your site while building it, so you don’t have to worry about cleaning a mess or spending a fortune later on.
Why Does Site Speed Matter?
- Google has mentioned that site speed is a ranking factor for searches.
- 53% of visitors leave a site if it takes more than 3 seconds to load, according to research done by Google.
- Pinterest reduced perceived wait times by 40% and this increased search engine traffic and sign-ups by 15%.
Here are a few quick tips to improve your site speed:
1. Choose a Good Hosting Provider
While several things can affect site speed, your host will affect it the most.
My recommendations:
- NameHero – best for beginners and people trying to keep expenses to a minimum. (my review)
- Cloudways – fast and managed host for those who can stretch their budget to $10-13/month (use with Vultr High Frequency or Digital Ocean). (my review)
- Kinsta – for those looking for the best of the best and don’t have an issue spending a little more. This is where my main fitness site is hosted. (my review)
2. Choose a Good Theme
After your hosting provider, your theme is what has the most effect on site speed.
My recommendation:
- GeneratePress – well-coded, lightweight, and fast theme with top-notch support. (my review)
If you’d like to explore other options, you can check out my article on the best WordPress themes.
3. Resize Your Images
The size or dimension of an image is basically how much space the image takes on the screen.
You want to make sure that you’re not uploading a 2,500 pixels wide image when your main content column is only 800 pixels.
Not only would those images have a larger file size, but your server would have to resize them to display them at the appropriate size, which will add some processing time.
My recommendations:
- Your computer’s default photo editor
- Any free or paid photo editing software
4. Compress Your Images
Compressing your images is basically reducing the file size to the lowest size possible without losing quality.
My recommendations:
- Tiny PNG – free image compression website.
- Optimizilla – free site with slightly better quality to file size ratio than Tiny PNG.
- Imagify – for those with tons of images already on their media library. This is a plugin with both a free and paid version.
- ShortPixel – another good image optimization plugin with free and paid versions.
5. Use a Caching Plugin
Caching is the process of storing copies of files in a temporary location so they can be accessed more quickly.
The best caching plugin for you will depend on your host.
My recommendations:
- LiteSpeed Cache (free) – best for hosts using LiteSpeed web servers, such as NameHero.
- WP Rocket (paid) – best overall caching plugin that’s easy for beginners to set up.
6. Use a CDN
A content delivery network (CDN) distributes copies of your site to different data centers around the world with the goal of minimizing the physical distance between the server and the user.
Basically, the CDN will serve your site from the data center closest to the user who requested it.
My recommendations:
- Cloudflare – the free version of Cloudflare should be enough for most people.
- BunnyCDN – if you can spend an extra $2-5/month (depending on usage), go for BunnyCDN instead. This is what I use.
7. Use Gutenberg Block Builders
Gutenberg block builders tend to be way lighter and easier to use than bloated page builders like Divi and WPBakery.
My recommendations:
- GenerateBlocks – extremely lightweight and well-coded, but it might be too minimal for beginners.
- Atomic Blocks – best for beginners who require more features.
- Stackable – similar to page builders but without the bloat.
You can check out my list of best Gutenberg Block plugins here.
8. Avoid Multi-Purpose Plugins
Multi-purpose plugins tend to add a lot of features to try and please everyone. However, more features mean more stuff your website has to load.
Instead of using all-in-one plugins, find plugins that only have the feature that you’re looking for.
How to Improve WordPress Security
Since WordPress is the most popular CMS, it’s often targeted by hackers.
Therefore, it’s important that you keep your site secure by following these best practices:
1. Choose a good hosting company
Some hosting companies handle security on their end so that you don’t have to install bloated security plugins and slow your site.
For example, NameHero includes security through Imunify360, which has features like advanced firewall, malware detection, and proactive defense.
Kinsta also handles security on their end, and even offer free hack fix guarantee.
The only downside is that Kinsta is a little expensive, but with their free hack fix, you don’t have to worry about paying a developer $300+ to fix your site if it ever gets hacked.
My recommendations:
- NameHero – great for those who value security but still want a cheap option.
- Kinsta – great for those who want to go to bed knowing that their site is extremely secured and if something does happen, it will be fixed for free.
2. Choose a Good Theme
A lot of beginners don’t understand the importance of choosing a theme that’s well-coded and well-supported, and often choose whatever looks nice.
However, it’s important that you choose a theme that doesn’t include any known security vulnerabilities, is constantly updated, and is compatible with the latest versions of WordPress.
My recommendation:
- GeneratePress – the theme has been around for over 6 years, and it’s still well supported.
- The Genesis Framework – great framework that has been around for more than 10 years, and it’s loved by developers. The only downside is that it’s a little difficult for beginners to customize.
3. Use Plugins From Respected Developers
More than 50% of hacks happen through a vulnerability in poorly-coded plugins.
So try to keep the use of plugins to a minimum, and make sure the ones you do use are from good developers who keep updating their plugins.
4. Keep Everything Updated
One of the reasons new versions of WordPress, themes, and plugins are introduced is to improve their security or fix known vulnerabilities as soon as they’re discovered.
So make sure that you keep everything updated to prevent getting hacked.
5. Use Long and Complicated Passwords
Make sure that your passwords have more than 10 characters, and include special characters, such as !, @, #, $, or %.
My recommendation:
- LastPass – use something like LastPass to generate tough passwords and keep them secure.
6. Use Two-Factor Authentication
Enable two-factor authentication for your WordPress and hosting account.
7. Hide Your Login Page
As you saw at the beginning of this WordPress tutorial, your login page can be easily found by adding /wp-admin at the end of your site’s address.
To prevent brute-force attacks, you could use a plugin to hide your login page.
My recommendations:
- WPS Hide Login – free plugin that allows you to change the URL of your login page.
- Perfmatters – great, but paid, performance plugin that also has the option to change your login page.
8. Use a CDN
The free version of Cloudflare content delivery network (CDN) not only helps improve your site speed but also filters malicious traffic.
My recommendation:
- Cloudflare – the free version should be all you need to protect yourself against DDoS attacks.
9. Install a Good Security Plugin
The last tip on the list is to obviously install a security plugin.
My recommendation:
- WordFence – the free version should be enough.
How to Update WordPress
As mentioned earlier, WordPress, themes, and plugins are updated periodically to introduce new features, bug fixes, and security and performance improvements.
Therefore, it’s important that you keep these three things up to date.
Whenever there’s an update available, a red notification will show up next to “Updates” on your WordPress dashboard.
Updating WordPress
By default, WordPress comes with automatic updates enabled for minor releases, which typically include maintenance and security improvements.
However, it does not update automatically when there’s a major release, as this can sometimes cause compatibility issues with some plugins and break your site.
Therefore, unless your hosting company lets you enable auto-updates, you’ll have to update WordPress yourself when there’s a major release.
To update WordPress, simply go to Dashboard > Updates and click update.
Updating Themes & Plugins
Under Dashboard > Updates, you’ll also be able to see if there are any themes or plugins that need to be updated.
Nowadays, you have the option to enable auto-update for some plugins.
Again, some updates can cause compatibility issues and break your site, so it’s really up to you if you want to enable auto-updates or not.
If you’re not checking your WordPress dashboard regularly, I’d suggest you enable them. I’d rather have my site look funny that get hacked, but it’s up to you.
I personally don’t enable auto-updates, but I do check my WordPress dashboard every day.
Why Should I Update my Theme, WordPress, and Plugins?
1. Improved Security
Not updating your theme, plugins, and WordPress will make you more vulnerable to cyber-attacks.
Plus, you’ll also miss out on new features and performance improvements.
Keeping your site secure is one of the main reasons you should update these things to their latest versions.
Since WordPress is super popular, hackers and data thieves are always trying to do some damage.
But don’t worry, there are more security experts studying WordPress and finding vulnerabilities to keep its users safe than there are hackers.
2. Speed Boost
Most updates come with an incredible increase in performance that makes WordPress lighting fast and more efficient.
And since speed is an important factor when it comes to search engine optimization (SEO), you should keep your WordPress site up to date.
Backup Before Updating
Like I said, major updates can sometimes break your site, so it’s a good idea to make a full back up before updating anything.
Which brings me to my next point.
How to Backup WordPress
It doesn’t matter how careful you are when making changes to your site or how secure your hosting is, there’s always the possibility of something going wrong or you getting hacked.
Therefore, it’s important that you back up your site regularly.
Nowadays, most hosting companies offer free daily or weekly backups, however, most of them keep the backup inside their servers.
This means that if they suffer an outage due to electrical problems or drive failures, your backup could be lost.
While using your hosting company’s backup solution can give you peace of mind, I’d still recommend using a free plugin to keep an off-site backup.
My recommend free backup plugins are:
- WPvivid – another well-coded backup plugin that allows you to make full backups and full restores of your site.
- BackWPup – lightweight backup plugin with offsite S3 backup capability.
- UpdraftPlus – often recommended. It’s okay, but it doesn’t allow you to back up your entire root directory unless you pay for their premium version.
Other WordPress FAQs
1. What’s the Difference Between WordPress.com and WordPress.org?
The main difference between WordPress.com and WordPress.org is who hosts and manages your website.
With WordPress.org, you’re in charge of maintaining and hosting your own website.
You have the freedom to customize and monetize it however you want. Therefore, it’s the best option for those looking to make money blogging.
With WordPress.com, on the other hand, it’s them who take care of all of this.
While it’s completely free to start a website with WordPress.com, there are a few downsides:
- You can’t remove the “Powered by WordPress.com” branding from your site.
- You can’t remove their ads from your site (and you don’t get paid for them).
- You can’t monetize with ads.
- You can’t create an online store or membership site unless you pay.
- You can’t upload any plugins or themes. You’re only allowed to use the features and themes they have.
- You can’t have your own domain, only a subdomain. Basically, your URL would look like this: YourWebsite.WordPress.com.
So I highly recommend you go with WordPress.org if you’re serious about growing your business and making money online.
2. Do I Need to Know Code to Start a WordPress Website?
No, as I mentioned earlier, the whole point of using a CMS like WordPress is that you can start your site without having to know HTML or CSS.
However, it’s always good to know at least the basics.
End of WordPress Tutorial
Well, I hope you enjoyed this WordPress tutorial!
If you still have questions or if there’s anything you’d like me to add, let me know in the comments section below.
Also, if you’d like to connect with other bloggers and entrepreneurs, you’re welcome to join my free Facebook group!