
Contents
- Why start an email list
- STEP 1: Choose your email provider
- STEP 2: Create your lead magnet
- STEP 3: Create your opt-in form
- STEP 4: Create your welcome email
- STEP 5: Learn the email marketing basics
- STEP 6: Create automations
- STEP 7: Promote your lead magnet
- STEP 8: Follow email regulations
- STEP 9: Analyze your email marketing performance
- How to start an email list: final thoughts
Why Start an Email List
1. Connect With Your Readers
Sending emails to your readers will let you build trust and connect with them on a deeper and more personal level.
This is not a message that they read on a public timeline or newsfeed. They can ask you questions directly in private with confidence.
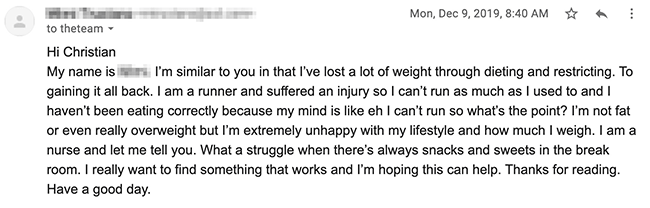
It’s not uncommon to get messages like the one above from people who sign up or read articles on my fitness site.
2. Understand Your Audience
If you’re just about to start an email list, chances are you don’t exactly know what your audience needs help with.
And if you’ve read my blog post on how to make money blogging or choose a blog topic, you know that to make a living online, you must be a problem solver.
An email list can help you figure out exactly what your audience wants and needs so you can create products and content around it.
For example, when I first started my fitness site, I constantly asked my subscribers what their biggest struggle was when it came to losing weight.

Even today, I still ask them about it and take the time to actually reply to their emails so they know I care.
3. You Own Your Email List
Another advantage of learning how to start an email list is that you own it and have complete control over it.
For example, you could have thousands of followers on Instagram, Facebook, or Pinterest, but they could shut down your account without notice and all your hard work and contacts would be gone.
There’s also the possibility that one day the social platform you’re using decides to close down or that a new one like Tik Tok comes along and everyone switches platforms.
4. Traffic During Algorithm Changes
Search engines like Google, Pinterest, and YouTube are constantly changing and improving their algorithms.
These changes can benefit some websites and completely destroy others in terms of traffic.
You could be ranking number one on Google and getting tons of traffic when suddenly they introduce an update and poof!
You disappear from the first page of search results and your traffic goes away.
With an email list, you can keep sending subscribers your newest blog posts and keep a constant stream of traffic regardless of what happens to the algorithm.
This is especially great if you’re someone who relies on pageviews for ad revenue.
5. High Conversion Rates
People don’t like giving away their emails.
So if someone subscribes to your list, it means they’re really interest in your content and what you have to offer.
In fact, businesses with email lists have higher earnings than those that don’t.
Here are some interesting email marketing statistics for you:
- Bloggers who earn over $50,000 per year from their blogs are more than twice as likely to focus on getting email subscribers as lower-income bloggers are.
- For every dollar you spend on email marketing, you can expect an average return of $42.
- 81% of B2B marketers say their most used form of content marketing is email newsletters.
- 78% of marketers have seen an increase in email engagement over the last 12 months.
- 60% of consumers say they’ve made a purchase as the result of a marketing email they received. That’s a lot compared to only 12.5% of consumers who say they’d consider using the “buy” button on social media.
STEP 1: Choose Your Email Provider
When learning how to start an email list, the first step is choosing a good email service provider (ESP).
I know what you’re thinking, “Christian, why do I need an ESP? Can’t I just send emails from my free Gmail or Outlook account?
You could… but you shouldn’t, and here’s why:
- You’ll be breaking the law – there are several restrictions on commercial emails and legal requirements under CAN-SPAM Act that you must abide by. (we’ll talk more about this later)
- You’ll eventually be marked as a spammer – bulk emails sent from free ESPs like Gmail and Outlook have a higher risk of getting marked as spam. One of the reasons is that spammers create free accounts, send spam, get blocked, create a new account, and repeat. Also, internet service providers (ISPs) have no way of validating that you’re a legitimate sender if you’re using a free email provider.
- Limitations – for example, Gmail only allows you to send 500 emails per day and have a maximum of 25,000 contacts.
- No automation – one of the biggest advantages of starting an email list using an ESP is that you can create automations and have emails delivered without you having to manually send them each day.
Everything we’ll cover in this guide can be used with any email service provider; however, the one I’m currently using and recommend is ConvertKit. (my review)
Besides their nice interface, here are other reasons I recommend ConvertKit:
- Great deliverability – while it’s nice to have a clean UI, what I really care about is deliverability. All the good features of your ESP won’t matter if your emails aren’t getting delivered. ConvertKit is one of the providers with highest deliverability rates.
- Use their address – the law requires you to include the address of your business in your marketing emails. If you don’t have an actual physical business address, you’ll have to either use your home address or rent a PO Box. ConvertKit lets you use their business address and sends you any important mail that you receive.
- 24/7 live chat support – pretty fast and knowledgeable support team. This will be of great help if you’re just learning how to start an email list.
- Advanced tagging and segmentation – ConvertKit allows you to run laser-focused automated campaigns to very specific groups of contacts. Marketers who use segmented campaigns can see as much as a 760% increase in revenue, according to data gathered by Campaign Monitor.
- Visual automations – one of my favorite features. Visual automations make it easy to create more complex automation rules.
- Free for up to 1,000 subscribers – you can start growing your email list for free.
So you can sign up for their free version and try out their premium features for 14 days.
The free plan includes:
- Unlimited landing pages
- Unlimited, customizable call-to-actions (CTAs) and signup forms
- 30+ premium landing page templates
- Unlimited traffic
- Mobile responsive designs
- Up to 1,000 subscribers
- Unlimited email broadcasts
- Subscriber tagging
- Unsplash integration
That’s heavy.
STEP 2: Create Your Lead Magnet
Now that you’ve chosen an email service provider, it’s time to start building your email list.
We’re no longer in the 2000s, so having an opt-in that says, “sign-up for my newsletter!” isn’t going to cut it anymore.
To get subscribers, you’ll need to provide tons of value and give them something for free in exchange for their email address.
This is called an opt-in incentive, freebie, lead magnet, or content upgrade.
In this section of the guide, we’ll take a look at:
- Creating high-converting lead magnets
- Finding lead magnet ideas
- Best types of lead magnets
Creating High-Converting Lead Magnets
When creating your lead magnet, you must make sure it’s relevant, offers a quick win, and is something subscribers would be willing to spend money on (even if you’re offering it for free).
1. Make It Relevant
To get the most visitors to sign up for your email list, you should create a lead magnet that’s related to the blog post where you’re placing it.
For example, if you write a blog post titled:
The Best Foods for Weight Loss
It’d be better to offer a free low-calorie recipe eBook than a free workout program.
Even though a free workout program is still related to weight loss, it isn’t exactly why your visitor is reading that blog post.
They’re specifically interested in “foods” or “dieting.”
Another great option would be to offer a free 7-day meal plan.
Sure, you might get a few subscribers, but it won’t be optimal.
2. Offer Quick Wins
Another mistake bloggers learning how to start an email list make is creating lead magnets that provide no value or are difficult for people to implement.
So create a freebie that offers your subscribers quick and actionable steps; something they can apply right away.
3. Create Something You Could Sell
A great way to make sure that you get tons of subscribers is to offer a very valuable freebie that solves a problem they’re having.
Create something that your readers wouldn’t mind spending money on, even if you’re offering it for free.
Finding Lead Magnet Ideas
Here are a few places you can find lead magnet ideas:
- Your competitors – if you’re on a popular niche, chances are big bloggers have already tested several opt-ins and found the ones that perform the best. So visit your competitors’ blogs and see what they’re offering. Needless to say, you don’t want to copy it because you’ll run into copyright issues, but you can use them to get ideas and inspiration from.
- Your friends and family – ask your friends and family what their biggest struggle is when it comes to *insert your niche*. This is one of the techniques I used when I was first started my fitness site and didn’t have an audience.
- Your subscribers and followers – if you have some email subscribers or followers on social media platforms, you can go ahead and also ask them about their biggest struggles when it comes to *insert niche*.
- Forums – forums like Reddit can also be a good place to get ideas. Visit Reddit or other forums in your niche and see what are the most common questions users are asking.
- Your most popular blog posts – check out your Google Analytics and see which blog posts get you the most visitors. This might give you an idea of the type of content your readers are most interested in so you can create a lead magnet base on them.
Best Types of Lead Magnets
After you’ve got an idea of what you’re going to offer, the next step is to figure out the format in which you’re going to deliver it.
Here are some of the most popular ones:
- eBook/PDF guide
- Checklist
- Worksheet
- Email course
- Webinar
- Cheatsheet
If you’re just starting out, I recommend going with something quick and simple like a checklist or a short PDF guide.
How to Deisgn Your Lead Magnet
You can choose any tool to create your lead magnet.
If you’re just starting out and don’t have any preferred tool, I highly recommend you use a free tool like Canva.
I believe it’s one of the easiest ones to use for beginners.
You can add free stock images, fancy texts, and shapes. They even have really nice-looking pre-made templates.
If you’re creating an eBook, PDF guide, checklist, cheatsheet, or worksheet, you can just write it in Google Docs or Word and then add the design elements and change the layout using Canva.
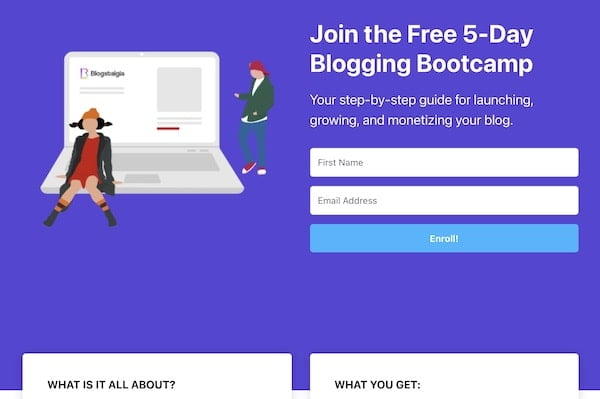
STEP 3: Create Your Opt-In Form
An opt-in form is what you’ll put on your blog so visitors can type in their email address and receive the freebie we created on the previous step.
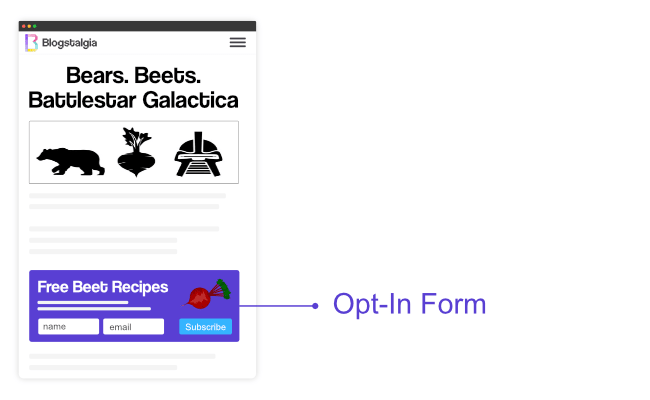
To create an opt-in form, you can simply use one of ConvertKit’s pre-made forms or landing page templates.
Here’s what we’ll go over in this section:
- Opt-in form design
- Single vs. double opt-in
- Opt-in form placement
- Landing pages
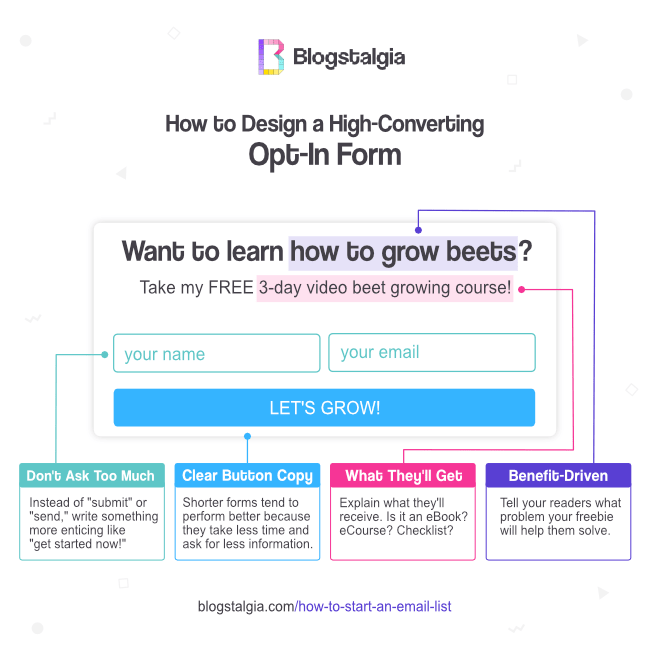
1. Opt-In Form Design
Here are a few things to keep in mind when designing your opt-in form:
- Make it benefit-driven – tell your readers what problem your freebie will help them solve.
- Keep it simple – don’t write a long essay. Keep it short and straight to the point.
- Explain what they’ll receive – is it an eBook? Email course? Checklist?
- Don’t ask for too much information – shorter forms tend to perform better because they take up less time and ask for less information. Unless you require some special information, only ask for name and email.
- Write a clear call to action – instead of writing “submit,” “subscribe,” or “send” in your button copy, use something more enticing like “get started now!” or “get your free guide.”
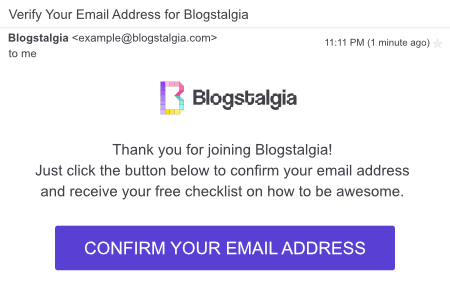
2. Single vs. Double Opt-In
When creating your opt-in form, you can choose between a single or double opt-in.
- Single opt-in – a single opt-in is when a visitor submits their email address and it’s immediately added to your email list and can start getting your emails.
- Double opt-in – a double opt-in is when a visitor needs to confirm their email address by clicking a link in an email they receive before they’re added to your email list.
Single Opt-In Pros
- Since users are immediately added to your email list, you’ll have more subscribers.
Single Opt-In Cons
- You’ll end up with more low-quality subscribers.
- Your list might end up with fake and mistyped emails, which will lead to inaccurate email open rate reports and a higher bill if your ESP charges based on subscriber count.
Double Opt-In Pros
- Higher quality subscribers.
- No fake or mistyped emails are added to your list since users have to confirm the address first.
- You’ll have better open rates and more accurate performance reports.
- Confirmed users are less likely to report your emails as spam. This is great because too many spam complaints will negatively affect your email deliverability and eventually get you banned from your ESP.
Double Opt-In Cons
- Since some users can forget to confirm their email address, you’ll end up with fewer subscribers.
- Only 80% of leads will go through the trouble of confirming their email address.
Basically, it ends up being a battle between quantity vs. quality.
A single opt-in will lead to a bigger list, while a double opt-in will lead to a smaller but more engaged one.
You’ll find experts that make great arguments for both of these options.
Personally, I like keeping things clean and having a smaller but engaged audience.
So my choice is to use double opt-ins.
But it’s really up to you which one you want to use.
Opt-In Form Placement
You can place your opt-in form anywhere you’d like, however, there are places that lead to more conversions and aren’t as annoying to your visitors.
Here are some places I recommend adding your opt-in forms:
- Within your blog posts – I recommend adding your opt-in form close to the beginning of your articles. I can’t tell you exactly where since it depends on the type of article and your writing style.
- At the end of your blog posts – people who have made it to the end of your blog posts are most likely super interested in your content, so make sure that you give them a chance to opt-in to your list right after they’ve finished reading.
- Homepage – one of the best places to add a call-to-action/opt-in form is in the hero section of your homepage.
- About page – an about page is another great place to add an opt-in that many bloggers don’t take advantage of. People reading more about you are highly interested in what you have to offer, so make sure that you have them sign up to your email list.
Landing Pages
A landing page is a page made specifically for a marketing or advertising campaign.
While other pages and blog posts on your site can have many goals and encourage exploration, landing pages are designed with one goal in mind, which is typically to get subscribers.
A good landing page will not include buttons, links, or any other form of navigation inside the page.
A lot of “big” bloggers will try to sell you tools like LeadPages, which is $25 per month, and ClickFunnels, which is $97 per month, to create landing pages.
However, you can easily create them on WordPress using your theme or one of ConvertKit’s templates.
They only promote these tools for their high and recurring affiliate commissions.
You can check if your WordPress theme allows you to remove navigation links and just create your landing page like you would any other page.
Just take a look at some examples from other successful businesses so you can get some ideas.
If your theme doesn’t have the option to disable navigation links and you want to switch themes, I highly recommend you go with GeneratePress.
This is the theme I use on all of my sites. (my review)
STEP 4: Create Your Welcome Email
Your welcome email is where you’ll deliver the lead magnet to your subscribers.
But that’s not all..!
With an average open rate of 82%, welcome emails are opened four times more than most marketing emails.
This makes them the best opportunity to connect with your customers since it’s when they’re most receptive to hearing from you.
So you’ve got to make sure that you write an engaging email.
Here are some things to take into consideration when doing so:
- Keep it short – don’t write an essay on how cool you and your business are. Briefly mention who you are and why they should trust you.
- Be fun – don’t use some random generic and boring welcome email template you found on Google. Be yourself, add some personality to your emails, let them know you’re a real person.
- Email frequency – let them know how often they can expect emails from you. (we’ll talk more about this in the next section)
- Tell them to whitelist you – we don’t want your emails ending up on their spam folder, right?
- Ask them a single question – a good one is to just ask them what they’re struggling with. This will encourage conversation and allow you to better understand your audience. Don’t ask questions that can be answered with a simple yes or no. Also, reply to them and show that you care; don’t be an eggplant.
STEP 5: Learn The Email Marketing Basics
Let’s take a look at some of the email marketing best practices so that you can get good open rates, click rates, and conversions.
Email open rate is the percentage of subscribers who open your emails out of your total number of subscribers
For example, if you had a 50% open rate, it would mean that for every 10 emails you delivered, 5 were actually opened.
The average open rate is between 15% and 30% across most industries.
Personal interest topics like photography and home decor tend to have higher open rates than marketing topics like eCommerce or coupon offers.
Email click rate (or click-through rate) is the percentage of subscribers who click a link or image inside your email.
Your average click-through rate should be around 2.5%
Conversion rate in email marketing is the percentage of subscribers who complete the goal or action you wanted them to complete after reading your email.
For example, the number of subscribers who purchased your product, signed up for your webinar or podcast, visited your blog, etc.
A good conversion rate will be between 2-11% depending on the industry.
1. Email Frequency
How often you send emails will depend on your audience, niche, and the type of content you’re publishing.
But to give you a baseline, Omnisend found that companies that sent an email only once per month showed the highest open rate, followed by those who sent 2-4 emails per month.
However, while companies who sent only 1 email per month had a higher open rate, those who sent 2-4 emails made more sales.
The lowest open rate and click rates were within the campaigns sent on a daily basis or 20+ times per month.
Personally, I would stick to 1-2 emails per week.
I once subscribed to the list of a “big” blogger and she bombarded me with emails, at least 2 per day and sometimes even 5 emails in a day.
Like come on, broski, chill out…
Needless to say, I unsubscribed from that list.
2. Best Days to Send Emails
After going through several studies, Tuesdays and Thursdays seem to be the best days to send emails for the most open and click rates, with Wednesdays coming in second. (1, 2)
3. Best Time of Day to Send Emails
This also depends on your audience, but data gathered by CoSchedule showed that the best time to send emails is around 10:00 am, 8:00 pm, 2:00 pm, and 6:00 am.
I like sending my emails between 10:00-11:00 am.
4. Write Great Subject Lines
To increase open rates, you should craft a subject line that creates curiosity.
Pay attention to your own personal inbox and see which subject lines make you want to open an email, then apply something similar to your emails.
Personalized subject lines with the recipient’s name or location are also a great way of increasing open rates.
Lastly, you should keep your subject line shorter than 9 words and 60 characters, and no more than 3 punctuation marks.
5. Keep It Simple
With the increase in online scammers, email companies have toughened their spam filters.
Besides choosing a great ESP, there are others measures you can take to reduce the chances of emails landing in your recipients’ spam box.
For example, images, links, and some words like “buy now,” “limited-time deal,” “bonus,” and “weight loss” can trigger spam filters.
That’s why many marketers now keep things simple and only send text-based emails.
This doesn’t that you can’t include images, links, and some of those words, but it’s something to keep in mind.
I mean… email marketing would be useless if you couldn’t include any links or tell your customers to “buy now.”
Just use those things sparingly.
6. Email Length
Lol, you’re probably tired of me telling you that everything “depends,” but it is true.
Your email should be as long as it needs to be.
However, 20 lines of text (or about 200 words) results in the highest email click-through rate for most industries, according to ConstantContact.
7. Unsubscribe Button
By law, you’re required to have an unsubscribe button in your emails.
And I highly recommend you make it clear and visible.
If users want to unsubscribe but can’t find the button, they’ll just mark your email as spam instead, which will damage your email sender reputation and reduce your deliverability.
8. Be Relevant
Only send emails related to the opt-in your subscribers signed up for.
If you start sending them unrelated emails, you risk having them marking you as spam.
This is especially important if you’re running a lifestyle blog.
For example, I have different opt-ins and email lists on my fitness site.
I send workout emails to those interested in workouts, weight loss emails to those interested in losing weight, and nutrition to those interested in healthy diets.
I do not send workout emails to those interested in nutrition or vice versa unless I feel the topic is super related.
With ConvertKit, you can have several lists and tag users based on interests and other criteria.
Pretty cool.
STEP 6: Create Automations
Automations are honestly one of the best parts of starting an email list.
They will save you A TON of time.
You can create an evergreen newsletter and sales funnel once, and every subscriber will automatically go through the sequence without you having to do any extra work.
To use automations in ConvertKit, though, you’ll need to upgrade to their premium plan.
But to me, it’s worth all the time you’ll save.
In this section of the guide, we’ll take a quick look at:
- Broadcast emails
- Evergreen newsletters
- Sales funnels
1. Broadcast Emails
Broadcast emails are simply emails sent for each individual piece of content as they’re published.
This is great if you recently launched your blog and don’t have much content to promote.
2. Evergreen Newsletters
An evergreen newsletter is an automated email sequence that runs without you having to do any extra work.
The idea here is to grab your best content and create a sequence so that one article is delivered each week (or month depending on the email frequency you choose).
As you publish more content, you can just add it to the end of the sequence.
The only downside of this technique is that your subscribers won’t receive your recently published articles until later.
3. Sales Funnels
An email sales funnel is a set of emails your subscribers go through before becoming a customer.
Here’s the thing, people won’t buy from someone as soon as they see their product or join their list.
They typically do a little more research, read reviews, and then make a purchase decision.
A good email sales funnel will teach your subscribers what your product can do for them and why they should trust it.
Here’s how a typical email sales funnel looks like:
- Email 1: provide value – this is where you send them the lead magnet they signed up for.
- Email 2: present yourself as an authority – tell them who you are, how you know what you know, and why they should listen to you.
- Email 3: touch on their pain points – remind them of their struggles so they know that you understand their problem. Include testimonials from other customers if you have them.
- Email 4: introduce the product – show them how your product (or the affiliate product) can help them.
- Email 5: answer common objections – include a list of your frequently asked questions (FAQs).
- Email 6: create urgency – you can introduce a limited-time deal.
STEP 7: Promote Your Lead Magnet
One of the most important steps when starting an email list is actually getting traffic to it and promoting your freebie.
Your lead magnet could cure the worst disease in the world, but it won’t save anyone if you don’t get the word out.
You can use different platforms, such as Google, Pinterest, Instagram, and Facebook to drive traffic to it.
However, if you’re looking exclusively for free organic traffic, Pinterest and Google will be your best bet.
If you have a little budget for ads, you can look into Facebook and Instagram.
You can check out my full Google SEO guide here and my Pinterest guide for beginners here.
STEP 8: Follow Email Regulations
As mentioned earlier, there are several laws and guidelines you must follow when using email for commercial purposes.
For example, you’ve got the CAN-SPAM Act in the US, the CASL laws in Canada, and the Privacy and Electronic Communications Regulations of 2003 in the UK.
Here are some rules you must follow to comply with all the laws across the globe when starting an email list:
- Permission to email – you can’t just add random people to your list (or buy email lists). People need to give you permission to email them before you’re able to send them campaigns. This permission often comes from entering their email address in a subscribe form on your site.
- Don’t use misleading header information – always make it clear who the email is coming from. Don’t use incorrect or misleading information in the “from” name field, subject line, or reply-to address.
- Include your address – I briefly went over this earlier. You must include your current address or PO Box address. Again, if you’re using ConvertKit, you can use theirs and they’ll forward you any important mail you receive.
- Include a way to opt-out – most countries’ email marketing laws stipulate your email campaigns must include a clear way for subscribers to unsubscribe from your email list.
- Honor opt-out requests quickly – The CAN-SPAM laws stipulate that you must honor a recipient’s opt-out request within 10 business days and you can’t charge a fee, ask for any extra information, or make them take a bunch of other steps besides sending a reply email or visiting a page on your site to opt-out.
STEP 9: Analyze Your Email Marketing Performance
Measuring, analyzing, and improving your email marketing strategy is crucial for growing your email list.
A lot of people simply create a sequence, don’t test other opt-ins and lead magnets, pay no attention to data, and then wonder why they can’t make money blogging or increase their current earnings.
I gave you a lot of good guidelines to get your started, but you still have to test things out and see what works with YOUR audience.
ConvertKit allows you to see data like open and click rate as well as to do A/B testing and see which forms and email sequences perform better.
Lastly, clean up your email list once in a while, okay?
There’s no point in keeping people who don’t engage with your content (aka cold subscribers), so don’t be afraid of going in and deleting them every few months.
This will help increase your open and click-through rates.
How to Start an Email List: Final Thoughts
I’m going to end up this article Ron Swanson style.
You should start an email list.
Email lists are beneficial to your business.
End of article.